Create or Edit a training unit
A training unit is a flexible set of items a person needs to read, review and/or complete to be considered trained in a topic. A training unit typically covers a particular topic. A training unit has the following features:
- Set renewal cycle timeframe (for example, training to be completed annually)
- Assign to specific roles within the organization
- Schedule different times for different trainees
- Sign-off by self or Supervisor sign-off option
- Request evidence of completion
- Occupational safety and health training.
- Nintex Process Manager User training.
Create a training unit
![]() Promasters A Nintex Process Manager system administrator who administers a Nintex Promapp site and has rights to view and edit all areas of a Nintex Promapp site. or Training Administrators Configures and coordinates the use of the Training Add-on, selects who will be training or competency owners, provides support and guidance for other roles, and acts as the primary point-of-contact for technical questions. can create training units.
Promasters A Nintex Process Manager system administrator who administers a Nintex Promapp site and has rights to view and edit all areas of a Nintex Promapp site. or Training Administrators Configures and coordinates the use of the Training Add-on, selects who will be training or competency owners, provides support and guidance for other roles, and acts as the primary point-of-contact for technical questions. can create training units.
- Do one of the following:
- Go to Training > New > Training Unit.
- Go to Training > Training Units > Create Training > Training Unit.
- In the Create Training Unit tab, complete the required fields.
 Create Training Unit fields and description
Field Description/Steps Training Unit Title (Required) Title of the training unit. Reference no. An identifying number. For example, a course code or NZQA number. Type (Required) Select one of the following values from the drop-down list:
- Course: An organized course that is facilitated by a provider.
- Online Resource: An online resource or online course.
- Document: Training material in document format to be read.
- Face to Face: Training that is conducted face-to-face.
Training Owner (Required) Name of the person who is responsible for the training unit. Location Default address or building location the training is located, this can be changed when an event is scheduled. Training Provider Default name of the person or organization that provides the training, this can be changed when an event is scheduled. Training Cycle Select one of the following values from the drop-down list:
- Once Only
- Monthly
- Yearly
Tags Click in the Tags field and select the tag from the drop-down list. For more information about managing tags, see manage training tags. Description Detailed summary of what the training involves. This can be formatted using Wiki Markup.
How can I format the Description field?
The description can be formatted using Wiki Markup. Wiki Markup uses curly braces ({}) to contain tags for formatting. All tags must have an opening tag and a closing tag.You can use the following tags in the description field:
- {b} - Bold
- {i} - Italics
- {u} - Underline
- {l} - Unordered list - each item in the list should be prefixed with a {*}
- {a} - Label of a link added with a resource URL as Online Resources/Other under the Resources section.
Example: Type the following text in the Description field:
{b}Purpose{b}
The purpose of this unit is to become familiar with the Freshdesk help desk tool.
{i}Please watch the attached videos and then attempt the following exercises: {i}
{l}{*}Create and merge two Freshdesk tickets.
{*}Create a scenario automation to classify and respond to a sample ticket with a canned response.
{*}Create a knowledge base article.{l}
The image below displays how this text is displayed.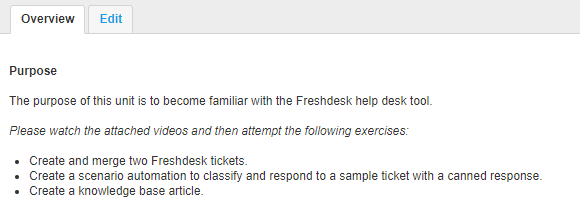
Required Roles Select the roles within your organization that are required to complete this training. Assessed by Select Self Sign Off (Users will receive a dashboard notification to sign off) or Supervisor Sign Off (Supervisors will receive a dashboard notification to mark attendance). Evidence of completion is required For self sign off training units only. Tick this box to enable users to upload a document or image of a certificate, results transcript or other type of evidence. Referenced Processes Click Add Process and select the process you want to reference for the training unit. Training Videos and Documents Click Add Document and select the documents you want to add for the training unit. Online Resources/Other Type a Label, Resource URL, and click Add Link to reference any required resources for the training unit. - Click Save. The training unit is created and displays the following tabs:Training unit tabs
Tab Description Overview Displays the training unit overview details.
Trainees Lists trainees who have completed the training unit, have one or more scheduled training events or those not yet scheduled for training but required to complete the training unit (this could be as a consequence of their assigned roles). For more information, see Schedule a new training and Amend a training unit. Edit Displays the Edit page. For more information, see Edit a training unit.
Import training units
Training units can be imported using a Comma Separated Version (CSV) file format. You can import all the details of a training unit except for the resources associated with a training unit.
Note: The owner and tags you import must be already created in your Nintex Process Manager site. You can only import new training records and cannot update existing training records using the import file.
- Go to Training >
.png) > Import Training Units > Import Training Units.
> Import Training Units > Import Training Units. - In the Import Training Units dialog box, click
 to download the template.Note:
- Required columns are prefixed with a *.
- The Owner field must be in the format "<First Name> <Last Name>" as displayed in the Admin > Users page.
- Include a key/reference number in the first column to update the data for an existing training unit.
- Use ; (semi-colon) to separate multiple tags or required roles.
You cannot import resources associated with a training unit.
- Click Choose File and select the .csv file to import.
- Click Import.
Import training history
You can import historical training records into your Nintex Process Manager site using a simple Comma Separated Version (CSV) file format.
- Go to Training > > Import History > Import Training History.
- In the Import Training History dialog box, click to download the template.Note:
- Required columns are prefixed with a *.
- The Trainee Name field must be in the format "<First Name> <Last Name>" as displayed in the Admin > Users page.
- Include a key/reference number in the first column to update the data for an existing training unit.
You cannot import resources associated with a training unit.
- Click Choose File and select the .csv file to import.
- Click Import.
Edit a training unit
- Go to Training > Training Units.
- Click on the Training Title you want to edit.
- In the Training Unit record, click the Edit tab.
- Make the required changes and click Save.
Schedule a new training
- Go to Training > Training Units.
- Click on the Training Title you want to schedule.
- In the Training Unit record, click the Trainees tab.
- If you have added roles when you created the training unit, the user details are displayed. You can filter using the following options:
- Filter by Role
- Filter by Status
- Filter by Team & Location
- Filter by Supervisor
- Do one of the following:
- Select the check box for a specific user(s) and click Schedule New.
- If you have not added roles - no user details are displayed, click Schedule New.
- In the Set Due Date dialog box:
- Verify and update the required details.
- Expand the Add Trainees section and add the required trainees by name or role/responsibility.
- Click Schedule.
Amend a training unit
![]() Promasters A Nintex Process Manager system administrator who administers a Nintex Promapp site and has rights to view and edit all areas of a Nintex Promapp site., Training Administrators Configures and coordinates the use of the Training Add-on, selects who will be training or competency owners, provides support and guidance for other roles, and acts as the primary point-of-contact for technical questions., Training Owners Owns the training materials and content, sets requirements, schedules trainees, and assigns a training supervisor for each scheduled session., or Training Supervisor Conducts the training or coordinates staff that need to complete the training, often a manager or team leader, and may be required to sign-off on the completion of training if "supervisor sign-off" has been selected. can amend the due date, supervisor or cancel a scheduled training.
Promasters A Nintex Process Manager system administrator who administers a Nintex Promapp site and has rights to view and edit all areas of a Nintex Promapp site., Training Administrators Configures and coordinates the use of the Training Add-on, selects who will be training or competency owners, provides support and guidance for other roles, and acts as the primary point-of-contact for technical questions., Training Owners Owns the training materials and content, sets requirements, schedules trainees, and assigns a training supervisor for each scheduled session., or Training Supervisor Conducts the training or coordinates staff that need to complete the training, often a manager or team leader, and may be required to sign-off on the completion of training if "supervisor sign-off" has been selected. can amend the due date, supervisor or cancel a scheduled training.
![]() Promasters A Nintex Process Manager system administrator who administers a Nintex Promapp site and has rights to view and edit all areas of a Nintex Promapp site. and Training Administrators Configures and coordinates the use of the Training Add-on, selects who will be training or competency owners, provides support and guidance for other roles, and acts as the primary point-of-contact for technical questions. can delete completed training records.
Promasters A Nintex Process Manager system administrator who administers a Nintex Promapp site and has rights to view and edit all areas of a Nintex Promapp site. and Training Administrators Configures and coordinates the use of the Training Add-on, selects who will be training or competency owners, provides support and guidance for other roles, and acts as the primary point-of-contact for technical questions. can delete completed training records.
-
While you are able to select any trainee, you can only amend trainees with scheduled training.
-
To know if a trainee has scheduled training; check if there is a date in the Required By column. If no training is scheduled then the Required By column displays "Not Scheduled".
- Events associated to an onboarding can be amended in the same way that regular training events can be amended:
- Changing the due date of an event associated to an onboarding will not affect the period in the onboarding plan.
- Canceling a training event associated to an onboarding will retain the training unit as part of the onboarding plan, however, it will be set to Exclude. The onboarding progress will be updated accordingly and a Close Onboarding notification will be generated for a completed induction.
- For more information, see onboarding.
- Go to Training > Training Units.
- Click on the Training Title you want to schedule.
- In the Training Unit record, click Trainees.
- The user details are displayed. You can filter using the following options:
- Filter by Role
- Filter by Status
- Filter by Team & Location
- Filter by Supervisor
-
Select the check box for the user(s) and click Amend Existing. Select one of the following options:
Option Description Reschedule Date - In the Reschedule Due Date dialog box, select the new date.
- Click Save.
The changes are applied only to the selected trainees with a scheduled training event. Where applicable both trainee and supervisor notifications are regenerated with the new due date.
Reassign Supervisor - In the Reassign Supervisor dialog box, select the new supervisor.
- Click Save.
Where applicable both trainee and supervisor notifications are regenerated. In the case of a Supervisor sign off training unit:
- The old supervisor will have Mark Attendance notifications removed for the affected trainees.
- The new supervisor will have Mark Attendance notifications created for the trainees.
- The trainee will receive a Seen It notification with the updated supervisor information. Any existing Seen It notifications for the previous supervisor will be removed.
For more information, see training notifications.
Cancel Training - In the Cancel Training dialog box, click Save.
Only the scheduled training for the selected trainees will be affected. Any previously completed training will not be canceled.
Delete Training In the Delete Training dialog box, the most recently completed training records (limited to a maximum of 10) are displayed in the list.
- In the Delete Training dialog box, select the check box next to the training record(s) you want to delete.
- Click Delete.
Delete a training unit
![]() Promasters A Nintex Process Manager system administrator who administers a Nintex Promapp site and has rights to view and edit all areas of a Nintex Promapp site., Training Administrators Configures and coordinates the use of the Training Add-on, selects who will be training or competency owners, provides support and guidance for other roles, and acts as the primary point-of-contact for technical questions., or Training Owners Owns the training materials and content, sets requirements, schedules trainees, and assigns a training supervisor for each scheduled session. can delete training units.
Promasters A Nintex Process Manager system administrator who administers a Nintex Promapp site and has rights to view and edit all areas of a Nintex Promapp site., Training Administrators Configures and coordinates the use of the Training Add-on, selects who will be training or competency owners, provides support and guidance for other roles, and acts as the primary point-of-contact for technical questions., or Training Owners Owns the training materials and content, sets requirements, schedules trainees, and assigns a training supervisor for each scheduled session. can delete training units.
- Go to Training > Training Units.
- Click on the Training Title you want to delete.
- In the Training Unit record, click Delete Training Unit on the top-right of the training unit section.
- Click Confirm.
All outstanding training sessions scheduled for the training unit are deleted. However, records of completed training are retained for reporting.