Checklists
Use Checklists in Nintex Process Manager to track and ensure each step in a process is completed and accounted for. A Checklist is a list of activities in a process that can be tracked and marked as completed to provide more compliance control for optimal process management.
Checklists can be used to validate a process manually and can be used as an intermediate step to identify and implement process automation Any form of automation that is used within a given process. Automation could be used to automate different tasks or activities within the process or could be used to automate the process end-to-end. Typically, automation consists of either an RPA (Robotic Process Automation) bot, no-code/low-code automated workflows, or custom-developed coded solutions..
Ensure you have published processes in your Nintex Process Manager site as you can create Checklists only for a published process. For more information, see:
For example: consider a common workplace process like employee onboarding with cross-department activities.
What are the benefits of using Checklists?
- Manage process compliance and improvements
- Get personalized notifications when your activities are due
- Mark items as completed on the go via the user Dashboard, email or the online Checklist
- Validate your process, capture feedback and improvement ideas as people complete it
- See evidence of process compliance and completion
- Track full audit records of who carried out which process steps, and when
- Improve communication and collaboration across business teams
- Reduce wait times and handover errors for more efficient and effective process execution
What can I do with Checklists?
Track process progress and completion
A Checklist can be created from a process to coordinate participants completing each step. Create easy to follow checklists from processes with the click of a button and track each step to see when it is completed.
Cross-team communication
Using Checklists increases cross team communication and coordination, ensuring everyone is informed when their input or participation is required as part of a process. Process users can clearly see their responsibilities as part of the end-to-end flow and are more conscious of handover points.
Feedback and process improvements
Checklists also provide feedback opportunities for the line of business. When exceptions or process breakdowns occur, the Checklist can be used for feedback and improvement suggestions, allowing the process user to log comments or attach documents for additional information.
Compliance and Accountability
Increased compliance and accountability is another outcome of using Checklists. By tracking the completed tasks, Checklists build complete audit records and identify who is responsible for every step, every time. Timestamped completions provide granular insight into time frames for greater analysis and opportunities to increase process efficiency.
Identify opportunities for process automation
Checklists can be used to validate a process manually, recognize potential improvements and optimize processes for automation.
Who has Checklist rights?
The following table describes who can manage different Checklist rights.
| Privileges | Process Stakeholders | Group Stakeholders | ||||||||||
|---|---|---|---|---|---|---|---|---|---|---|---|---|
| Checklist rights | Promaster A Nintex Process Manager system administrator who administers a Nintex Promapp site and has rights to view and edit all areas of a Nintex Promapp site. | Business analyst A user who can create and edit all processes if not restricted by permissions, view all reports and edit Roles and Responsibilities. | User | Process expert A user who performs day-to-day process management on behalf of the Process Owner. This role requires detailed understanding of the process. | Process group champion A user responsible for the maintenance and improvement of all processes within their area. | Process Group Editor | Process Approver | Process Publisher | Process Participants | |||
| Assigned to a role | Can only view process | Assigned to Checklist item | ||||||||||
| Create or View Checklists |

|
|
|
|
|
|
|
|
|
|
|
|
| Assign Checklist items |
|
|
|
|
|
|
|
|
|
|
|
|
| Discard Checklist |
|
|

|
|
|
|
|
|
|
|
|
|
| Add or View comments or files to any Checklist |
|
|
|
|
|
|
|
|
|
|
|
|
| Edit Checklist title |
|
Only the user who created the Checklist. | ||||||||||
| Add or edit dates |
|
Only the user who created the Checklist. | ||||||||||
| Edit comments |
|
Only the user who added the comment. | ||||||||||
| Delete comments and files |
|
Only the user who added the comment or file. | ||||||||||
| Edit completed Checklist items |
|
Only the user who completed the item. | ||||||||||
| Delete Checklist |
|
Only the user who created the Checklist. | ||||||||||
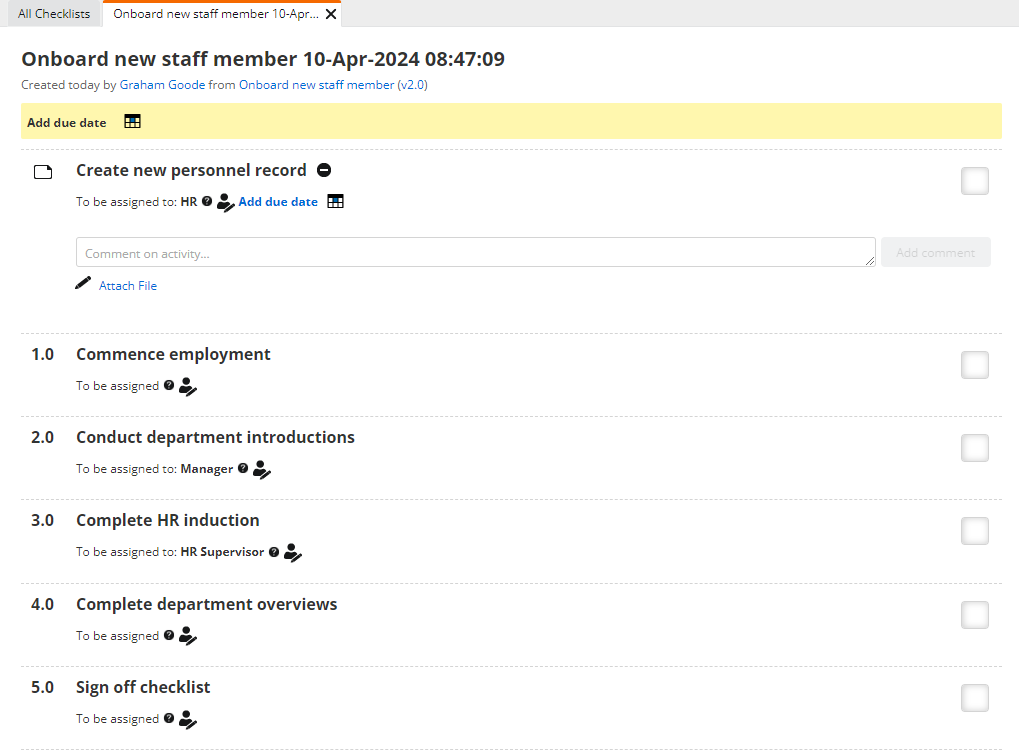
Create a Checklist
- You can only create Checklists for a published process.
- A Checklist is linked to the process version. For example: If you create a Checklist for version 1.0 and then publish a new process version 2.0, the Checklist will still be linked to version 1.0. It will not reflect the changes for version 2.0.
- You must create a new Checklist whenever you publish a new process version.
- Go to Processes > All Processes and navigate to the process page.
- Do one of the following to create a Checklist:
- Click
 on the top right of the process toolbar.
 - Click Checklists > Create a checklist. This option is available only if you are creating the first Checklist for a process or if you have no active Checklists for the process.
The Checklist is created and displayed.
Note: If you want to go back to the process page, click on the process link displayed below the Checklist title.
The following Checklist fields and actions are available. Select or enter the required details.
| Field | Description | Action |
|---|---|---|
| Title | Pre-filled with the process name and date/time the Checklist is created. | Hover on the title and click  to update. Type a descriptive title which will help other users understand what the Checklist is used for. to update. Type a descriptive title which will help other users understand what the Checklist is used for. |
| Due Date | Date by which the Checklist must be completed. | Select a date from the date selector. |
| Checklist items |
Each activity in the process is displayed as an item in the Checklist with a check box next to it. |
Expand and view details: Hover over the activity and click |
Assign item: Hover over the To be assigned to text and click  to select the user you want to assign the item to. to select the user you want to assign the item to. |
||
| Add a due date: Add a date by which the Checklist activity must be completed. Hover over the To be assigned to text, click Add due date and select a date from the date selector. | ||
|
Add comments:Type the required text and click Add Comment. Note:
|
||
| Attach File: Click Attach File to upload related documents. | ||
| Discard Checklist |
You can discard an incomplete Checklist. For example: If you have an incomplete Checklist which has been started but there is a change in the process and you want to retain the Checklist for reference. Once discarded, the Checklist details are displayed in Read-only mode. |
Discard Checklist:
View Discarded Checklists:
The list of discarded checklists is displayed. |
| Delete Checklist |
You can delete a Checklist only if there are no items marked as done. |
The Checklist is deleted and cannot be viewed by anyone. |
.png) .
.Note: When all Checklist items are marked as done, the Checklist is automatically completed. Any user who completed a checklist item, or a Promaster A Nintex Process Manager system administrator who administers a Nintex Promapp site and has rights to view and edit all areas of a Nintex Promapp site. can edit a completed Checklist.
View active process Checklists
You can view active Checklists for a particular process from the process page.
- Go to Processes > All Processes and open the required process.
- Click Checklists on the top left of the process toolbar. All active Checklists for the process are displayed with the following columns:
- Active
- Completed
- Discarded
Column Name Description Name Checklist name. Click to open the Checklist. Status One of the following based on the current Checklist status:
Version Links to the process Minimode page. Created By User who created the Checklist. Created Date when the Checklist is created. Due Date when the Checklist is due for completion.
View all Checklists
You can view all Checklists from the Checklists menu.
- Go to Processes > Checklists. The list of all Checklists in your Nintex Process Manager site is displayed with the following filters and columns:
- All: Displays all active, completed, and discarded Checklists.
- Active: Displays all active Checklists.
- Completed: Displays all completed Checklists.
- Discarded: Displays all discarded Checklists.
- Active
- Completed
- Discarded
Filters
| Filter Name | Description |
|---|---|
| Status | Select multiple filters or click Clear selection to display all Checklists. The following values are available: |
| Created from and to | Select the date range. Default date range is the last 3 months from the current date. |
Checklists Columns
| Column Name | Description |
|---|---|
| Name | Checklist name. Click to open the Checklist. |
| Status | One of the following based on the current Checklist status: |
| Process | Links to the process Minimode A permalink to a Nintex Process Manager process or document which allows anonymous users to access processes, documents or process groups. page. |
| Created By | User who created the Checklist. |
| Created | Date when the Checklist is created. |
| Due | Date when the Checklist is due for completion. |
Checklist notifications
The following table describes which actions trigger notifications and who gets notified.
| Checklist Action | Dashboard | Who gets notified? | |
|---|---|---|---|
| Create a Checklist | | | N/A |
| Edit a Checklist | | | N/A |
| Delete a Checklist | | | N/A |
| Discard a Checklist | | | N/A |
| Checklist activity status: | |||
| | | Assigned user, Checklist creator |
| | | Assigned user, Checklist creator |
| | | Checklist creator when another user completes a Checklist activity. |
| | | Checklist creator will get this if the next activity to be completed is not assigned. |
| Assign user to the first Checklist item | | | Assigned user, Checklist creator (only dashboard notifications) |
| Complete Checklist item | | | The user assigned to the next item in the Checklist. If there is no user assigned to the next Checklist item, the email and dashboard notifications are not sent. Checklist creator (only dashboard notifications) |
| Complete Checklist | | | Checklist creator |
If you are assigned two consecutive Checklist items, for example: item 1 and item 2:
- You will receive dashboard and email notifications when item 1 is assigned to you.
- If you complete item 1 from the dashboard or email notification, you will receive dashboard and email notifications for item 2.
- If you complete item 1 from the Checklist, you will only get a dashboard notification for item 2.
View Checklist notifications
Do one of the following to view Checklist notifications:
- Go to Home Page and click Checklist Activites:
- On the main navigation bar of your Nintex Process Manager site, click My Dashboard > My Checklist Activities.
The My Checklist Activities page is displayed and the following columns and actions are available:
Column Description Activity Displays the activity number for the assigned Checklist item. Status One of the following based on the current Checklist activity status:
- Not assigned
- Waiting
- Complete
- Overdue
Activity due date Date when the Checklist activity is due for completion. Checklist Links to the Checklist. Checklist due date Date by which the Checklist item must be completed. Assigned by Name of the user who assigned the Checklist item. Assigned to Name of the user who is responsible for completing the Checklist item.
- View: Click to review the assigned item.
- Seen it: Click to mark the Checklist item as done.
Checklist FAQs
Go to Admin > Configuration > Process Editing > Enable Process Checklist. This setting is enabled by default.
Any user who can view a process can create Checklists.
You can create any number of required Checklists for a process.
You can create Checklists only for published processes. For more information, see Create a Checklist.
The following table describes who can manage different Checklist rights.
| Privileges | Process Stakeholders | Group Stakeholders | ||||||||||
|---|---|---|---|---|---|---|---|---|---|---|---|---|
| Checklist rights | Promaster A Nintex Process Manager system administrator who administers a Nintex Promapp site and has rights to view and edit all areas of a Nintex Promapp site. | Business analyst A user who can create and edit all processes if not restricted by permissions, view all reports and edit Roles and Responsibilities. | User | Process expert A user who performs day-to-day process management on behalf of the Process Owner. This role requires detailed understanding of the process. | Process group champion A user responsible for the maintenance and improvement of all processes within their area. | Process Group Editor | Process Approver | Process Publisher | Process Participants | |||
| Assigned to a role | Can only view process | Assigned to Checklist item | ||||||||||
| Create or View Checklists | | | | | | | | | | | | |
| Assign Checklist items | | | | | | | | | | | | |
| Discard Checklist | | | | | | | | | | | | |
| Add or View comments or files to any Checklist | | | | | | | | | | | | |
| Edit Checklist title | | Only the user who created the Checklist. | ||||||||||
| Add or edit dates | | Only the user who created the Checklist. | ||||||||||
| Edit comments | | Only the user who added the comment. | ||||||||||
| Delete comments and files | | Only the user who added the comment or file. | ||||||||||
| Edit completed Checklist items | | Only the user who completed the item. | ||||||||||
| Delete Checklist | | Only the user who created the Checklist. | ||||||||||
The following table describes which actions trigger notifications and who gets notified.
| Checklist Action | Dashboard | Who gets notified? | |
|---|---|---|---|
| Create a Checklist | | | N/A |
| Edit a Checklist | | | N/A |
| Delete a Checklist | | | N/A |
| Discard a Checklist | | | N/A |
| Checklist activity status: | |||
| | | Assigned user, Checklist creator |
| | | Assigned user, Checklist creator |
| | | Checklist creator when another user completes a Checklist activity. |
| | | Checklist creator will get this if the next activity to be completed is not assigned. |
| Assign user to the first Checklist item | | | Assigned user, Checklist creator (only dashboard notifications) |
| Complete Checklist item | | | The user assigned to the next item in the Checklist. If there is no user assigned to the next Checklist item, the email and dashboard notifications are not sent. Checklist creator (only dashboard notifications) |
| Complete Checklist | | | Checklist creator |
If you are assigned two consecutive Checklist items, for example: item 1 and item 2:
- You will receive dashboard and email notifications when item 1 is assigned to you.
- If you complete item 1 from the dashboard or email notification, you will receive dashboard and email notifications for item 2.
- If you complete item 1 from the Checklist, you will only get a dashboard notification for item 2.
Yes. For a decision, the check box will be replaced with a Yes / No button. When you create the Checklist, activities after the decision are not displayed. They are displayed once you select Yes or No for the decision.
Verify the conditional process and click Yes, Done or No, Skipped. Hover over the conditional process title, and click + to add comments and attach any related documents which will help other users understand any specific details about why it is marked as done or why it was skipped.
![]() Network or System Administrator role required.
Network or System Administrator role required.
The Nintex Process Manager Checklists feature uses the promapp.io domain, which is new. To load Checklists, you must add the following entries based on region to your network access control list (ACL):
- Australia: checklist-au.promapp.io
- Europe: checklist-eu.promapp.io
- United States: checklist-us.promapp.io
- Canada: checklist-ca.promapp.io
- Demo sites: checklist-demo.promapp.io