Workflows
Use the Workflows page to manage workflows. You can open, edit, delete or schedule workflows.
Users with the Administrator role can see all workflows across the tenancy.
Nintex for Office 365 uses the native SharePoint list and site workflows. For more information about workflow types, see Types of Workflows.
Open the Workflows page
Do one of the following to open the Workflows page:
- From a Site List or Document Library, or the Site Contents page:
- On a SharePoint Site Contents page, click the Nintex Workflow for Office 365 app.
- On a SharePoint List or Document Library page, click Nintex Workflow on the top ribbon.
-
If you are on a different page on the Workflow Gallery, click Workflows on the left menu.
Types of Workflows
Nintex for Office 365 uses the native SharePoint list and site workflows.
List Workflows are associated with document libraries and lists. A workflow associated with a document library operates on specific documents in the library and a workflow associated with a list operates on specific items in the list.
You can set up list workflows to automatically start whenever a document or item is added or edited. You can also manually start these workflows or start them from other workflows.
List workflows have the following common uses
- Collect feedback on documents or list items
- Request approval for documents or list items
Site workflows operate across the site, independent of specific documents or list items. You can manually start these workflows or start them from other workflows.
Site workflows have the following common uses
- Site maintenance, such as deleting completed tasks and copying files to archives
- Reports on list items and other items on the site
- Validation of data in the site against external sources, such as price lists stored outside SharePoint
- Reminders
- Other workflows that operate independently of specific documents or list items
Create workflows
- Go to the document library or list, select the Library or List tab, and then click Nintex Workflow in the ribbon. The Workflows page opens.
- Click Create List Workflow. The Designer page opens to design your workflow.
- Go to the site, click Settings, select Site Contents, and then click Nintex Workflow for Office 365. The Workflows page opens.
- Click Create Site Workflow. The Designer page opens to design your workflow.
Save your workflow
Saving a workflow allows you to save workflows to work on and publish later. Note that saving a workflow, whether new or existing, does not publish the workflow.
- From the toolbar at the top of the Designer page, click Save.
- In the Save dialog box, fill in the fields and then click Save. For more information about the fields and settings in the Save dialog box, see Save dialog box fields and buttons.
Edit workflow
Do one of the following to open the workflow in the Designer to edit as required:
- On the Workflows page, click the name of the workflow you want to open.
-
On the right of the workflow you want to open, click
 and then select the option you want from the menu.
Publish your workflow
Publishing a workflow makes it available to start depending on how it is configured. When you publish the workflow, you must specify if the workflow is counted against your workflow subscription license as production or development.
-
From the toolbar at the top of the Designer page, click Publish.
-
In the Publish dialog box, fill in the fields and then click Publish. For more information about the fields and settings in the Publish dialog box, see Publish dialog box fields and buttons.
If your tenant has a workflow-based subscription license, you will be asked to specify the assigned use or intended use of the workflow or form when publishing them.
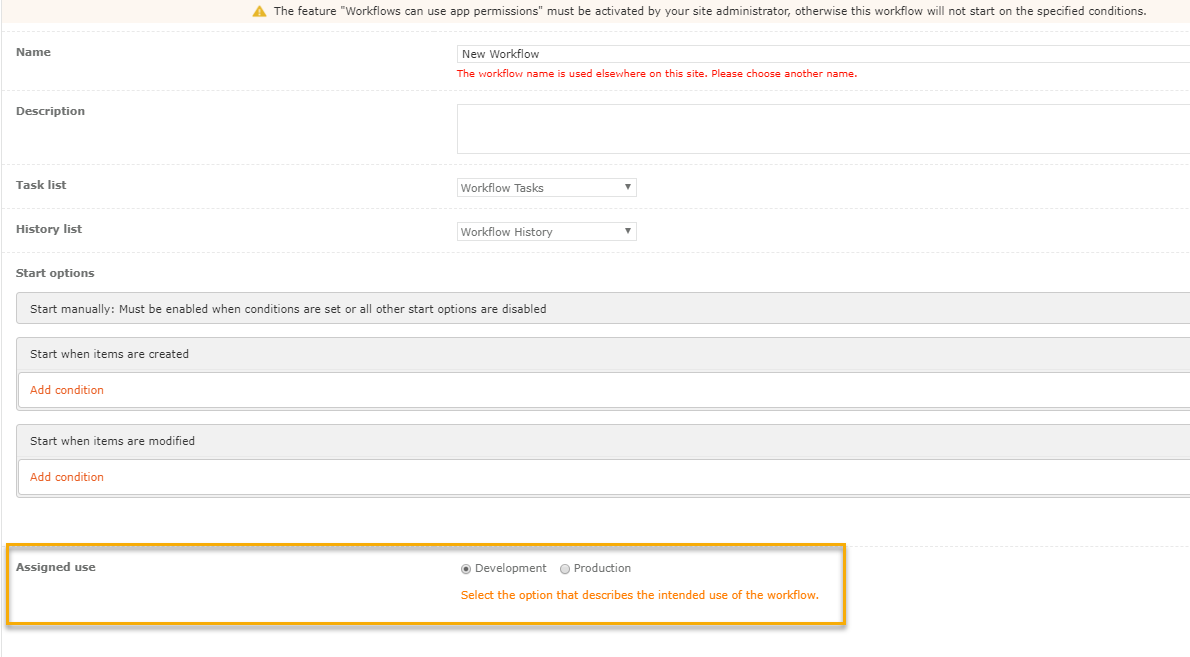
The image below shows the Assigned use options presented when publishing a workflow:
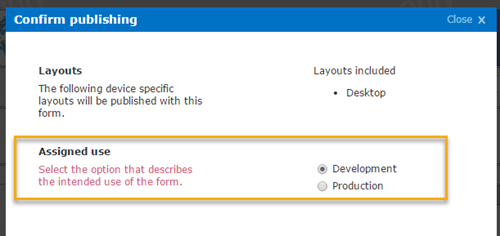
The image below shows the Assigned use options presented when publishing a form:
Available options are explained below:
-
Development: Intended for testing and development use only. Counts as a development workflow under your subscription license. Watermarks appear on development workflows and forms as well as on email messages sent by workflows.
Note: The watermark is not displayed in form preview.
-
Production: Intended for production use. Counts as a production workflow under your subscription license.
Workflow failure alerts
You can configure a workflow to send an email notification to a user if an instance of the workflow fails. The alert that includes details of instances of the workflow that failed is sent as an email notification to the users selected.
One or both of the following users can be selected to send the notification to from the Publish dialog box when you are publishing the workflow:
- Last user to modify the workflow
- Workflow owner
- Alert notifications are sent only for failed production workflows.
- The notification will include details of instances of the workflow that failed during a certain period. One email will include an aggregation of the failed instances that occurred during that period of time and the maximum number that will be shown in one email is 100.
-
Notifications for a failed workflow will not be sent instantly and it may take up to six hours from the time the workflow fails to receive a failure notification.
Setup a user to receive workflow failure alerts
-
From the toolbar at the top of the Designer page, click Publish.
-
In the Publish dialog box, under Alerts select the user to send the alert notification to.
- If the Workflow owner option is selected you must select a user in the Workflow owner field.
For more information, see the detailed descriptions of the Workflow failure alerts and Workflow owner fields in Publish dialog box fields and buttons.
Unpublish a workflow
You can unpublish a workflow using the SharePoint workflow setting page. When you remove a Nintex for Office 365 workflow, it is no longer available for users to start. However, the workflow continues to be available as an unpublished workflow.To unpublish a workflow
- In the SharePoint site, open the Workflow Settings page for the list, library, or site on which the workflow is published.
- Open the list or library and click Settings on the top ribbon.
- Select List settings.
- Under the Permissions and Management section, click Workflow Settings.
- Open the Site contents page and click Site Settings on the ribbon.
- Under the Site Administration section, click Workflow settings.
- On the Workflow Settings page, click Remove, Block, or Restore a Workflow.
- On the Remove Workflows page, click Remove for the workflow that you want to remove, and then click OK.
Import and Export workflows
You can import and export Nintex for Office 365 workflows to and from Office 365 lists, libraries, and sites. Workflows exported fromNintex for Office 365 are saved as .nwp files.
Things to consider:
- Only site workflows can be imported to a site; only list workflows can be imported to a list or document library.
- Importing a workflow overwrites any existing workflow of the same name. The existing version is not retained or retrievable by default in Nintex for Office 365. To retain the existing version, you should first export the workflow. For more details about best practices when importing workflows, see Workflow version control.
Export a workflow
- Open the workflow that you want to export.
- On the Toolbar, click Export. The browser determines if the site is trusted and then initiates the file download process.
Note: If the file download process does not begin, then the browser may not trust the site. To configure your browser to trust the site, add the Office 365 domain to your trusted sites.
-
Respond to prompts from the web browser to download and save the workflow.
Import a workflow
- Open the designer for the destination list, library, or site. For more information, see Designer.
- On the Toolbar, click Import. The Choose file to upload dialog box is displayed.
- Select the workflow file you want to open (.nwp), and then click Open. The workflow opens in the designer.
|
Column or Selection |
Description |
|---|---|
|
Information |
Provides more information. Lists the following options.
|
|
Community |
Launches Nintex Connect in a new tab. |
|
Feedback |
Launches the Feedback tool. You can provide feedback within the product or online. |
|
Help |
Launches the product help in a new tab. |
|
Create Site Workflow / Create List Workflow |
Displays the Designer page for a new site or list workflow. |
|
Modify existing workflows |
Shows the list of existing workflows for the site, list, or library |
|
Name |
The name of the workflow specified when the workflows was saved or published. Click the name to open the workflow. |
|
Last modified |
Lists the modified dates and times for existing workflows. |
|
Latest version published |
Lists the publication status of the latest saved versions of existing workflows. |
|
Assigned use |
(Subscription licensing only.) The intended use of the workflow: Development: Intended for testing and development use only. Counts as a development workflow under your subscription license. Production: Intended for production use. Counts as a production workflow under your subscription license. |
|
Action count |
(Subscription licensing only.) Indicates the number of actions counted against subscription licensing in existing workflows. |
|
Modified by |
Lists the user names last used to modify existing workflows. |
|
Workflow location |
Lists the sites, lists, and libraries containing existing workflows. |
| Upgrade availability |
Note: Available only if the upgrade tool is enabled for the tenant. The status indicates if the workflow is ready for upgrade to Nintex Workflow. The workflow can have one of the following statuses:
|
| Upgrade status |
Note: Available only if the upgrade tool is enabled for the tenant. When you start the upgrade of a workflow, the Upgrade status displayed for the workflow is updated. The Upgrade status column describe the status the workflow upgrade is currently in. The different statuses include:
|
|
Options ( |
Lists selections relevant to the indicated workflow.
|

