Rules
Use Rules in forms to control the behavior of a form. Form rules provides the ability to:
-
Apply logic to forms and make them more dynamic
-
Adjust forms when user enters data
-
Display only relevant information to users
-
Improve the accuracy of data that is submitted
An example of a rule is when you want to show a set of controls only when a user is from Australia, based on a query run on the browser URL. See this example in action.
Another example is when you want to compare values between two of the same controls. In a form, there could be two Email fields: Email and Confirm Email. You can create a rule that checks if the user enters the same email address in these two form fields. If true, the form can be submitted. Else, an error message appears.
Jump to:
Types of rules
There are two types of rules you can create for forms.
Form rules
Use form rules to set behavior and values for fields. For example, when users enter data into form fields or when default values of controls determine the behavior of the form on load.
You can modify the values and behavior of form fields using form rules. For example, you want users to enter more details if they select Yes in an RSVP online form. For step-by-step instructions, see Step-by-step example: Create an RSVP form.
Submit rules
Use submit rules to set behavior and values for fields which occur when user submits a form. You can use submit rules to set custom validation messages when submitting a form. For example, you can specify a custom validation message to be displayed if the user doesn't enter a valid value in a form field.
Add rules to your form
- Click Rules tab at the top of the forms designer.
- Decide which of the following rules you want and complete the following:
- Form Rules: Click Add form rule to add rules to set behavior and values for fields which occur when users enter data into the form.
- Submit Rules: Click Add submit rule to add rules to show custom validation messages, which display when users attempt a form submission.
- Complete the fields for the new rule as follows:
- For Apply to, select the form or a repeating section to apply the rule to. (Available only if you have a repeating section control in the form.)
- For Name, type a user-friendly name for your rule.
- For If, define one or more conditions triggering the rule.
- For Then, define one or more actions to occur if the rule is true.
- For Else, define one or more actions to occur if the If/Then clause is not true.
Note: Click Insert if you want to insert form controls or variables with applied formulas. For more information on the Insert window, see Insert variable dialog fields, buttons, and settings.
- Click Create rule to save your configuration.
To see your new rule in action, click the Preview tab on the upper left of the forms designer.
For more information on the fields and settings of the Rule builder page, see Rule builder fields, buttons, and settings.
Search for a rule
You can search for a rule using the rule name, variable, or control name. All rules that match the search text are displayed.
- Click Rules tab at the top of the forms designer.
- In the Form rules or Submit rules sections, enter the text you want in the Search box.
All rules containing the rule, control or variable name are displayed.
To clear the search, click x on the right of the Search box.
In this example, you want to show the Upload file button only when the person accessing the job application form is from Australia, as indicated by the browser query parameter key and value Country=AU.
This exercise involves adding controls and rules. The controls determine the appearance of the file-upload field and message; the rules determine which one of these controls are displayed in the public form.
- In the Start event configuration panel, select Form from the Start from drop-down, and click Design form to open the forms designer.
- Drag the following controls onto the canvas.
- File upload
- Label
- Click within the File upload box and change the following fields in the File upload configuration panel:
- Title: Resume
- Visible: No
You can leave default values for other fields.
The form canvas displays a “Hidden” indicator on the control to show that this field will be hidden when the published form initially loads.
Example of "Hidden" indicator:

Note: Control configuration affects behavior of the form on loading only. Define rules to set control values on loading or to set form behavior after loading.
- Click the Label control box and change the following fields in the configuration panel:
- Title: This is only available to Australian applicants
- Visible: No
- Paragraph format for Text: Normal
As with the previous control, the form canvas displays a "Hidden" indicator on the control.
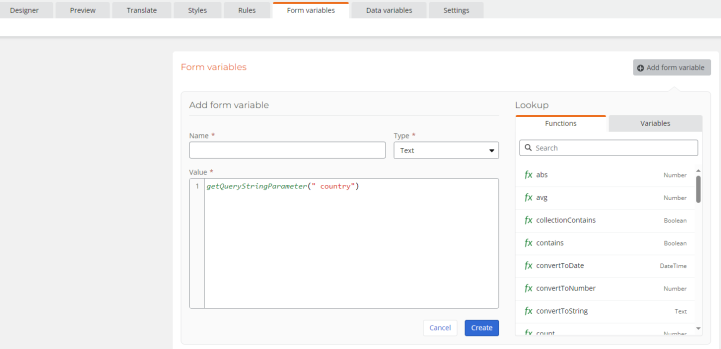
- Click the Variables tab at the top of the forms designer.
- Click Add form variable.
- In the new window that appears, type "country" for Name.
- From the Lookup pane, find the getQueryStringParameter function.
- Hover over getQueryStringParameter and then click Insert.
- In the Value field, type "country" inside the parentheses.
- Click Create.
Your formula should look like the following:
- Click the Rules tab at the top of the forms designer.
- On the Rule builder page, under Form rules, click Add form rule.
- In the Name field, enter a name for this rule, such as “When country is AU".
- In the If line, complete the following:
- 1st field: Click Insert and in the new window that appears, click Form variables and hover over country and click Insert.
- 2nd field: Select Equals.
- 3rd field: Type "AU".
- In the Then line, complete the following:
- 1st field: Select Resume.
- 2nd field: Select Visible.
- Select Yes.
- To the right of Yes, click
 (And) to add another Then line.
 - In the new Then line, select or type:
- 1st field: Select This is only available to Australian applicants.
- 2nd field: Select Visible.
- Select Yes.
- Click Create rule to save your configuration.
Your rule should look like the following:
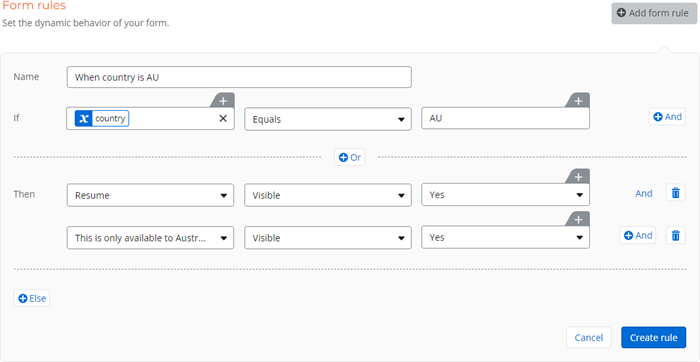
On the published form, the file-upload field will be visible when the browser query string includes "Country=AU". For example, if an applicant accesses this form by clicking a link that includes a country code, and that country code is AU, as in https://www.example.com/job5231/application?country=au, then the file-upload field is visible.
- On the Rule builder page, click
 (Clone rule) to make a copy of the rule you just created.
 - Click the copied rule to open it for editing and then edit the fields as follows.
- In the Name field, update the rule name (such as “When country is not AU”).
- In the If section, change Equals to Does not equal and reset "Country" and "AU."
- In the Then section, for Resume, change Visible toggle to No.
- In the Then section, for This is only available to Australian applicants, change Visible toggle to Yes.
On the published form, the file-upload field will be hidden when the browser query string does not include "Country=AU". For example, if an applicant accesses this form by clicking a link that includes a country code, and that country code is UK, as in
https://www.example.com/job5231/application?country=uk, then the file-upload field is hidden. - Click Update rule to save your configuration.
- On the upper left of the forms designer, click Preview to observe the rules in action. Preview assumes no browser query strings, so the file-upload field is hidden, and the message is displayed.
In this example, you want users to enter more details if they select Yes in an RSVP online form.
This exercise involves adding controls to configure form behavior on loading and then defining a rule to configure form behavior to show a set of fields after user selects an option.
In the form designer:
- Drag the following controls onto the canvas.
- Label
- Yes/No
- Group
- Number
-
Click the Label control and set the following:
- Text: Event Registration
- Style for Text: Heading 1
Note: Open the Text editor in full screen to find the Text style.
-
Click the Yes/No control and set the following:
- Title: Are you able to attend?
-
Click the Group control and set the following:
- Visible: No
The form canvas displays a “Hidden” indicator on the Short text control to show that this text field will be hidden when the published form initially loads.
Example of "Hidden" indicator:

Note: Control configuration affects behavior of the form on loading only. Define rules to set control values on loading or to set form behavior after loading.
-
Click the Number control and set the following:
- Title: How many guests will you be bringing ?. Please write a number below.
The Number control is hidden by default because it belongs to the Group control which is hidden.
-
Click the Email control and set the following:
- Title: Email address
The Email control is hidden from the default by default because it belongs to the Group control which is hidden.
- Click Rules at the top of the forms designer.
- On the Rule builder page, to the right of Form rules, click Add new and then fill in the fields as follows.
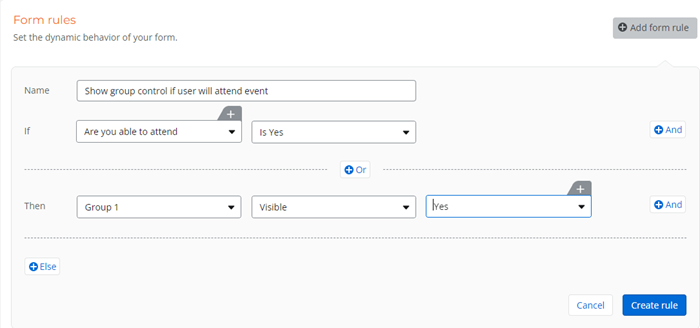
- In the Name field, enter a name for this rule, such as “Show group control if user will attend event”.
- In the If section, select:
- Are you able to attend?
- Is Yes
- In the Then section, select:
- Group 1
- Visible
- Yes
Your new rule should look like the following:
- Click Create rule to save your configuration.
- Click Preview to take a look at how you form looks like when published and accessed by users.
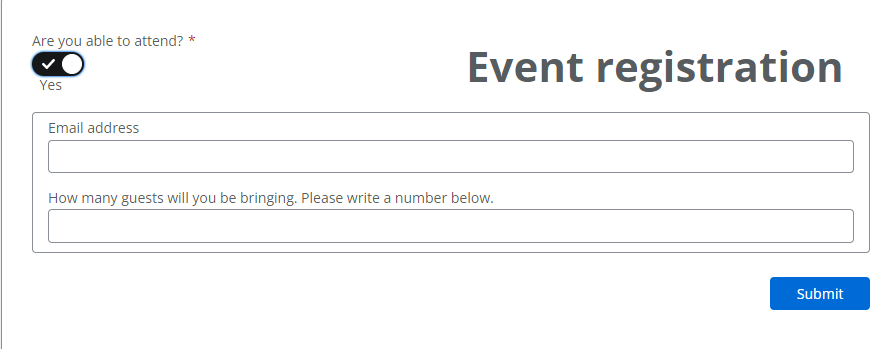
When Yes is selected:
On the published form, the group control will be visible when Yes is selected.
|
Setting |
Description |
|---|---|
| Apply to |
(Available only if you have a repeating section control in the form.) Displays options to select the form or a repeating section to apply the rule to. For more information, see Rules for repeating sections. |
|
Name |
Type a name for the rule. |
|
If |
The conditions that trigger the rule.
Depending on the form control you select in the first drop-down in the IF condition, additional fields appear where you can select an operator and type values for the condition. |
|
Then |
Form behaviors that occur when the If condition of the rule is true. Depending on the form control you select in the first drop-down in the Then statement, additional fields appear where you can select or type values for the statement. |
|
Else |
Form behaviors that occur when the If condition of the rule is false. Depending on the form control you select in the first drop-down in the Else statement, additional fields appear where you can select or type values for the statement. |
|
Insert |
Click Insert to insert form controls or variables with applied formulas. See Insert variable dialog fields, buttons, and settings for detailed descriptions on the Insert variable dialog. |
|
|
|
|
|
Removes the selected If or Then condition of the rule. |
|
Cancel |
Removes the draft of the rule you are creating. |
|
Create rule |
Saves the rule. |
|
User interface |
Description |
|---|---|
| Formula |
Formula builder to create formulas and variables. |
| Form variables |
List of variables with applied formulas which you can use throughout your form and workflow. This tab appears depending from where you click Insert. For example, this tab appears when you click Insert from the Label control in the Designer page. Click Create variable to open the Formula builder where you can create variables with applied formulas. |
|
Form controls |
List of variables that hold values entered in form controls. Each form control that you add in the form designer is listed here. |
| SharePoint columns |
Variables equivalent to the SharePoint columns in your list. |
| Context | Context variables that represent data related to the current workflow instance, such as current item or site URL and workflow name. |
| Name | Name of the variable with applied formulas. |
|
Type |
Type of variable:
|
|
Value |
The values and/ or formulas stored in the variable. |
|
|
If in Designer tab, click to insert the variable into the Label control. If In Rules tab, click to insert variable into a field of a statement. |
|
|
Click to edit an existing variable. |
|
|
Click to delete a variable. |
When you have one or more Repeating section controls in the form, the Apply to drop-down is displayed in the Rules with options to select the form or select a Repeating section to which you want to apply the rule. For example, if you select a Repeating section, the rule is applied to that Repeating section. In the example below, there are two Repeating sections in the form:
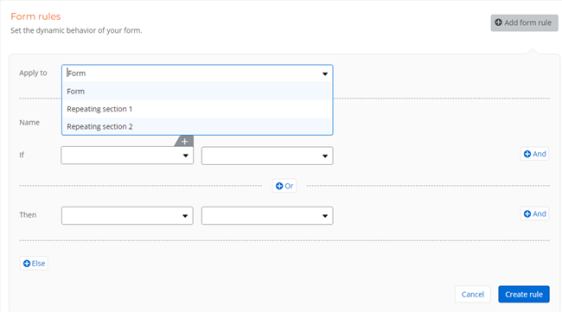
If a Repeating section is selected, you can select any control that is on the form and inside the Repeating section in the If field. However, the Then field will only display the controls inside the Repeating section that you selected in the Apply to field.

