Office 365 upload file
Note: This is an external action and may execute on servers running outside your data center Centralized locations used to house servers used by Nintex for remote storage, processing, or distribution of data. Nintex has a number of regional data centers available for Nintex for Office 365. For information about Nintex data centers and where your data center is located, contact your Nintex account or territory manager. region. Before implementing, consider performance and regional concerns where digital boundaries are an issue. For more information, see In-tenant and external actions.
Use the Office 365 upload file action A tool for building the processes, logic, and direction within workflows. Actions are the steps the workflow performs to complete a process. to upload a file to a document library on SharePoint.
Note: Maximum upload file size is 250MB.
Variables are placeholders that store information that changes each time the workflow runs or even during execution of a single workflow instance.
Each variable has a type that determines what values can be stored in the variable, such as a date, number, file path or a workflow user name. For example, if you want to save the name of an employee in a variable, you have to create a variable of type Text. The workflow can then store a name of the employee, such as "John," in the variable.
- Text: Text string.
- Boolean: Yes or No value.
- Date/Time: Date and time value.
- GUID: Globally unique identifier, often used to reference a list item in SharePoint.
- Number: Integer number with decimal value.
- Integer: Integer number with no decimal value.
- Choice: A value that requests a selection from a list of allowed values.
- Person or Group: A value that requests a selection from a user lookup.
- Hyperlink: A value that requests a hyperlink URL and description.
- Dictionary: A container that holds a single logical unit of variables. For more information, see Dictionary variables.
- Collection: An index-based array of values, also known as an ordered list of values. For more information, see Collection variables.
In NintexOffice 365, the different categories of variables that can be used in a workflow are given below:
-
Workflow Context: Context variables that represent data related to the current workflow instance, such as current item or site URL and workflow name.
- Workflow Variables: User-defined variables that you create to store values such as file paths, dates, workflow outputs Variable to store a value or file on completion of the workflow. and other data for use throughout the workflow.
- Start Variables: Workflow variables with the initiation option selected. Start Variables are used to get data from users when a workflow manually starts.
For more information on manually starting a workflow, see .
- Text
- Boolean
- Date/Time
- Number
- Choice
- Person or Group
- Hyperlink
To configure a variable as a start variable, select the Initiation option when creating a variable.
You can insert an existing Workflow Variable or Context Variable into the configuration fields of workflow actions A tool for building the processes, logic, and direction within workflows. Actions are the steps the workflow performs to complete a process. and you can create user-defined variables for use throughout your workflow.
You can create user-defined variables from the Action configuration window when you are configuring a workflow action or from the toolbar of the designer page.
- In the Action configuration window, click in a field that accepts variables.
- Do one of the following depending on the method available;
- On the drop-down list that appears, Click Create New Variable.
- On the Insert Reference pane that appears, expand the Workflow Variables section and click Create New Variable.
- Do the following in the Workflow Variables pane to create the variable:
- For Name, type the variable name you want to use.
- Select a Type.
- If you want to display the variable on the start form, select the Show on start form check box.
- Click Create.
- On the toolbar of the Designer page, click Variables. The Variables dialog box appears.
- Click New and fill in the following:
- For Name, type the variable name you want to use.
- For Type, select a variable type corresponding to the type of data you want to store.
- If you want to specify the variable as a start variable, select the Initiation check box.
- Click
 to specify the Initiation options Initiation options control the display and behavior of the variable on the start form that is displayed when a workflow is started manually..
- Click Save.
For more information, see User-defined variable types and Initiation options.
The following table describes the variable types available in the Variables dialog box as well as their initiation options, which are available when you select Yes for Initiation. Initiation options control the display and behavior of the variable on the start form that is displayed when a workflow is started manually.
| Variable type | Description |
Initiation Available |
Initiation options |
|---|---|---|---|
| Text |
Any text value. Underlying .NET data type: System.String. |
Yes |
|
| Boolean |
Yes or No value. Underlying .NET data type: System.Boolean. |
Yes |
|
| Date/Time |
Date and time value. Underlying .NET data type: System.DateTime. |
Yes |
|
| GUID |
Globally unique identifier, often used to reference a list item in SharePoint. Underlying .NET data type: System.Guid. |
No |
(n/a) |
| Number |
Numeric with a Decimal value. Underlying .NET data type: System.Double. |
Yes |
|
| Integer |
Numeric without a decimal. Underlying .NET data type: System.Int32. |
No |
(n/a) |
| Choice |
A value that requests a selection from a list of allowed values. The value selected by the workflow initiator is stored in the variable. Underlying .NET data type: System.String. |
Yes |
|
| Person or Group |
A value that requests a selection from a user lookup. The item selected by the workflow initiator is stored in the variable. Underlying .NET data type: System.String. |
Yes |
|
| Hyperlink |
A value that requests a hyperlink URL and description. Two text boxes are provided:
The values entered by the workflow initiator are stored in the variable. Underlying .NET data type: System.String. |
Yes |
|
| Dictionary |
A container that holds a single logical unit of variables. For more information, see Dictionary variables. Underlying .NET data type: Microsoft.Activities.DynamicValue. |
No |
(n/a) |
|
Collection |
An index-based array of values, also known as an ordered list of values. For more information, see Collection variables. |
No |
(n/a) |
You can insert a Workflow Variable, Reference A workflow reference which is used to construct content containing information specific to the list or library item and to the current instance of the workflow. or a Context Variable into the configuration fields of workflow actions A tool for building the processes, logic, and direction within workflows. Actions are the steps the workflow performs to complete a process..
Each field that accepts variables accepts one or more methods for inserting variables. The method available differs depending on the field.
Available methods are given below:
-
Click on the field and select an existing variable from the drop-down list for the field.
- Click on the field, click Create New Variable, and fill the following fields in the Workflow Variable pane that appears:
- For Name, type the variable name you want to use.
- Select the Show on start form check box if you want to display the variable on the start form.
- Click Create.
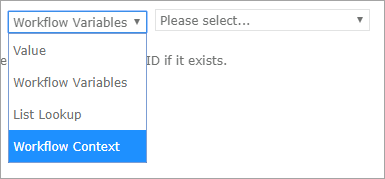
- Click on the field, select Workflow Variables or Workflow Context, and select a variable from the corresponding drop-down list.
- Click Advanced Lookup, select Workflow Variables or Workflow Context from the drop-down list that appears, and then select a variable from the corresponding drop down and click Insert.
- Click on the field that accept references and from the Insert Reference pane that appears on the right, double-click on a reference to select. Available sections and lookup values depend on the options available for the workflow action.

- Current item URL: The URL of the item the workflow is associated item. Available only for list workflow actions.
- Current site URL: The URL of the site the workflow is associated site.
- Initiator login name: The login name of the person who started the workflow instance.
- Initiator display name: The display name of the person who started the workflow instance.
- Initiator email address: The email address of the person who started the workflow instance.
- Instance ID: The unique identifier of the workflow instance.
- List ID: The unique identifier of the list the workflow is associated with. Available only for list workflow actions.
- List Name: The name of the list the workflow is associated with. Available only for list workflow actions.
- Manager login name: The login name of the manager of the initiator (the person who started the workflow instance).
- Manager display name: The display name of the manager of the initiator (the person who started the workflow instance).
- Manager email address: The email address of the manager of the initiator (the person who started the workflow instance).
- Publish user: The person who published the workflow.
- Workflow name: The name of the executing workflow.
| Section | Description |
|---|---|
| Item Properties |
Metadata columns for the item the workflow is associated with. Available only for list workflows. |
| Workflow Context |
Context variables that represent data related to the current workflow instance, such as current item or site URL and workflow name. |
| Workflow Variables | Workflow variables configured for the workflow. |
You can configure variables to collect data when a workflow is manually started. These variables will be shown on a start form used to initiate the workflow and allows users to specify a value for the workflow variable before the workflow starts, basically passing values into the workflow before it starts.
Variables displayed on a start form are also known as the "start data" of the workflow and represent data that must be collected when the workflow is started.
Note: If the workflow starts automatically, then default values are used for start data.
To learn how to manually start a workflow, see Start a workflow manually.
Configure a variable to show on a workflow start form:
-
Open the required workflow. The workflow designer opens.
- On the toolbar, click Variables. The Variables window opens.
-
To edit an existing variable, click the required variable. The row becomes editable.
or
- Select the Initiation check box for the required variable.
- If you want to configure initiation options, click
 to open the Initiation options dialog box, make the changes and click OK. For more information about the fields, see User-defined variable types and Initiation options.
To create a variable, click New on the Variables window toolbar, enter a Name, and select the Type for the variable.
- Click Save to commit changes.
Add and configure the Office 365 upload file action
-
Click the Libraries and Lists action group in the action toolbox.
or
Type the action name or function in the Search field at the top of the action toolbox.
- Drag the Office 365 upload file action to the designer canvas.
-
Do one of the following to open the Action configuration window:
- Double-click the action.
- Click
 on the action and then click Configure.
See Action configuration window for more information.
- Select an option for File to upload.
- Specify the Destination site URL where the document library is located.
- Select a Connection. If you want to create a new connection, see Create a personal connection for instructions.
- Type the URL of the web page you want to be viewable inside the channel.
- Specify the Folder path.
- Specify the File name including the extension for the file you are uploading.
- Click Save.
For more information about the fields buttons and settings, see Office 365 upload file fields, buttons and settings.
| Field | Description |
|---|---|
| File to upload |
The file to upload to the document library. Select one of the following items:
|
| Destination site URL |
URL of the site where the document library you want to upload the file to is located. If the document library is in the current site you can insert the Current site URL context variable.
{Workflow Context:Current site URL} is inserted in the Destination site URL. |
| Connection |
The connection to use to connect the SharePoint Online site.
|
| Username / Password |
(Displayed for legacy actions not yet updated.) Unmanaged credentials.
Note: As a best practice, manage credentials by updating actions to use connections. |
| Folder path |
Folder path to the document library you want to upload the file to. Include the document library name and any folder names. If you want to upload the file directly to the document library specify the name of the document library. If you want to upload the file into a folder in the document library the folder name should be included. For example: To upload the file to folder A inside the Shared Documents document library specify the folder path as, Shared Documents\Folder A |
| File name |
The file name and extension to use for the file you are uploading. For example: NewDocument.docx. |
| Overwrite existing file |
Option to specify whether to overwrite an existing file with the same name in the selected destination. To overwrite, select Value in the first drop-down list and Yes in the second drop-down list?. |
| Fields |
File properties/metadata for the uploaded file.
|
| Link to uploaded file |
Variable to store the URL of the uploaded file. |
| List item ID |
Variable to store the list item ID. |
| Upload successful |
Boolean variable to store operation result. Returns "Yes" if the file was successfully uploaded. |
 ).
).