Add automation task to queue
Before you begin:
-
Learn how to navigate the Wizard Editor
-
Understand how to create Sensors
-
Understand how to Create wizards and use Advanced commands
-
Understand Variables
-
Learn how to customize Error handling within an advanced command
-
Understand how to configure Wizard fallbacks
The Add automation task to queue Advanced command is part of the RPA commands, enabling various automation tasks within the RPA application. With this command, you can execute and add a task to the Console Task queue. It also supports a hybrid mode, where the Nintex Robot starts a task and can get input from the Nintex Assistant user. To incorporate this command into your automation workflow, drag it into a wizard using the Advanced command view in the Studio Wizard Editor.
For examples of using this command in hybrid mode, see Example.
-
Attended users and robots can use this command in both sensors and wizards. This command allows you to add tasks to the Nintex - Robot Task Queue.
-
After adding the task to the queue, the sensor or wizard where this command runs keeps going. It doesn't wait for a robot to finish the assigned task.
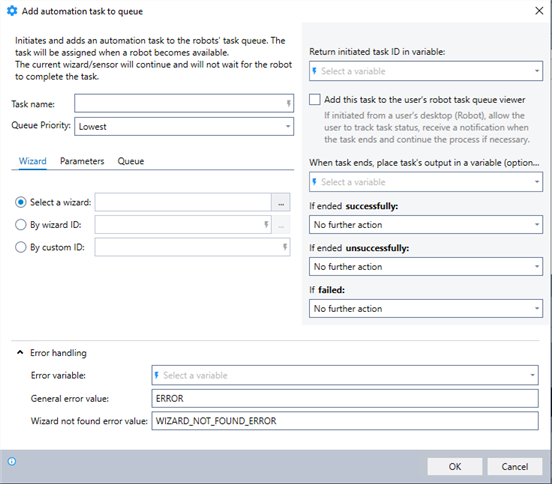
In the Advanced command view, search for the Add automation task to queue command and drag it into your steps. Then, follow the configuration instructions below:
-
Enter a Task name. This namee name you enter is the name that appears in the Console.
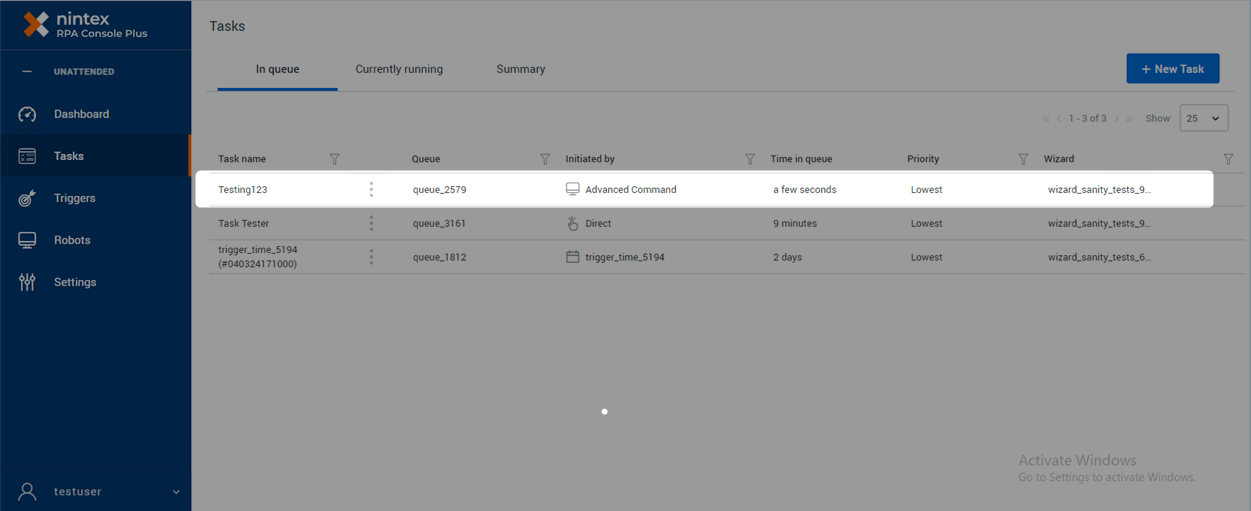
-
Select the Queue Priority, ranging from 1 to 9, where 1 represents the lowest priority and 9 the highest.
-
Complete the Wizard section. Select a wizard for the task by using one of the three methods:
-
Select a wizard
-
By wizard ID
-
By custom ID
-
-
If you selected Select a wizard, select a wizard from the Wizard Catalog.
-
If you selected By wizard ID, use one of these methods to add the wizard ID:
-
Select a wizard from the Wizard Catalog. The wizard ID is populated. and the wizard ID is filled in.
-
Enter the wizard's ID. To find the ID, open the wizard in the Catalog and expand the More options section. The ID is the number following the Hyperlink. For example, in the following image, the wizard ID is 5.
Ensure the wizard's ID is exact to prevent a WIZARD_NOT_FOUND_ERROR message.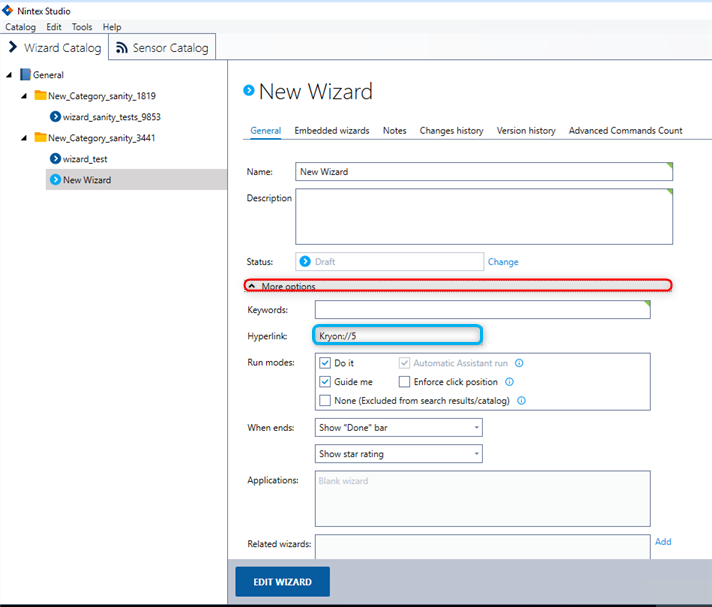
-
Enter the variable for the wizard ID. To create or specify the variable for the wizard ID, use one of these methods:
-
Use the Set value command within the wizard, to store the wizard ID in a variable. To use a variable in this field, type its name between dollar signs (for example $MyVar$). When the wizard runs, the variable name is replaced with its value.

-
When starting the wizard from the Console, you can include variables when selecting the automation that the task or trigger runs. Add these in the Wizard section under Wizard variables (advanced).
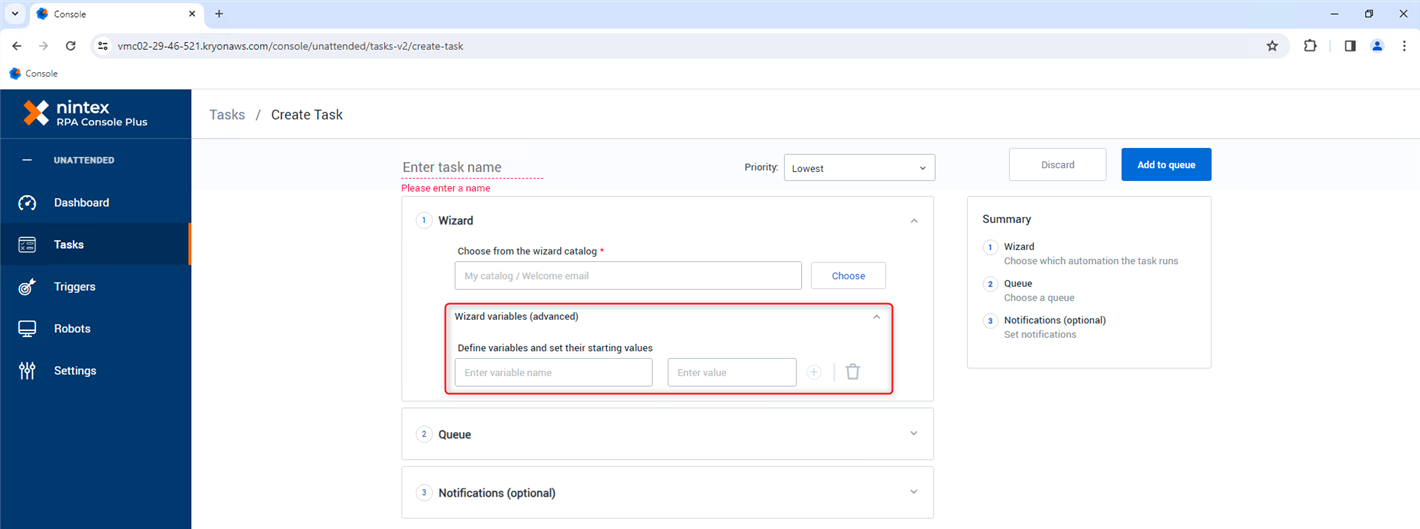
-
In hybrid mode, you can use the variable $wizard$ to dynamically select different wizards based on the user's actions with the Nintex Assistant.
*See the example below.
-
-
-
If you selected By custom ID, enter the custom ID for the wizard. This ID must be added in the Studio by selecting Tools from the main menu and then Wizard custom IDs. To use a variable in this field, type its name between dollar signs (for example $MyVar$). When the wizard runs, the variable name is replaced with its value.
-
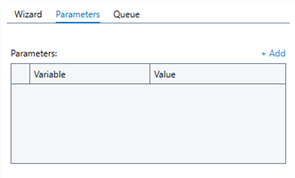
(Optional) Click the Parameters tab and enter the values for some or all of the task wizard's variables. If you want the other wizards embedded within this automation to start with specific values for certain variables each time they run, enter the name of the variable for which you want to set a starting value for. Make sure to use the exact variable name (it's not case-sensitive). Then, enter the starting value for the variable.
-
Click the Queue tab and select a queue from the Console where you want to add the automation task.
-
Select a variable to save the task ID in the Return initiated task ID in variable field. The task ID appears right away when this command runs, even if a robot hasn't started or finished the task yet. You can then use the task ID to check the task's status using the Get automation task status command.
-
(Optional) Select Add this task to the user's robot task queue viewer if you want to check its status, get notifications when they're done, and continue with the hybrid process with the Nintex Assistant (Attended robot). This queue keeps a list of tasks that the Nintex Robot (Unattended robot) started.
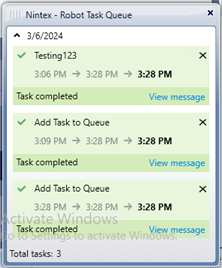
- This queue is only visible from the Nintex Assistant (Attended robot).
-
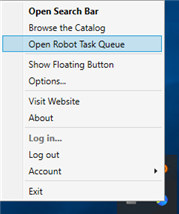
To access the Nintex - Robot Task Queue, right-click on the Nintex Assistant icon located in the taskbar tray and select Open Robot Task Queue.
-
(Optional) Select a variable or create a new one to capture the task's output upon completion. This variable stores information generated by the automated task, which you can access using the Report wizard output advanced command.
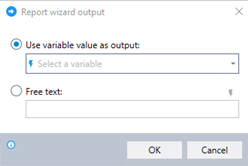 This variable doesn't apply to messages displayed during the current sensor/wizard execution or for other advanced commands within the current wizard. But, you can use it for messages displayed after completing the task, as explained in the next step.
 -
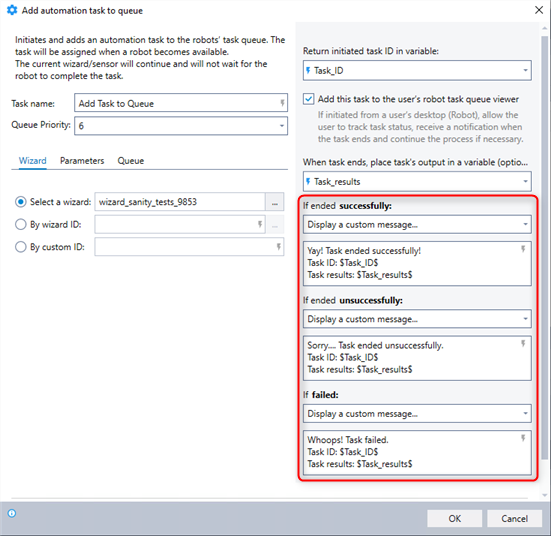
Add logic to specify actions that the system should take based on different outcomes when the task completes, such as success, failure, or an error.
-
No further action
-
Display a custom message...
-
Run the current wizard from a specific step...
-
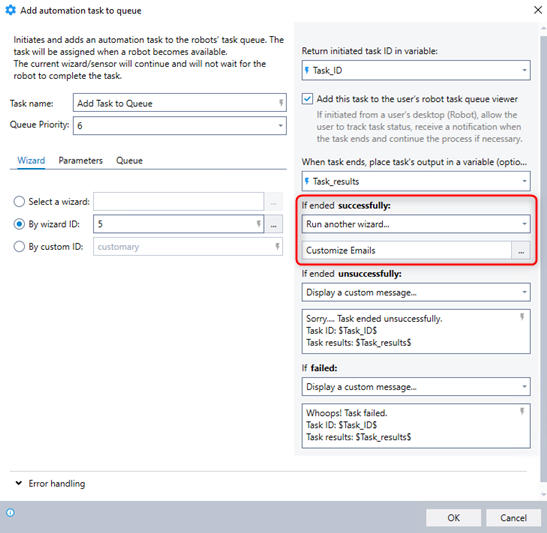
Run another wizard...
-
-
Expand the Error handling option to provide instructions to the wizard on how to manage errors. Use a designated error variable to indicate if the command fails.
-
Click OK.
The following scenarios are useful ways to use the Add automation task to queue command in hybrid mode.
-
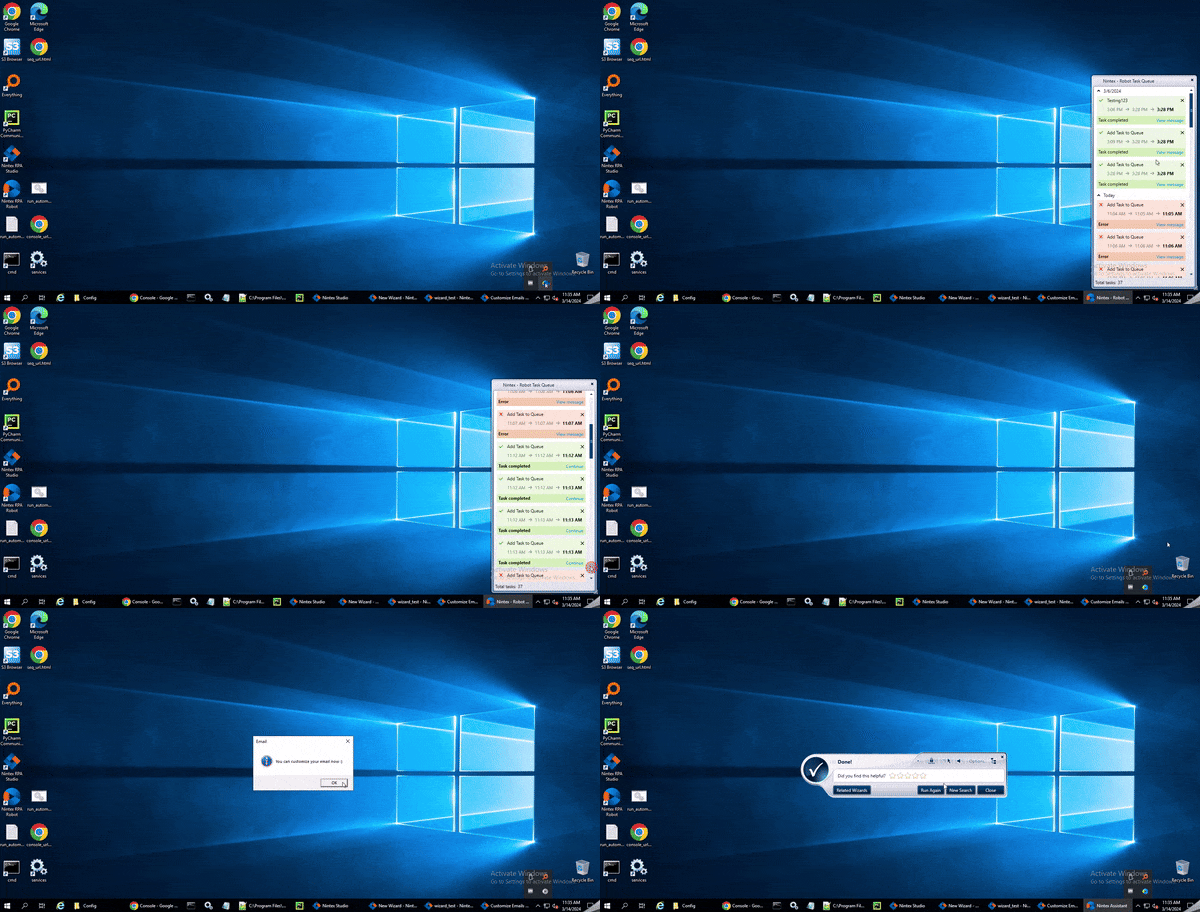
Imagine running an online store. When someone places an order, several tasks get automated, such as checking item availability and processing payment. Afterward, a confirmation email is sent. But, sometimes you may want send another email with special messages or discounts based on the customer's purchase or location. Instead of making the initial automation too complex, let the Nintex Robot (unattended robot) handle basic tasks without any manual help. Afterward, use the Nintex Assistant (attended robot) to customize an email. The user can do this by clicking Continue in the Nintex - Robot Task Queue to start another wizard. In this wizard, they'll see a message to customize an email. Remember, this wizard can be any automation that you want.
-
* In the following scenario, the Nintex Robot (unattended robot) starts a wizard. But, the Nintex Assistant (attended robot) desktop user interacts with the system and makes decisions, directing the Nintex Robots to execute different tasks on the server.
Setup
-
Configure a wizard with a recording in the Studio Wizard Editor.
-
Add a Bubble to display options to prompt the Nintex Assistant user for action.

-
Switch to the Advanced command view in the Nintex Robot's Studio Wizard Editor.
-
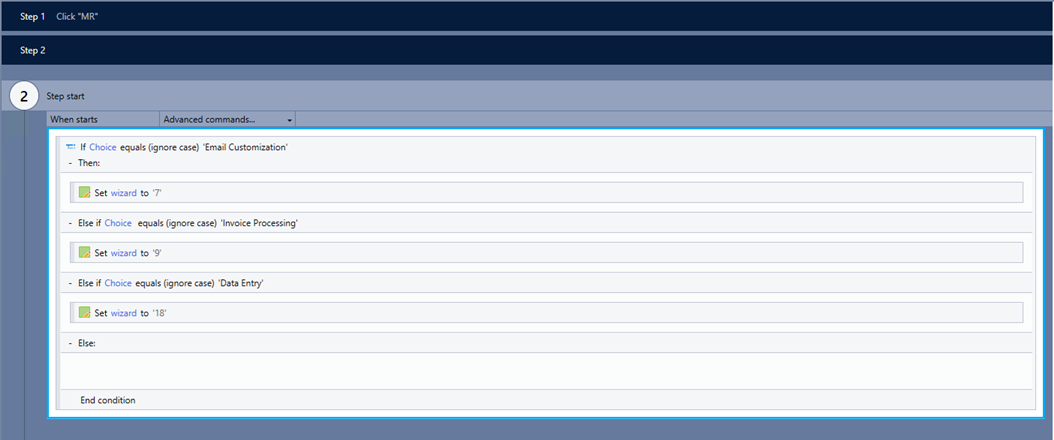
Add the If else command using the $wizard$ variable, to handle the user's response. This involves setting up logic to determine which wizard should start based on the user's selection.
-
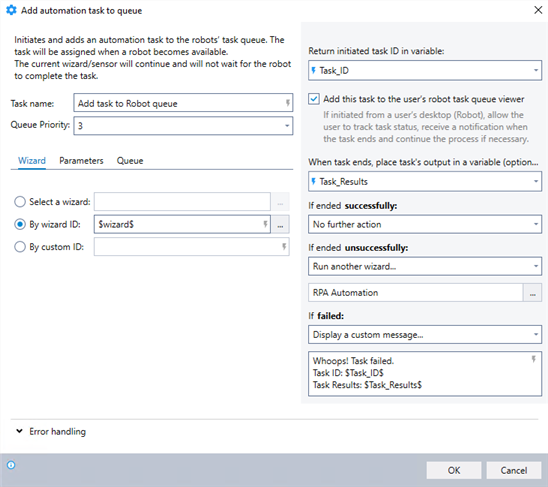
Add the Add automation task to queue command with the $wizard$ variable as the By wizard ID, and include logic to specify actions that the system will take based on different outcomes when the task completes, such as success, failure, or an error.
User interaction
The Nintex Assistant user sees the message from the Bubble, instructing them to select one of the three options.

Depending on the user's selection, different wizards are triggered. These outcomes are determined with the If else command.
In this example:
-
If Email Customization is selected, the wizard with the ID of 7 is selected for the task.
-
If Invoice Processing is selected, the wizard with the ID of 9 is selected for the task.
-
If Data Entry is selected, the wizard with the ID of 18 is selected for the task.
Outcome
The execution of the wizard by the Nintex Robot results in an interaction with the Nintex Assistant user. Depending on the user's input, a different wizard task is initiated and added to the Nintex - Robot Task Queue. If the task ends successfully, no additional action is triggered. In case of an unsuccessful outcome, the RPA Automation wizard is launched. However, if the task fails, a custom message is displayed to notify the user.
-