Delete from Excel DAC
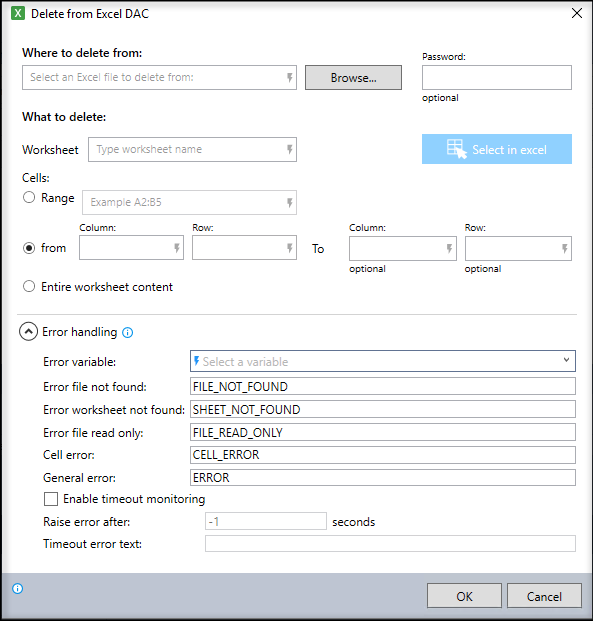
The Delete from Excel dynamic advanced command is part of the Excel commands. Use this command to delete specific cell values or entire worksheet content from an Excel file. You don’t need Excel installed to use this command unless you are using the Select in Excel option. Drag it into a wizard from the Advanced commands view in the Nintex Wizard Editor to use it.
Before you begin:
Learn how to navigate the Nintex Wizard Editor of the Studio.
Understand how to create wizards and use advanced commands.
Understand variables.
Learn how to customize error handling within an advanced command.
Understand how to configure wizard fallbacks.
Use the Delete from Excel command to enhance your automation in various scenarios:
-
Removing sensitive data from an Excel file before sharing it.
-
Cleaning up data from specific cells in a worksheet during a business process.
-
Automating the deletion of unnecessary rows and columns in Excel files as part of data preparation.

In the Nintex Wizard Editor, search for the Delete from Excel command and drag it into your steps. Use the table below to configure each field and understand the settings:
| Field | Description | What to do | |
|---|---|---|---|
| Where to delete from | The Excel file containing the data you want to delete. You can reference it using a variable, enter the full file path, or browse for the file on your local machine. | Enter the full file path (e.g., C:\Users\dev\Downloads\sample_invoices.xlsx), use a variable, or click Browse to select the file from your computer. | |
| Password | The password to unlock the Excel file, if it is password-protected. | If applicable, enter the password to unlock the Excel file. | |
| What to copy | |||
| Worksheet | The name of the worksheet from which to delete the data. | Enter the worksheet name (e.g., Sheet1) or use a variable to specify it. | |
| Cells | Range |
The specific range of cells to delete. |
Enter the cell range in the from:to format, even if it's a single cell (e.g., A1:A1), or use a variable. |
| from:To | The starting and ending columns and rows to delete. | Enter the starting column and row in the from fields (e.g., C5). You can also specify the ending column and row in the To fields. Use numbers, letters, or a variable. See Considerations. | |
| Entire worksheet content | Option to delete all data from the entire worksheet until the command reaches the last row and column. | Select this to delete all the data in the worksheet. The command will stop after 20 consecutive empty rows/columns. | |
| Select in Excel | Optional feature to manually select the cells within Excel (requires Excel to be installed). | Click Select in Excel to select the cells you want to delete. | |
| Error handling | |||
| Error variable | Optional error handling with customizable error messages. | Enter an Error variable name to ensure errors will display in the View variable list command. Use the default error handling messages or customize the error message and response as needed. | |
| Enable timeout monitoring | Optional feature to track the command's runtime and raise an error if it exceeds a set duration. | Select the checkbox to enable timeout monitoring and then set the duration (default is 1800 seconds). Customize the timeout error message, or use the default one. | |
When working with Excel commands like Copy from Excel, Paste to Excel, or Delete from Excel, there are two options for selecting the cells to use: manual selection and Select in Excel. This allows you to specify which worksheet and cell range to manipulate, making the commands flexible for different use cases.
Enter Excel data selection manually
This method allows you to manually define the worksheet content to use in your command. It's especially useful when you want to use variables to select specific cells dynamically. When using variables in any of the fields, remember to enclose the variable name in dollar signs (e.g., $MyVar$).

You can choose one of the following methods for manual selection:
-
Range: Specify the range using standard Excel notation, even if it's a single cell (e.g., A1:A1), to select specific cells.
-
from/To: Specify the starting and ending column and row. For example, from: C5, To: E10, or leave the To field blank to copy all rows/columns until the wizard detects 20 consecutive empty cells.
-
Entire worksheet content: This option allows you to copy, paste, or delete the entire worksheet content. The wizard will stop after detecting 20 consecutive empty rows or columns.
Select in Excel
This method allows you to select the cells you want to use from within the Excel sheet. It's useful when you prefer to work directly in the file and see the data you're manipulating. Here's how it works:
-
Click Select in Excel to bring up the Select from Excel window. The selected Excel file appears behind the selector window.
/Advanced Commands_236.png)
-
Select your worksheet and cells by clicking in the Excel file to choose the worksheet (tab) and the cells you want to use in your command. The Current selection fields in the selector window fill in with your selections.
If the selector window interferes with your view, you can drag it to a different location on your screen./Advanced Commands_237.png)
-
Click OK to confirm your selection. The Worksheet and Range fields in the command fill in based on your selections.
/Advanced Commands_238.png)
If you need to change your selections, you can either edit the fields manually or repeat the Select in Excel process.
Follow these best practices when using the Delete from Excel command:
-
Always verify that the Excel file path or variable is accurate to avoid errors.
-
Always enclose variables in $ signs to ensure proper recognition by the wizard.
-
Use a defined range or worksheet name for more control over the deletion process.
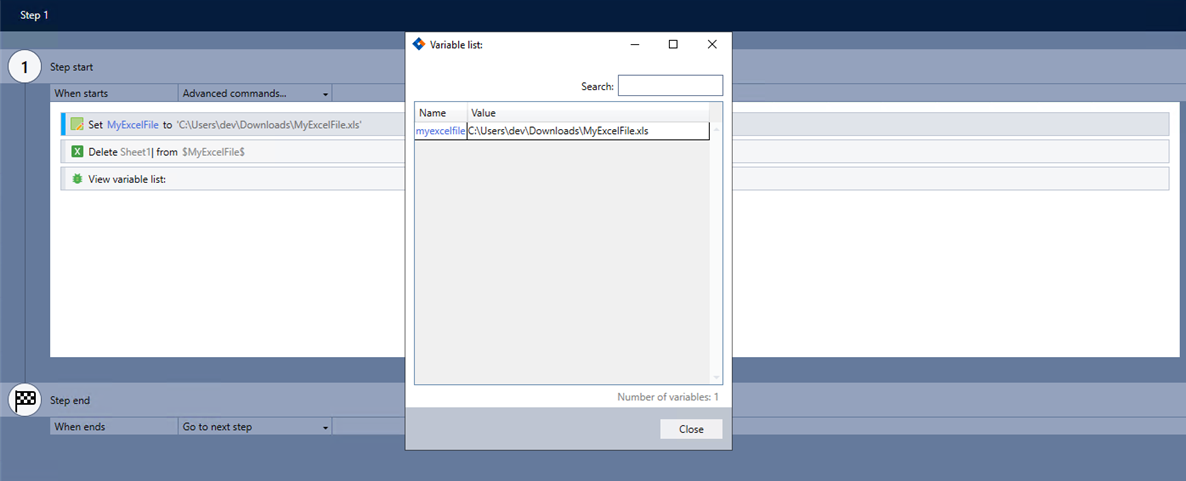
This example shows how to delete a worksheet from an Excel file.

-
Add the Set value command to your wizard to specify the file name and location. Complete the following fields:
-
In the variable: MyExcelFile
-
Set the value: C:\Users\dev\Downloads\MyExcelFile.xls
-
-
Add the Delete from Excel file command and complete the following fields:
-
Where to delete from: $MyExcelFile$
-
Worksheet: Sheet1
-
Select Entire worksheet content.
-
Error variable: Error
-
-
Use the View variable list command to verify the command works without errors.
-
Select in Excel is unavailable until you complete the required fields.
-
When using the from/To option without specifying an endpoint, the command copies data until it detects 20 consecutive empty rows or columns.
-
Using Entire worksheet content copies the entire worksheet but stops after detecting 20 consecutive empty rows/columns.