Create new Excel file DAC
The Create new Excel file dynamic advanced command is part of the Excel commands. Use this command to create a new Excel file in a specified location with the file name and extension of your choice. You don’t need Excel installed to use this command. Drag it into a wizard from the Advanced commands view in the Nintex Wizard Editor to use it.
Before you begin:
Learn how to navigate the Nintex Wizard Editor of the Studio.
Understand how to create wizards and use advanced commands.
Understand variables.
Learn how to customize error handling within an advanced command.
Understand how to configure wizard fallbacks.
Use the Create new Excel file command to enhance your automation in various scenarios:
-
Automatically generate Excel files in specific locations as part of a workflow or process.
-
Prepare blank Excel files for data entry, reporting, or analysis.
-
Overwrite existing Excel files with updated versions.

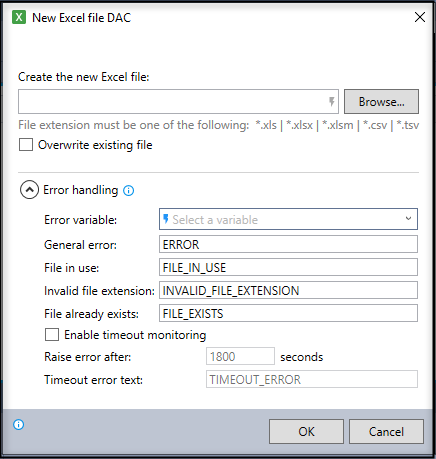
In the Nintex Wizard Editor, search for the Create new Excel file command and drag it into your steps. Use the table below to configure each field and understand the settings:
| Field | Description | What to do |
|---|---|---|
| Create the new Excel file | The name and location for the new file. File extension must be one of the following: .xls, .xlsx, .xlsm, .csv, or .tsv. | Enter the full file path manually, by variable, or browse to select the file location. For example, C:\Users\dev\Documents\SalesReports\Q1_Financial_Report_2024.xlsx. If you click Browse, the Select file window opens, where you can enter any file name with characters, numbers, spaces, and an allowed extension (e.g., .xls). If using a variable, make sure it has been previously defined with a Set value command and enclose it in dollar signs (e.g., $MyFile$). |
| Overwrite existing file | Option to overwrite an existing file if it has the same name. | Check this box if you want the wizard to overwrite a file in the target location only when the file has the same name. If unchecked, the wizard will not overwrite any existing file in the target location. |
| Error handling | ||
| Error handling | Optional error handling with customizable error messages. | Enter an Error variable name to ensure errors will display in the View variable list command. Use the default error handling messages or customize the error message and response as needed. |
| Enable timeout monitoring | Optional feature to track the command's runtime and raise an error if it exceeds a set duration. | Select the checkbox to enable timeout monitoring and then set the duration (default is 1800 seconds). Customize the timeout error message, or use the default one. |
Follow these best practices when using the Create new Excel file command:
-
Ensure that file names and extensions are descriptive to avoid conflicts or errors.
-
Use variables to set file names and locations when your workflow involves multiple files or scenarios.
-
If overwriting files, make sure the files you are replacing do not contain important data, or that backups are in place.
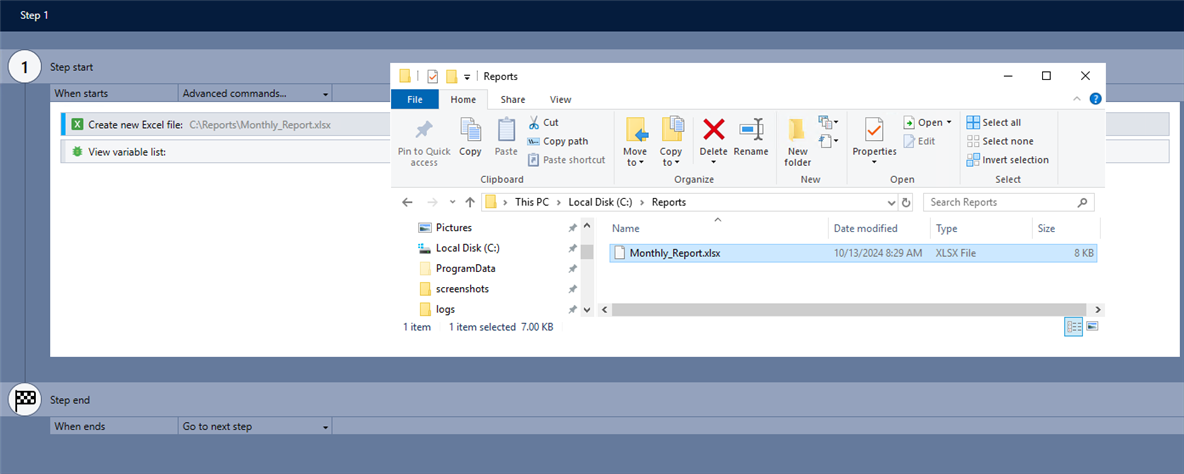
This example shows how to create a new Excel file using the command.

-
Add the Create new Excel file command to your wizard and complete the following fields:
-
Create the new Excel file: C:\Reports\Monthly_Report.xlsx
-
Error variable: Error
-
-
Use the View variable list command to verify the command works without errors.