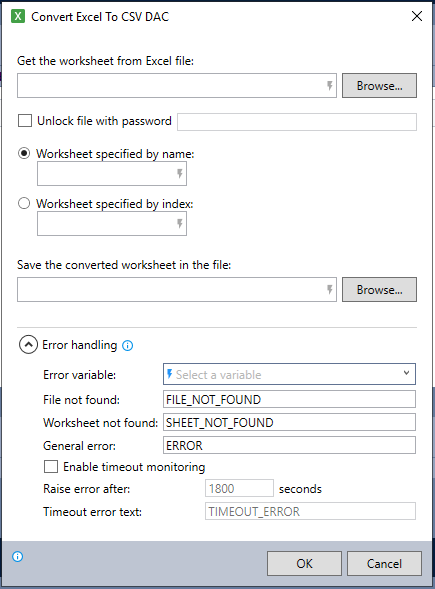
Convert Excel To CSV DAC
The Convert Excel To CSV dynamic advanced command is part of the Excel commands. Use this command to convert a single worksheet from an Excel file to CSV format and save it in the specified location. You do not need Excel installed to use this command. Drag it into a wizard from the Advanced commands view in the Nintex Wizard Editor to use it.
Before you begin:
Learn how to navigate the Nintex Wizard Editor of the Studio.
Understand how to create wizards and use advanced commands.
Understand variables.
Learn how to customize error handling within an advanced command.
Understand how to configure wizard fallbacks.
Use the Convert Excel To CSV command to enhance your automation in various scenarios:
-
Convert a worksheet from an Excel file into a CSV format for easier data manipulation.
-
Automate the export of Excel worksheet data into a CSV file.

In the Nintex Wizard Editor, search for the Convert Excel To CSV command and drag it into your steps. Use the table below to configure each field and understand the settings:
| Field | Description | What to do |
|---|---|---|
| Get the worksheet from Excel file | The Excel file that contains the worksheet the wizard will convert. You can reference it using a variable, enter the full file path, or browse for the file on your local machine. | Enter the full file path (e.g., C:\Users\dev\Downloads\sample_invoices.xlsx), use a variable, or click Browse to find the file on your computer. |
| Unlock file with password | The password required to unlock the Excel file if it is password-protected. | Select the checkbox to unlock the file, then enter the password. |
| Worksheet specified by name | The name of the worksheet you want to convert. It can be set manually or by using a variable. | Enter the worksheet name (e.g., Sheet1) or use a variable to define it. |
| Worksheet specified by index |
The position (index) of the worksheet in the workbook you want to convert. The index starts at 1 for the first sheet, 2 for the second, and so on. This is useful when the worksheet name may change, but the order remains consistent. See consideration below. |
Enter the index number or use a variable to define it. |
| Save the converted worksheet in the file | The full file path or variable for the converted CSV file. If the file does not exist, the wizard creates it. If the file exists, the wizard overwrites it. | Enter the full file path (e.g., C:\Users\dev\Downloads\customer_data.csv) for the CSV file, use a variable, or click Browse to choose a location. |
| Error handling | Optional error handling with customizable error messages. | Enter an Error variable name to ensure errors will display in the View variable list command. Use the default error handling messages or customize the error message and response as needed. |
| Enable timeout monitoring | Optional feature to track the command's runtime and raise an error if it exceeds a set duration. | Select the checkbox to enable timeout monitoring, then set the duration (default is 1800 seconds). Customize the timeout error message, or use the default one. |
Follow these best practices when using the Convert Excel To CSV command:
-
Always provide clear file paths and worksheet names to ensure the command executes correctly.
-
Customize error messages to match the context of your automation, especially if using timeout monitoring.
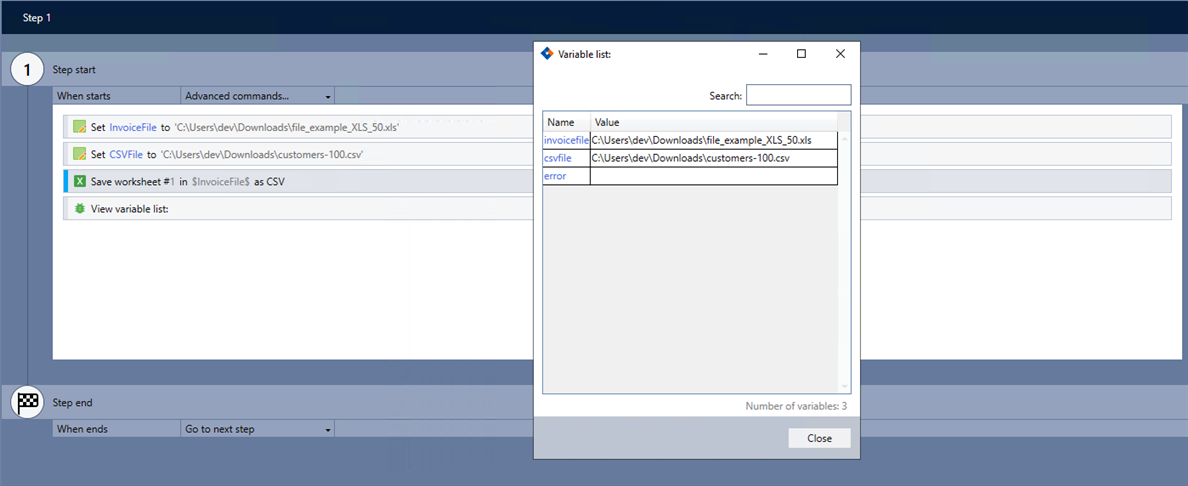
This example shows how to convert data from an Excel file containing a list of 50 customers to a CSV format for further processing in another system.

-
Add the Set value command to your wizard to specify the Excel file location.
-
Add another Set value command to specify the CSV file location.
-
Add the Convert Excel to CSV command and complete the following fields:
-
Get the worksheet from Excel file: $InvoiceFile$
-
Worksheet specified by index: 1
-
Save the converted worksheet in the file: $CSVFile$
-
Error variable: Error
-
-
Use the View variable list command to verify the command works without errors.
-
Verify that the CSV file was successfully saved as customers-100.csv.