3. Add Email Steps to Send Confirmations
In this step you will add two Send Email steps, one for each outcome. After the recipient chooses either the football or the soccer option, the workflow continues by sending an email back to the workflow originator with the decision they made. The email message contains either a football reference or a soccer reference, depending on the outcome it is connected to. You will also add an End step, that provides a visual indicator that the workflow is complete.
- Begin by adding a Send Email step for the Football action. Return to the Toolbox main menu. From the Toolbox > Basic node, add a Send Email step to the canvas and connect it to the Football outcome line.
- Click the Toolbox icon in the breadcrumb bar to return to the main menu. Expand the Toolbox > Basic node. Drag a Send Email step onto the design canvas, so that it lines up next to the Football outcome line.
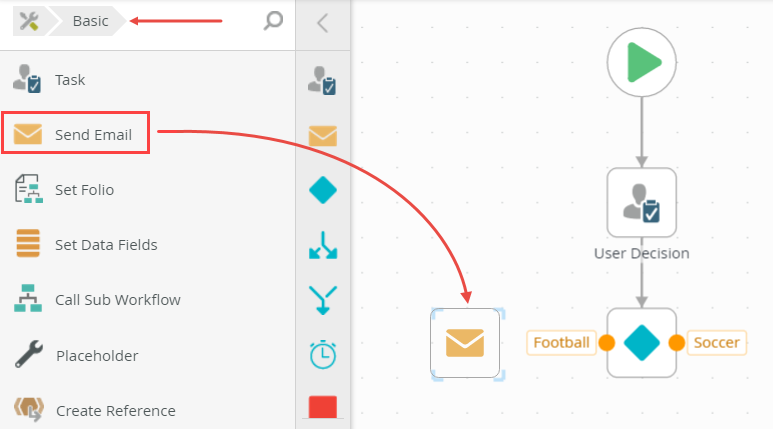
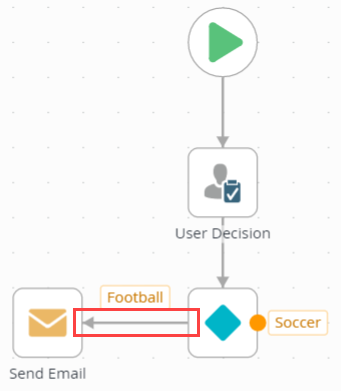
- Connect the Football outcome line to the new Send Email step. Click anywhere on the design canvas to set the line. If the task recipient chooses Football, the workflow follows this outcome (line).
- Click the Toolbox icon in the breadcrumb bar to return to the main menu. Expand the Toolbox > Basic node. Drag a Send Email step onto the design canvas, so that it lines up next to the Football outcome line.
- Now you will configure the email properties. For the subject line, you will use a variable from the Context Browser. At runtime, the variables are replaced with "live" data. For the Subject line, enter Test Workflow then append the Folio to the end of the line. The Folio is located in the Context Browser > Workflow tab > Workflow node. For the email message body, enter You chose Football.
Take a minute to review the basics of what you will find in the Context Browser.
The Context Browser provides access to data about the current user and process, as well as functions and SmartObject data. You can use variables dragged from the Context Browser throughout the configuration of workflow steps. At runtime, the variables are replaced with "live" data. There are four tabs:- Fields: This section contains references to SharePoint lists, SmartForms, and SmartObjects. You can also create variables to hold and use data within the workflow itself, such as to store record IDs.
- Functions: This section contains tools for transforming data. Some examples include performing calculations, formatting text, and working with date and time values.
- SmartObjects: This section contains system and custom SmartObject references.
- Workflow: This section contains process variables. Examples include the originator's name, email, manager, and folio.
- Begin by setting the email subject line. Click to highlight the Send Email step, then expand the Configuration Panel. Click the Notification tab. Confirm the recipient TO property shows Originator. This is the person who started the workflow in the first place. For the Subject line, enter
Test Workflow
then expand the Context Browser.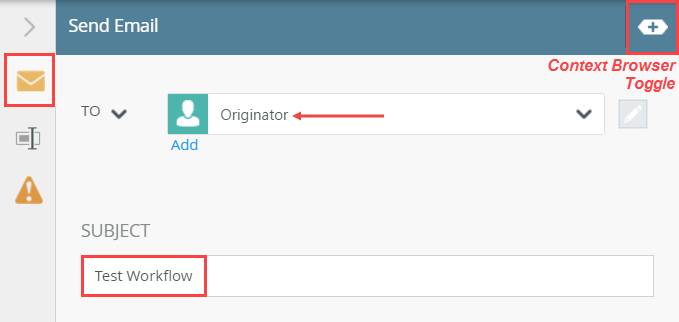
- Next, you will append the folio variable to the end of the subject line. The folio is a variable that the workflow designer sets and is often used to distinguish one workflow instance from another workflow instance. In this application, you will manually set the folio value when you start a new workflow instance.
At the bottom of the screen, click the Workflow tab. Expand the Workflow node. Drag the Folio variable into the email subject line, after the text you entered.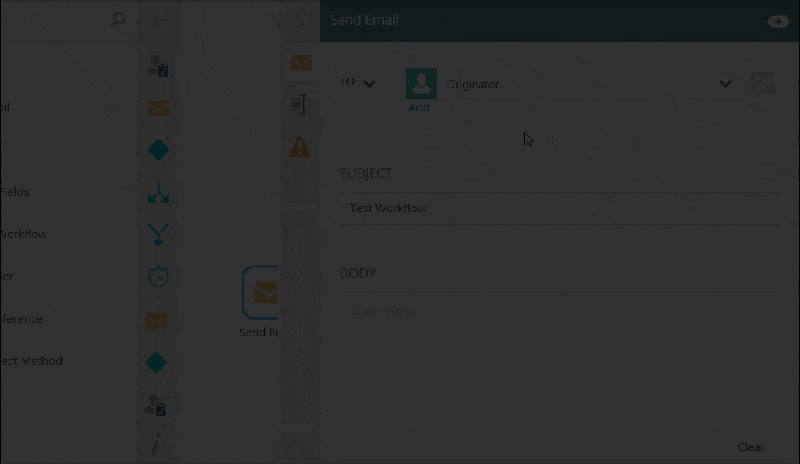
- For the message Body, enter
You chose Football.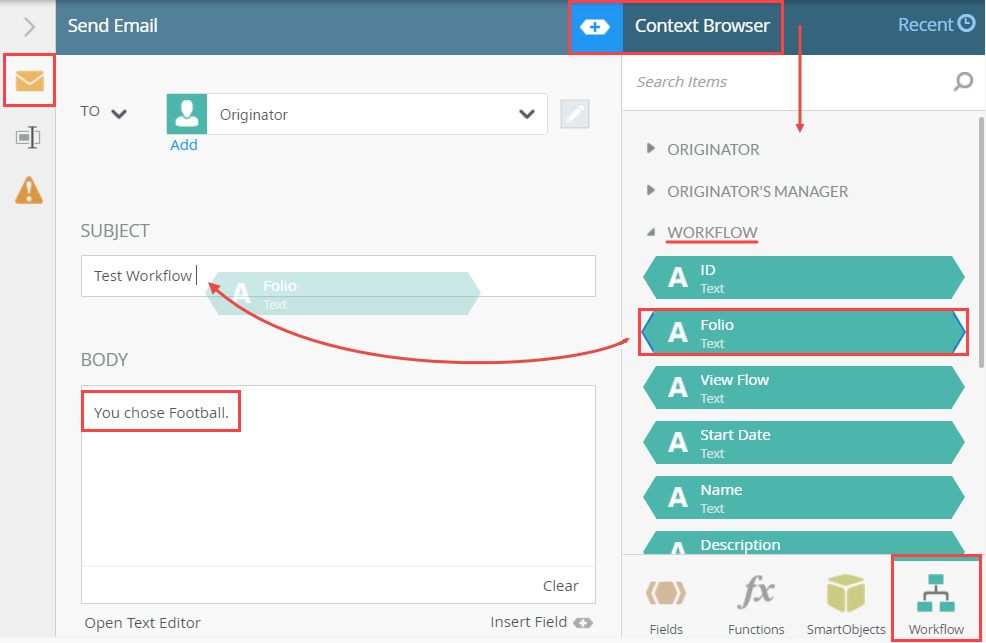
- Change the step name to Email Football. The step Name property is in the General Properties tab.
- Next, you will change the name of the step so it is easy to tell what the step does. Click the General Properties tab. Change the label name to
Email Football
then collapse the Configuration Panel.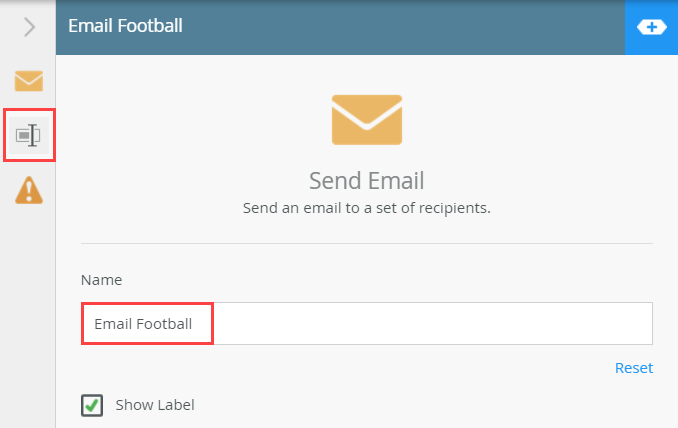
- Next, you will change the name of the step so it is easy to tell what the step does. Click the General Properties tab. Change the label name to
- Repeat the steps above and add an email step for the Soccer outcome line, again using the Folio as part of the email Subject line. Rename the step to Email Soccer.
- Now, you will repeat the previous steps for the Soccer side. Add a Send Email step for the Soccer outcome, then connect the Soccer outcome to the Send Email step.
- Expand the Configuration Panel, then click the Notification tab to make it active, if it isn't already. For the Subject line, enter
Test Workflow
then append the Folio from the Context Browser > Workflow tab > Workflow node to the subject line. For the message body, enter
You chose Soccer.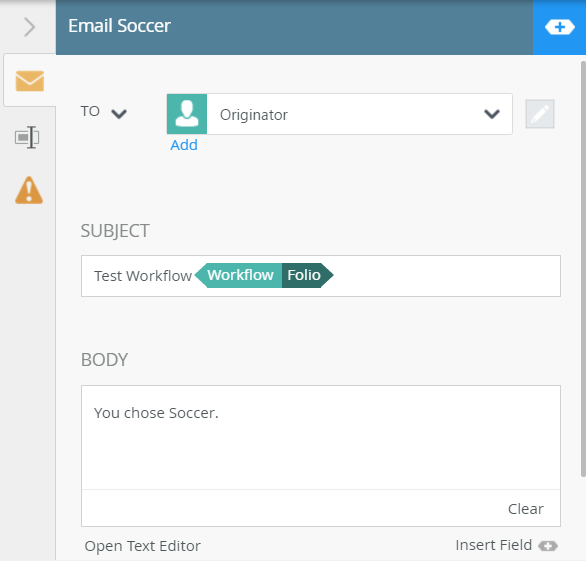
- Switch to the General Properties tab and change the step name to
Email Soccer
then collapse the Configuration Panel.
- The final task is to add an End step. The End step provides a visual indication that the workflow is complete. You will find the End step in the Logic category.
Add an End step, then connect both the Email Football step and the Email Soccer step to the End step.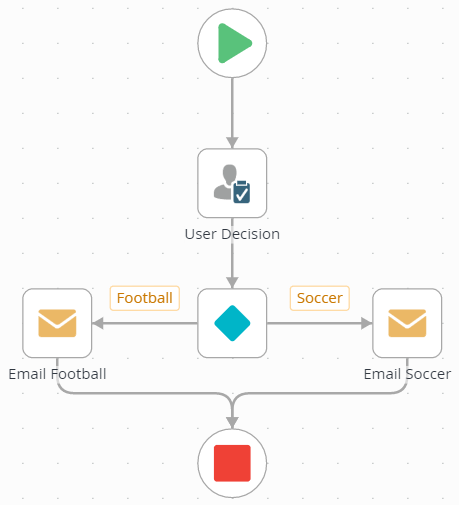
- From the Toolbox > Logic node, drag a single End step below the Decision step. Starting with Email Football step, drag the handle and connect the Send Football step to the End step. Repeat this process for the Send Soccer side.
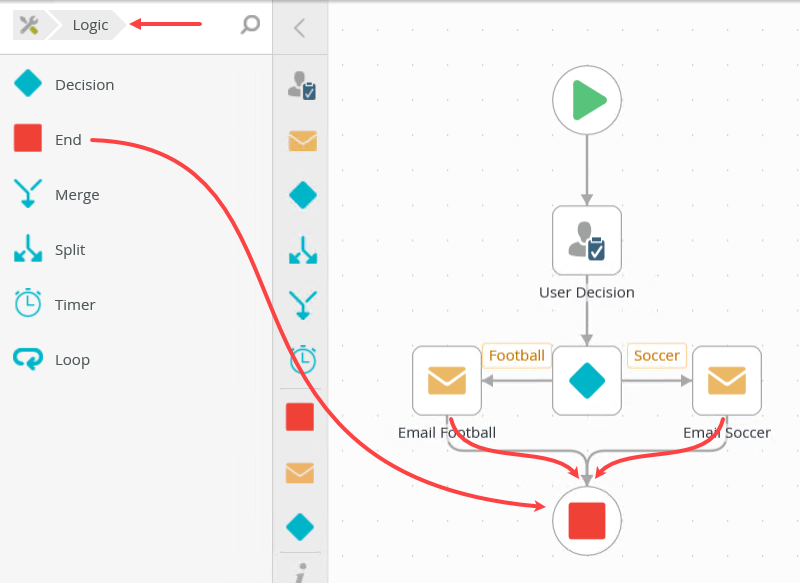
Your completed Hello World workflow should look like the image below.
- From the Toolbox > Logic node, drag a single End step below the Decision step. Starting with Email Football step, drag the handle and connect the Send Football step to the End step. Repeat this process for the Send Soccer side.
Review
In this step, you added a Send Email step to each outcome (Football and Soccer). You configured a simple email message for both steps. You added a variable (the Folio) from the Context Browser. Finally, you added an End step, which gives you a visual indication of the completed workflow. When you start a new workflow instance, you will enter a value for the folio. When you test the workflow, you will confirm that the correct email message is sent for the decision selected. You will also confirm the subject line contains the folio value you entered. In the next step, you will deploy the Hello World Workflow to the server.