2. Build the Hello World Workflow
In this step you will create the Hello World Workflow with the Workflow Designer. You will create a new workflow, then add steps and outcomes (lines) for a simple single user task workflow. You will add a (user) Task step, and assign the task to the workflow originator (the person who started the workflow).
In this workflow, the Task step contains two possible actions that the user can take: "Football" or "Soccer". You will complete this step by adding a Decision step, which generates the outcome lines for the two actions.
-
From the Hello World category, create a new workflow and name it Hello World.Each workflow name must be unique. You will see an error if you try to duplicate workflow names. If you are working in a shared environment where there may be multiple builds of this workflow, consider adding your initials to the name so that it is unique. For example, Hello World [YourInitials], like Hello World KL.
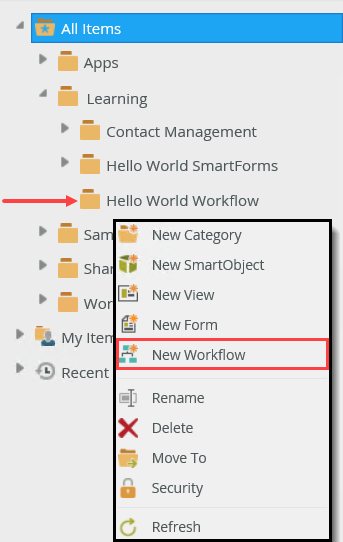
- Right-click the Hello World category and select New Workflow. Creating the workflow directly off the category saves the workflow in that category. This helps to keep your projects organized.
- The Workflow Designer landing page opens. Name the new workflow
Hello World
then click the Create button. The folder category is correct for our application, but you could change folders by clicking the link next to the folder icon.Each workflow name must be unique. You will see an error if you try to duplicate workflow names. If you are working in a shared environment where there may be multiple builds of this workflow, consider adding your initials to the name so that it is unique. For example, Hello World [YourInitials], like Hello World KL.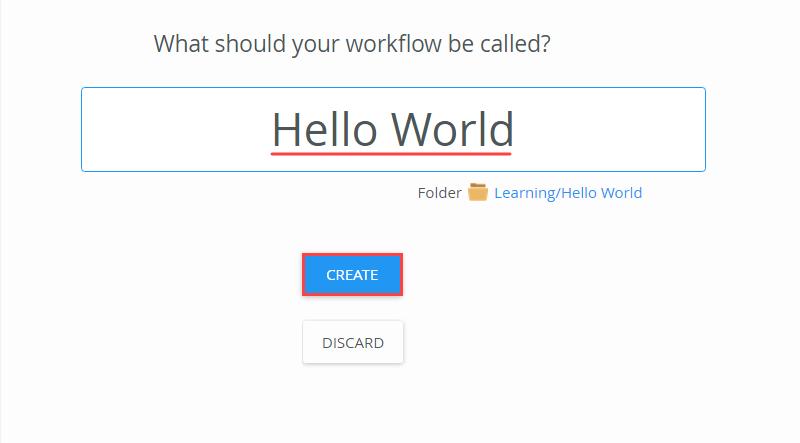
- Right-click the Hello World category and select New Workflow. Creating the workflow directly off the category saves the workflow in that category. This helps to keep your projects organized.
- You are likely to see the Welcome screen, which is an animated image that introduces you to the workflow designer. If you like, you can click through the screens to learn a bit more about the designer. Otherwise, click Close to continue. Begin by adding a Task step to the design canvas. You will assign the Task step to the workflow originator, who must choose their preferred term: Football or Soccer. (We will not use a form for this task, instead, the user will make their decision by replying to an email.)
Add a Task step with the following configurations (from the Configuration Panel):- Task Detail: Add two actions: Football and Soccer
- Recipients: Confirm the default value: Originator
- Notifications:
- Send email task notification: CHECKED
- Customize Notification: CHECKED
- Subject line: Choose your preferred sport
- Message Body: Which sport do you prefer? Reply to this email with either "Football" or "Soccer" as the message body.
- General Properties: Change the Name to: User Decision
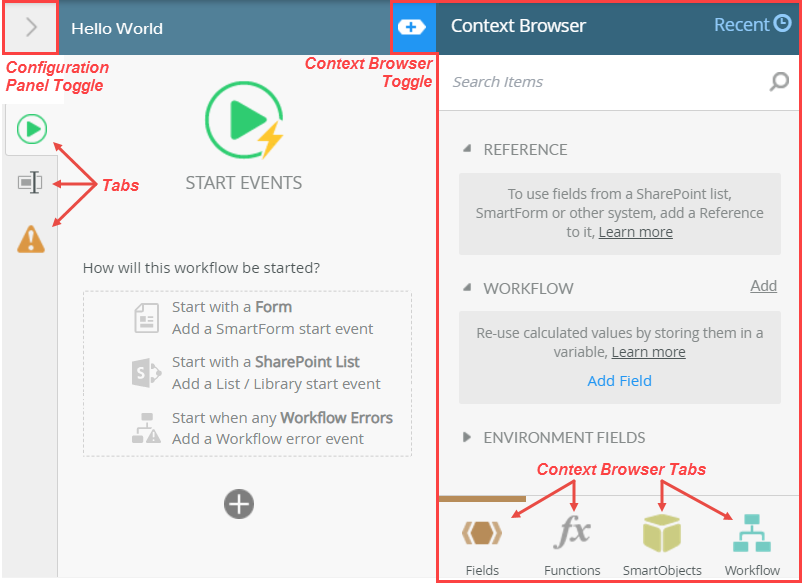
- Take a minute to learn about the Workflow Designer layout.
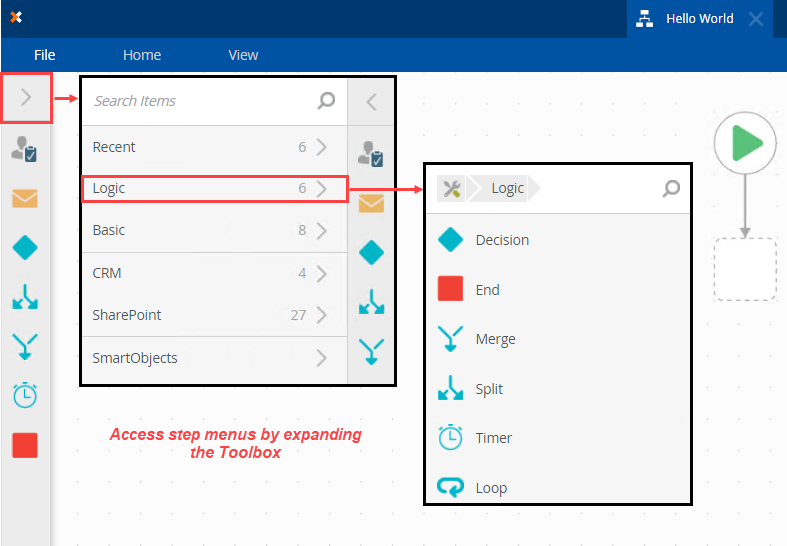
The Workflow Designer environment contains four primary sections:
- the Toolbox on the left-side of the page
- the Design Canvas in the center of the page
- the Configuration Panel on the right-side of the page
- the Context Browser located within the Configuration Panel
The Toolbox is where you will find the different types of steps that you can add to a workflow. You can drag and drop the steps you need for your workflow onto the canvas. User steps usually involve human interaction, such as a person having to make a decision for the workflow to continue. System steps, such as sending an email or updating data in some other system, are performed by the server. Lines connect steps to each other, and define the "path" that the workflow will follow.
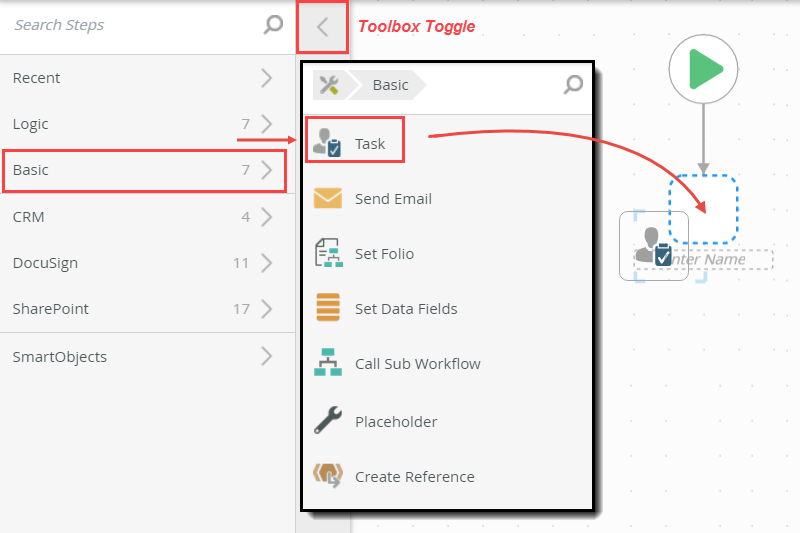
Accessing steps in the Toolbox
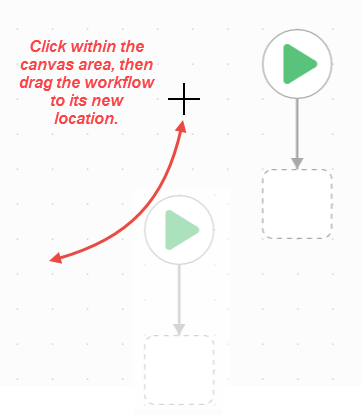
The Design Canvas is where you drag and drop the steps you need for constructing your workflow. You can move the workflow around by clicking within the canvas, then dragging your mouse to a new location. This is helpful if your workflow is larger than your browser screen.
Moving the workflow around the design canvas
The Configuration Panel contains the settings for each step. After highlighting a step on the canvas and expanding the Configuration Panel, the Configuration Panel will display a series of tabs. The tabs are specific to the step type. The Configuration Panel also contains the Context Browser. The Context Browser provides access to variables, functions, SmartObjects, and workflow variables.
Accessing step tabs in the Configuration Panel; expanding the Context Browser
- Now that you have a basic idea of the design environment, you can begin building your workflow. The first step you will add is a Task step. The Task is a user step and you will assign it to the workflow originator (the person who started the workflow). The originator needs to make a simple decision, football or soccer. The workflow will continue along a path based on the decision made.
Expand the Toolbox, then expand the Basic node. Drag and drop a Task step into the placeholder just below the Start step. (The Start step has a green triangle).
- Select the Task step (it will have a bold blue border), then expand the Configuration Panel.
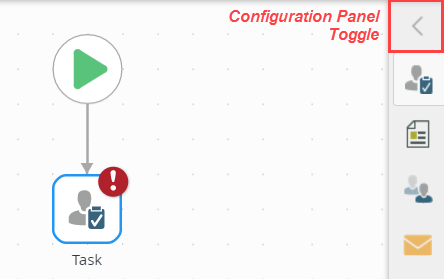 When adding a step to the workflow design canvas, you may see a red warning badge. This badge simply indicates the step has required configurations. When you expand the Configuration Panel, the required configuration is also flagged.
 -
Now, you will begin configuring the step. The Configuration
Panel contains tabs that you work through to complete the step's
settings. Begin by clicking the first tab, the Task tab.
This is the tab where you configure the actions, or decision
options, the task recipient can select. Locate the Actions section. Click the Add icon. Highlight and delete the action watermark, then enter
Football
for the first action. Click the Add icon once again and add a second action called
Soccer.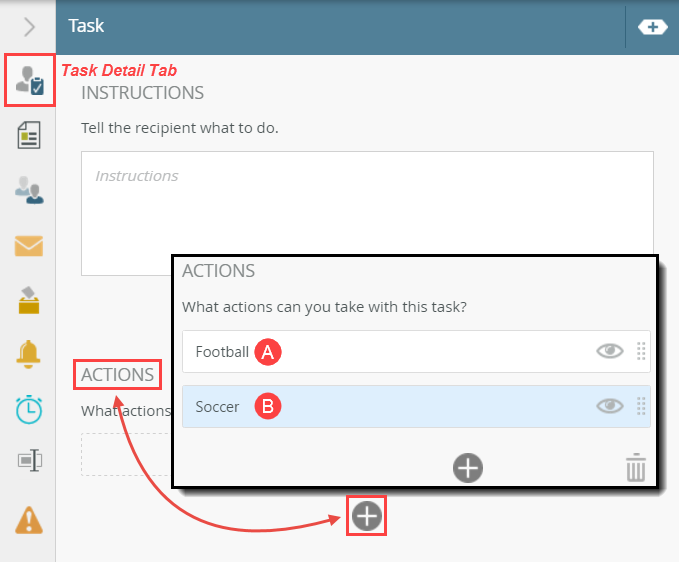
- Next, you will assign the task to a recipient. A recipient is a user or group that must respond to the task for the workflow to continue. In this case, you will assign the task back to the originator, or person who started the workflow in the first place.
While still in the Configuration Panel, click the Recipients tab. Confirm the default recipient is Originator. By assigning the task back to the originator, you can start and test the workflow as the same user. There are no other changes to the Recipients screen.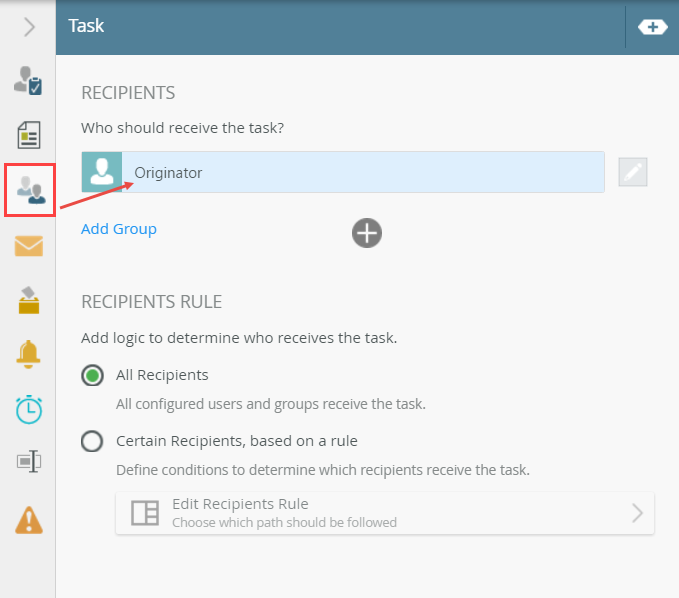
- Next, you will configure the task notification email that is sent to the recipient. This email lets the recipient know they have a task assigned to them. The email contains the two actions that you configured earlier (Football and Soccer). The email also contains instructions on how to respond to the task.
You can use the default email message template, or
you can choose to customize the email with your own
content. In this application, you will customize the
email message.
Click the Notification tab. Check the boxes to Send email task notification and Customize Notification. For the Subject line, enter
Choose your preferred sport
then enter the following for the message Body, just under the Dear Participant line:
Which sport do you prefer? Reply to this email with either "Football" or "Soccer" as the message body.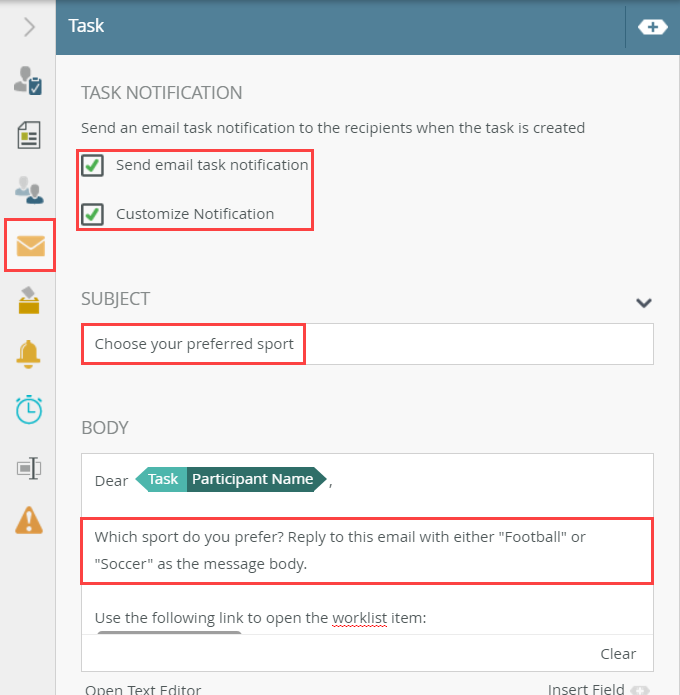
- The last configuration is to give the step a meaningful name.
This helps you to tell at a glance what the step does. This is especially useful for larger workflows that contain many of the same step types. Click the General Properties tab. For the Name, delete the default entry. Enter
User Decision
then collapse the Configuration Panel.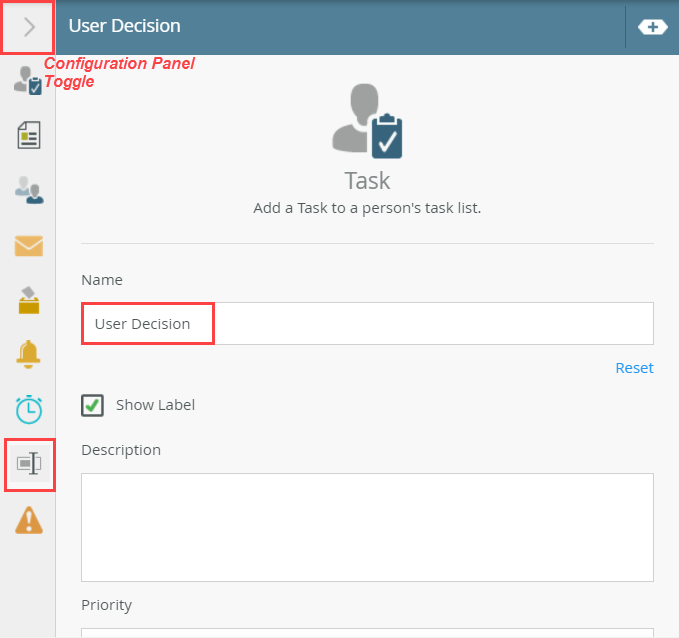
- Add a Decision step and connect the User Decision step to the new Decision step. The Decision step generates the outcome lines for the actions you configured in the Task step. In this case, the actions are Football and Soccer. If needed, you can also apply rules to the decision step outcomes. For example, you might have two approvers for a particular task and a rule that states both approvers must approve the task before the workflow can move on. You would set this rule in the Decision step.To return to the main Toolbox menu, click the Toolbox icon in the breadcrumb bar. You'll want to return to the main menu each time you need to change Toolbox categories. In this step, you are going from the Basic category to the Logic category.
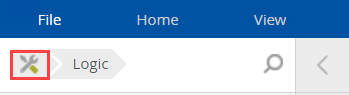
- Expand the Toolbox, then expand the Logic node. Drag a Decision step below the Task step.
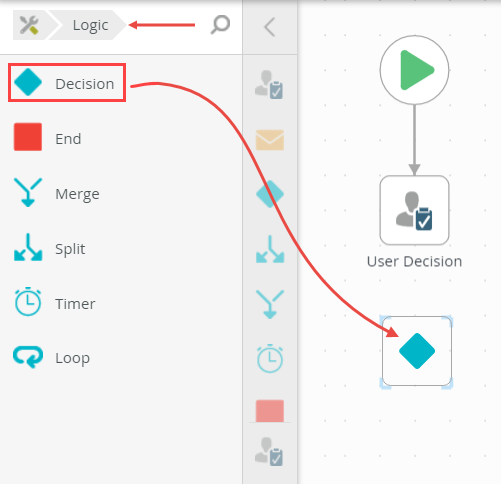
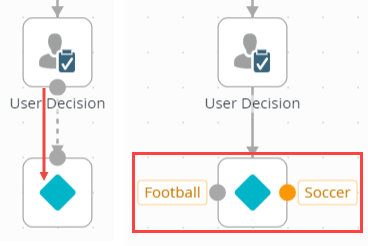
- Connect the User Decision step to the Decision step. Hover over the bottom border of the User Decision. (You may have to click within the design canvas to focus your mouse.) A handle will appear. Click and drag the handle into the Decision step. Notice the Decision step displays the two outcomes from the User Decision step (Football and Soccer).
- Click to highlight the Decision step. Expand the Configuration Panel. Click the Decision Detail tab. Notice the two actions under the Decisions heading. When you connected the two steps, the actions were transferred from the User Decision step to the Decision step. Take a minute to review the settings. For this tutorial, you will use the default Decisions Rule settings. However, you can create custom rules to add conditional statements to your outcome rules if desired.
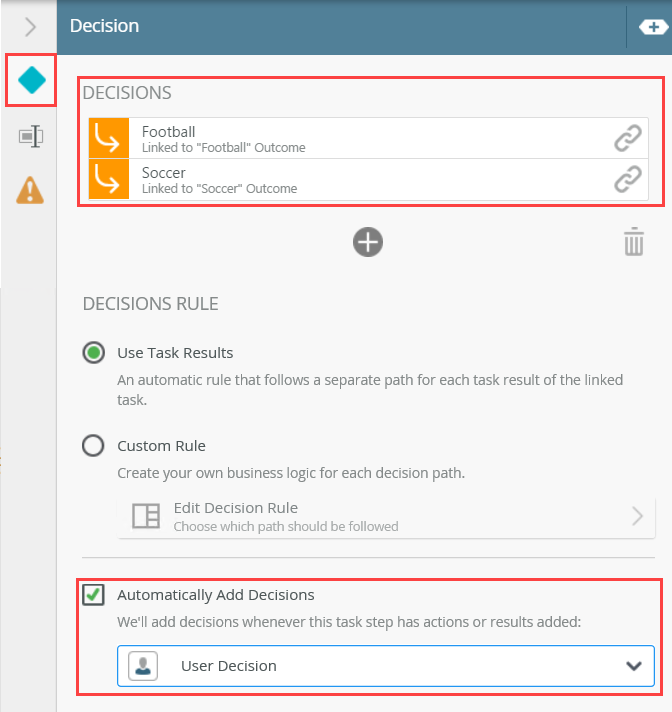
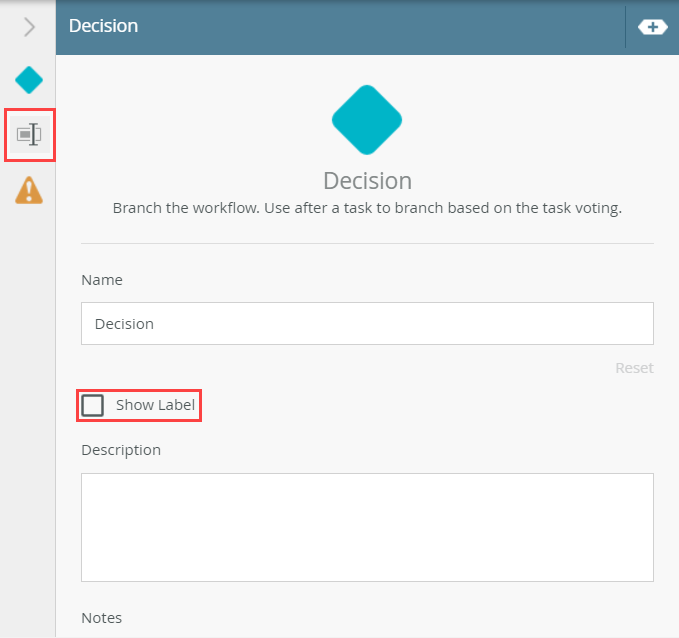
- Click the General Properties tab. Confirm the option to Show Label is unchecked. This step is connected to the User Decision step, so it is logical that the two steps work together. You should label Decision steps if they are not directly related to another step. There are no further edits, so collapse the Configuration Panel.
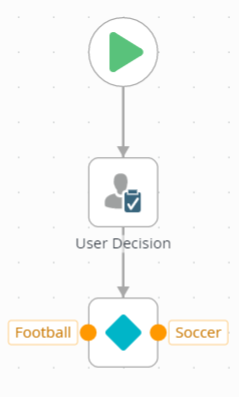
At this point, your workflow should look like the image below.
- Expand the Toolbox, then expand the Logic node. Drag a Decision step below the Task step.
Review
In this step, you created the Hello World Workflow. You added a (user) Task step and added two actions: Football and Soccer. You assigned the task to the workflow originator, then customized the task notification email. You added a Decision step that generated two outcomes lines, one for each action. In the next step, you will add Send Email steps to each of the outcome lines.