Create a SmartObject reminder
Use this option to add a SmartObject reminder that calls a SmartObject method after an interval, or on a specific date and time. You can create multiple SmartObject reminders on the same step.
For example, your organization may have strict Service Level requirements in place. If a user task step is not complete after a certain amount of time has passed, you may want to call a SmartObject method to insert a Service Level Exception entry into a database for reporting purposes.
-
With the Task step selected, click the Reminders tab.

- Click the SmartObject Method link.

- The SmartObject Item reminder shows.
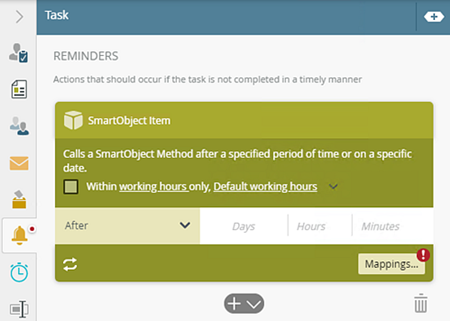
The following table explains the reminder options available:
Option Explanation How to Use SmartObject Item title Use this to edit the title of the reminder. 
Click the SmartObject Item title to edit it. Within Working Hours Only Within working hours only allows you to set the reminder to take the specified working hours into account when calculating when the reminder should occur. This function applies when either the On Date or After option is selected. If you select one of these options, the reminder will execute on a specific date or after the set time, but take working hours into consideration. If you don't select the Within Working Hours only option, the reminder does not take working hours into consideration (so in some cases, the reminder actions could occur sooner, which may not be when people are in the office).
For example: suppose that you want to send an email reminder, and you configured the reminder to run 30 minutes After. You also configure this reminder to happen within working hours, and you selected the Sales team working hours zone, which is set up as Monday through Friday, 8 am - 5 pm.
- Suppose the task starts at 2PM on a Friday. Since this is still within working hours for the Sales team, the system will send the reminder email at 2:30PM, because 30 minutes of working time have elapsed.
- Now suppose that the task starts at 10AM on a Saturday. Since this time falls outside of working hours for the sales team, the system waits until working hours start at 8AM on Monday, and then starts counting down. This means that the system sends the reminder email at 8:30AM on Monday, once 30 minutes of working time have passed.
To define the working hours for your organization, click the working hours link. You must have access to, and admin permissions in, Management to set the working hours. For more information on how to set your working hours see Work Hours. Keep in mind that working hours are based on static time zones because you select a specific time zone when defining the working hours. If you want the time zone to be dynamic and change depending on some condition (such as a user's geographical location), select the Type/Construct my own option to add logic that determines which working hours configuration to use when calculating the time limit.
Select the Type/Construct my own option to configure which working hours should apply to your reminder. You can use this approach to specify a dynamic value for the working hours, based on some logic. This option is useful when you have global users across multiple time zones. You can, for example, use the result of a SmartObject method and/or functions to determine where a specific user is based, return the name of that working hours zone, and then use the returned working hours zone value in the Within working hours only option to match their location.
Type values or create dynamic values by dragging Functions, Fields, SmartObjects and Workflow-related items from the Context Browser into the fields.
The Default working hours menu has a list of working hours defined by your administrator. If you have not defined any working hours, the Default working hours option is selected.
By default, the Within Working Hours Only option is not checked.
Check the Within Working Hours Only box.
Click the working hours link to edit or add the working hours parameters.
Click the Default working hours menu to select a preconfigured set of work hours or select Type/Construct my own to configure a dynamic time zone.
After Use this to configure a deadline after a task is assigned such as 7 days. After is the default option and allows you to set days, hours, minutes, and seconds. You can use a single field or multiple fields, such as two days or one hour and 30 minutes. You cannot use decimal values such as 9.5 hours. Instead use 9 hours and 30 minutes.

By default, the After option is selected.
Click the After option. Enter values in days, hours, minutes, and seconds.
Type values or create dynamic values by dragging Functions, Fields, SmartObjects and Workflow-related items from the Context Browser into the fields.
On Date Use this to add a deadline on a specific or calculated date. Use the calendar picker to set a date or use a function such as Tomorrow.
Select the On Date option. Click the calendar picker to show the date picker then select a date using the calendar control.
Type values or create dynamic values by dragging Functions, Fields, SmartObjects and Workflow-related items from the Context Browser into the fields.
Before Deadline Use this to set the reminder some time before the task is due.
Set days, hours, minutes, and seconds. You can use a single field of multiple fields, such as two days or one hour and 30 minutes. You cannot use decimal values such as 9.5 hours. Instead use 9 hours and 30 minutes.If you have not defined a deadline, validation indicators show on both the reminder and the Deadline tab of the step. For more information see Error Console and Indicators.
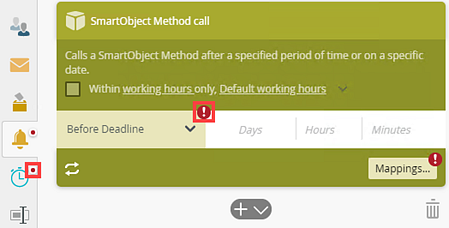
The Within working hours option does not apply when you select the Before Deadline option. When you configure the task reminder to send an email to someone else before the deadline, Work Hours are not taken into consideration. If your company's working hours are, for example, Monday through Friday, 8 am - 5 pm, and the task reminder is due outside of those hours, the reminder is sent at that time and does not wait until the next working hour.
Select the Before Deadline option.
Type values or create dynamic values by dragging Functions, Fields, SmartObjects and Workflow-related items from the Context Browser into the fields.
Repetitions / Intervals Use this to specify reminder intervals and repetitions, select the repeat icon to show:
- Interval - Enter values in the Days, Hours, Minutes or Seconds fields. Enter values individually or in combination.
- Repetitions - Type values (numbers only) or create dynamic values by dragging Functions, Fields, SmartObjects and Workflow-related items from the into the fields. Select the infinity icon to set infinite repetitions.
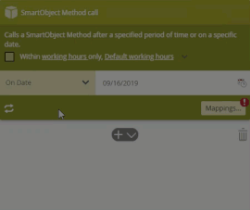
- When you configure On Date or Before Deadline, make sure to specify both an interval and a repetition value.
- When you use the Infinite setting in the Repetitions field and the interval resolves to zero (0), the reminder will not behave as expected at runtime. Ensure you manually configure an interval greater than zero (0), or if using dynamic values, ensure the value does not resolve to zero (0) or and empty value.
Click the repeat icon to set reminder intervals and repetitions. Mappings... Use this to configure the SmartObject. Here you select the SmartObject, method and the identifier, specify filters and configure the input and output mappings. You can also create a reference and specify what you want to return from the selected method. For detailed information see the description table below.
The red indicator on the Mappings... button shows that you need to configure the mappings.
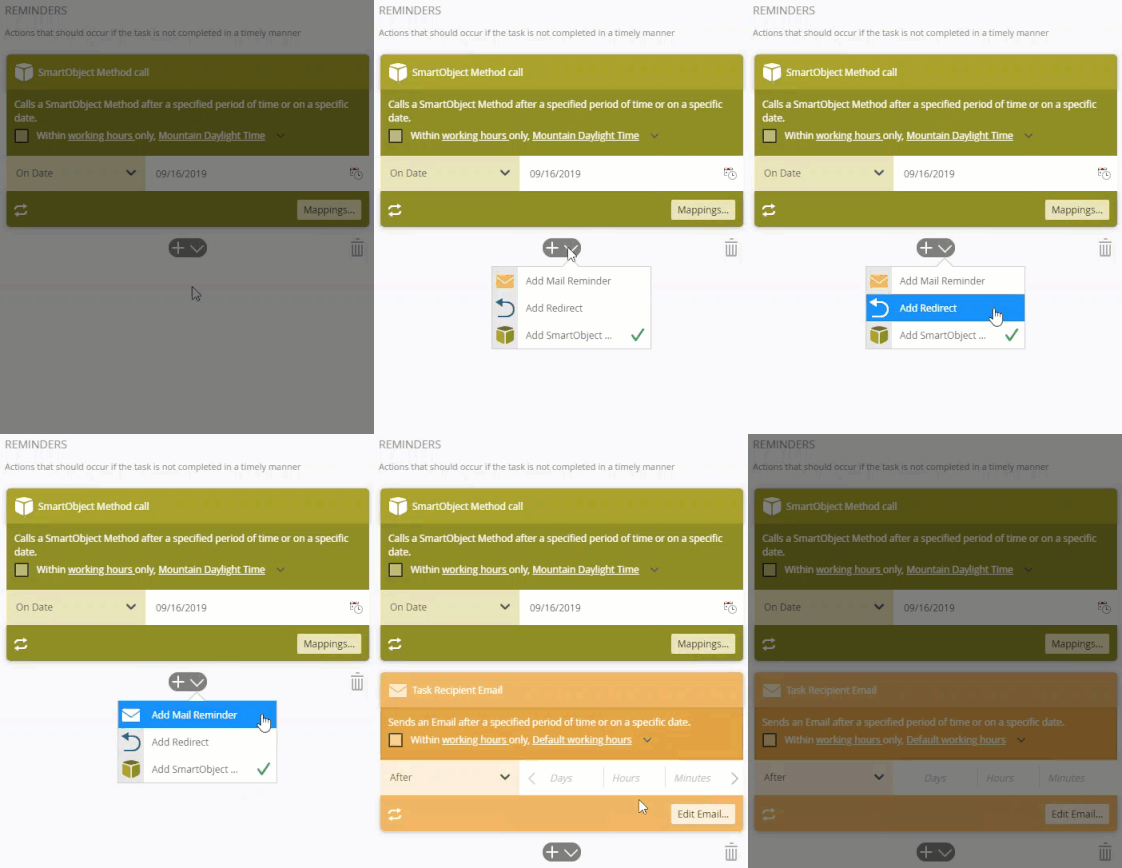
Only SmartObjects that you have access rights to will show in the Configuration Panel. The list of SmartObject and the categories that appear might be different, depending on your rights and environment.Click the Mappings... button to customize the SmartObject. Add / Toggle / Trash bin buttons Use the Add (+) button to add more reminders.
Use the Toggle button to open the menu and add a different reminder type.
Use the Trash bin button to delete added reminders.
Click the Add button to add more reminders.
Click the toggle button to toggle between the different reminders. Click the Trash bin to delete reminders.
- Check the Within working hours check box to enable this feature. This allows you to set the reminder to occur within specified working hours. If you select one of these options (On Date or After), the task expires on a specific date or after the set time within the specified working hours. If you don't select this option, the deadline does not take these hours into consideration (and in most cases the deadline or reminder occurs sooner).

- You can define working hours on your environment to store the working hours for your organization, or to create different zones for different departments and offices in the organization. To configure them, click the working hours link. You must have access and admin permissions in Management to set the working hours. For more information on how to set your working hours see Work Hours. In this example, five different working hours are available in your organization.

- To view and set the predefined working hours in the reminder, click the Default working hours link menu. By default, the Default working hours option is selected. In this example, select Central Daylight Time from the menu.
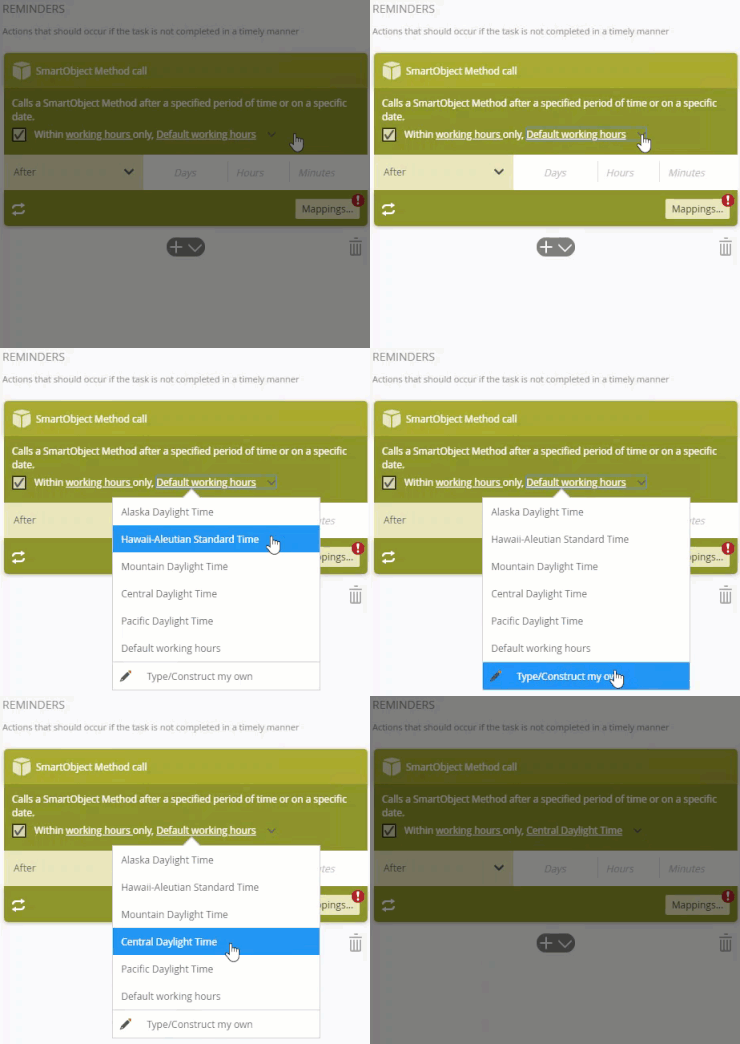
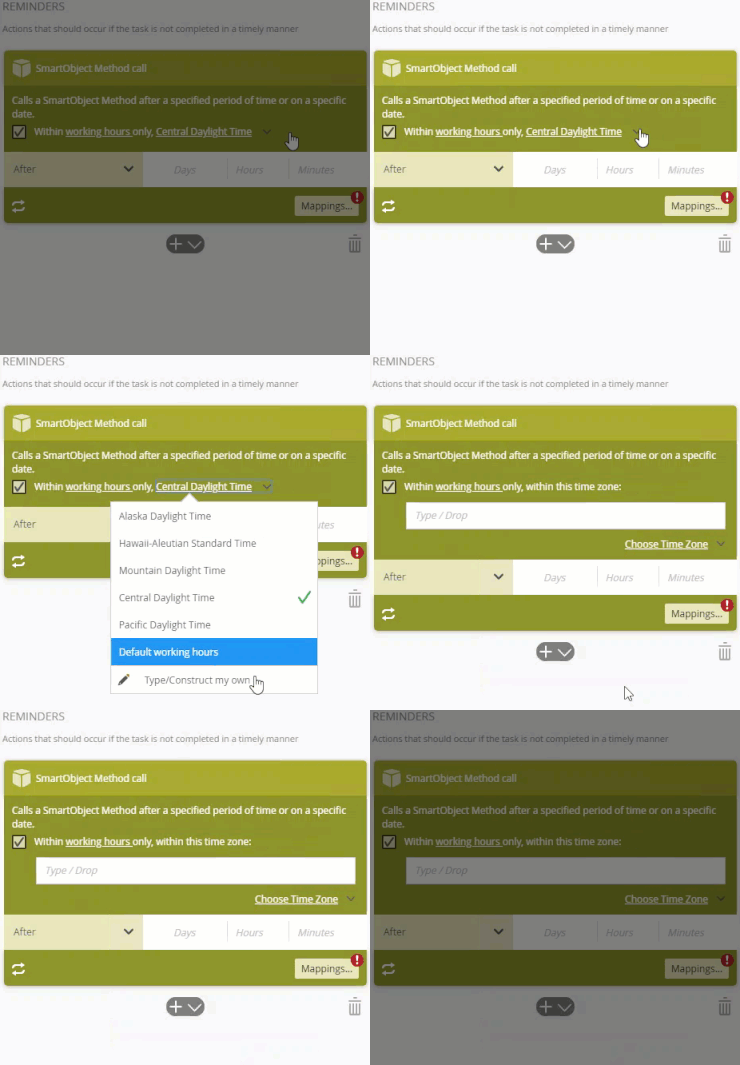
- To create a dynamic time zone, select the Type/Construct my own option.
Here you can specify a dynamic value for the working hours. This option is useful when you have global users across multiple time zones.
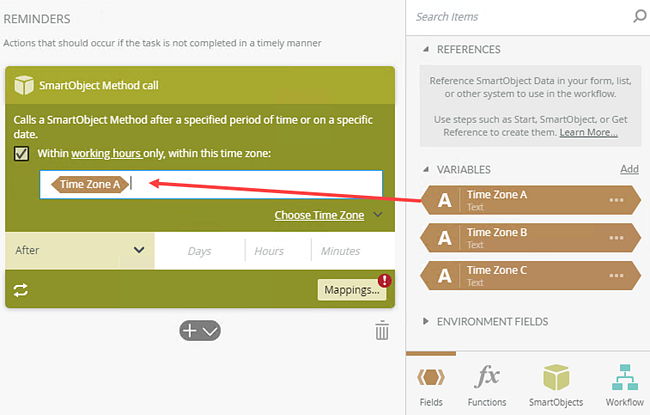
- You can use a combination of SmartObject calls and functions to determine where a specific user is based, and then use a variable in the Within working hours only option that matches their location.
Type values or create dynamic values by dragging Functions, Fields, SmartObjects and Workflow-related items from the Context Browser into the fields.
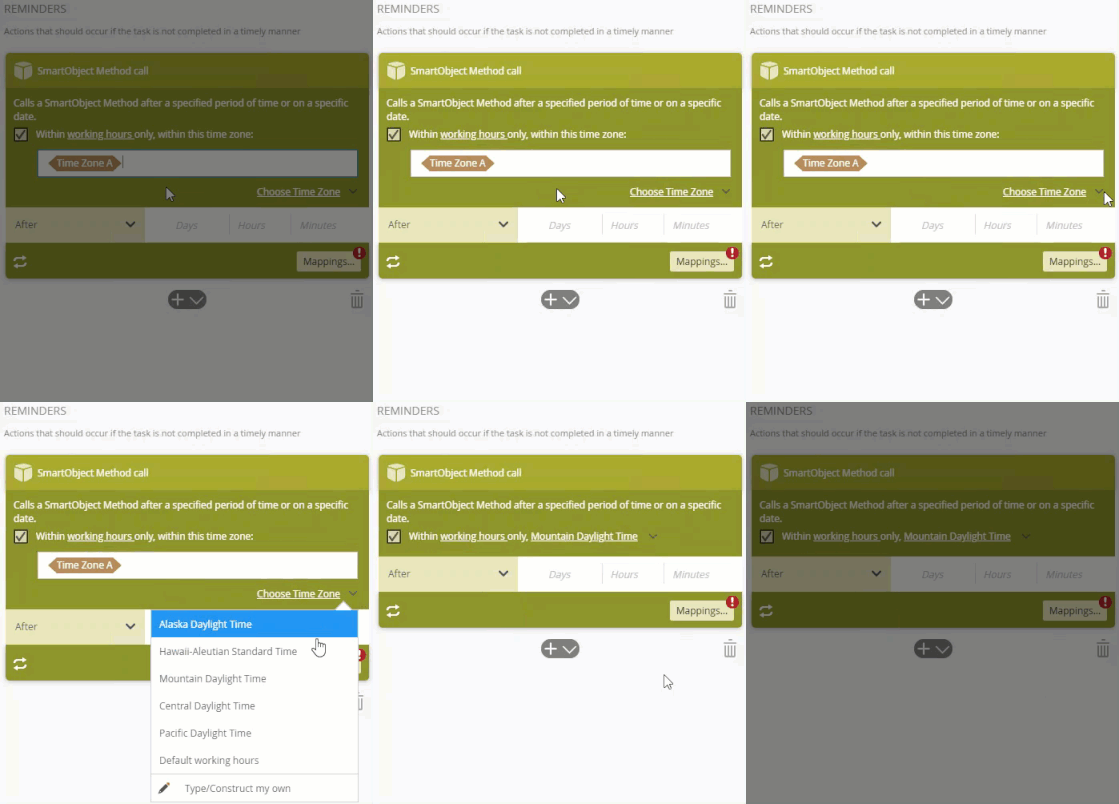
- To revert to static working hours, select one from the Choose Time Zone link menu.
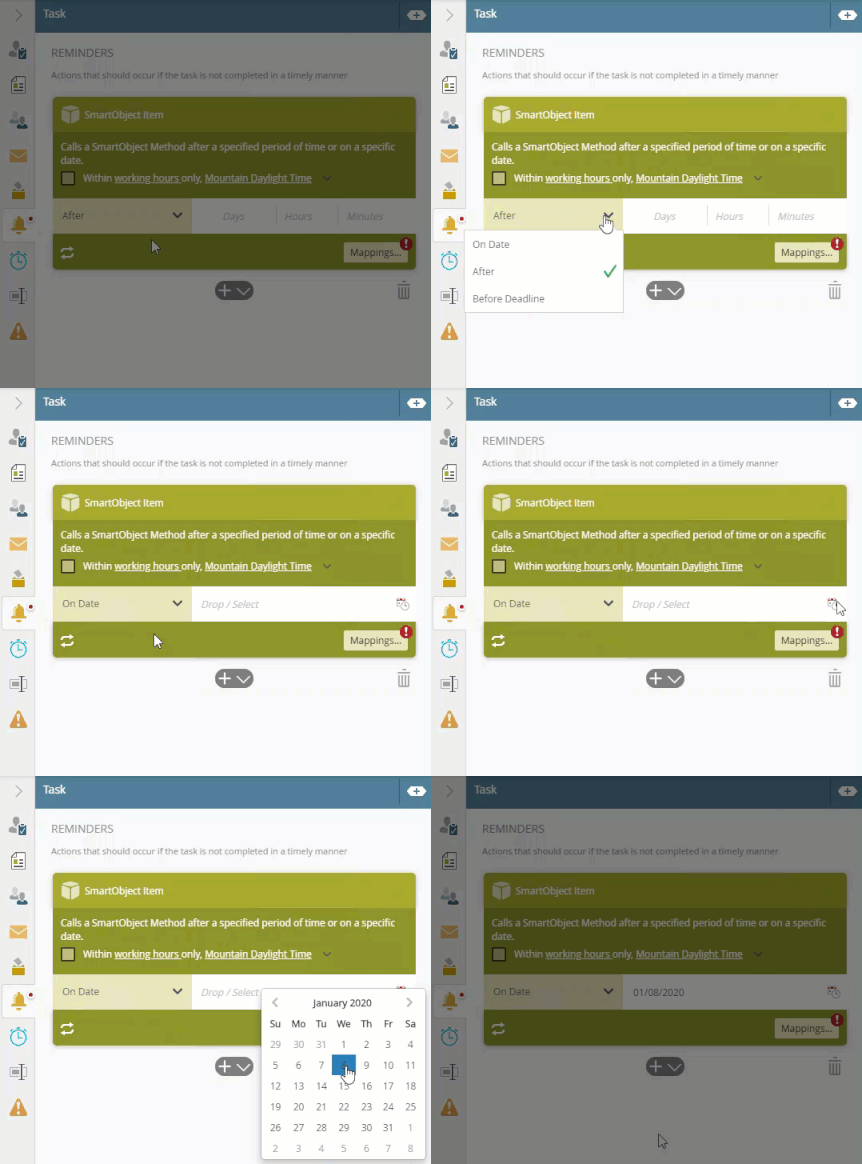
- From the menu, select one of the following options; On Date, After, or Before Deadline. In this example the On Date option is selected. Use the calendar picker to select a date or drag a dynamic SmartField into the field. When you select the After or Before Deadline option, you can enter values into the field. Enter values in days, hours, minutes, and seconds. You can use a single field or multiple fields, such as two days, or one hour and 30 minutes.
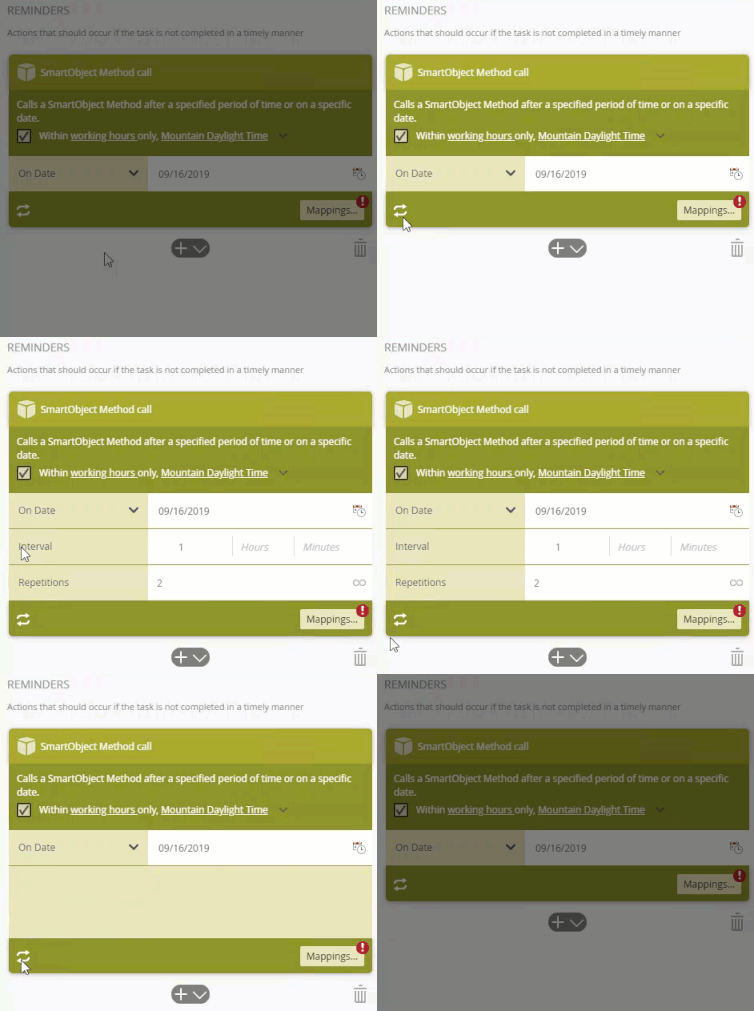
- Click the repeat icon to configure the repetitions or intervals. Click the infinity icon to set an infinite repetition.
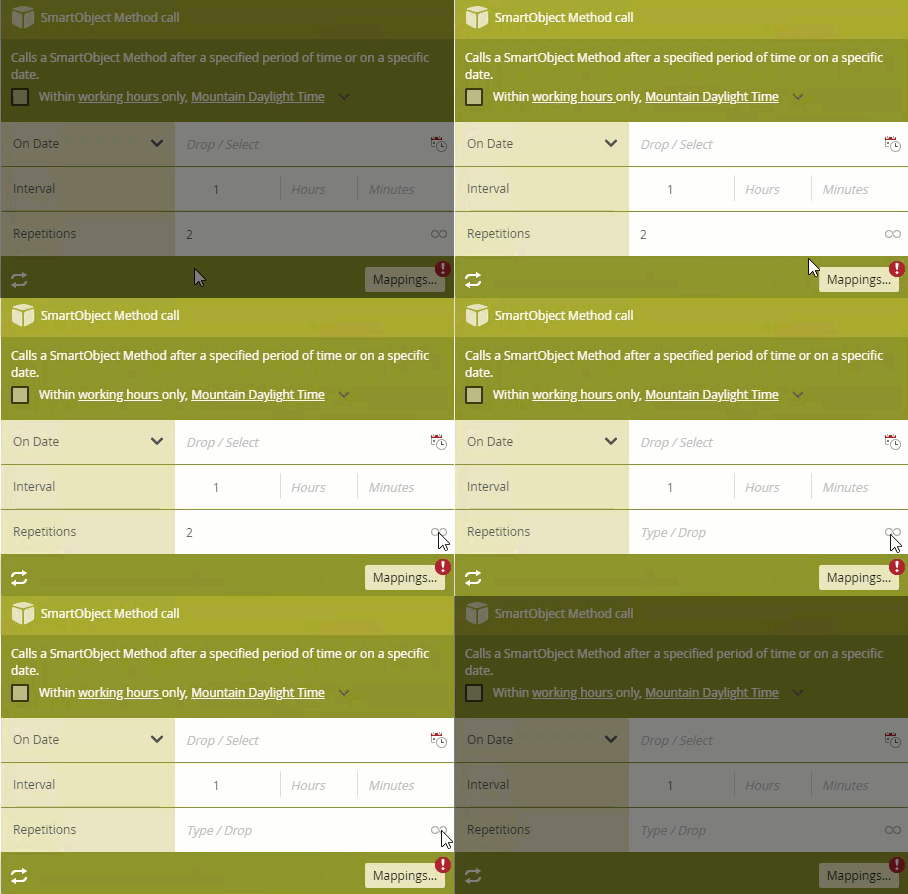
- Use the infinity icon to toggle between edit and infinite mode.
- Type values or create dynamic values by dragging Functions,
Fields,
SmartObjects and
Workflow-related items from the Context Browser into the fields.

- Click Mappings... to expand the Configuration Panel.

- The Configuration Panel shows.
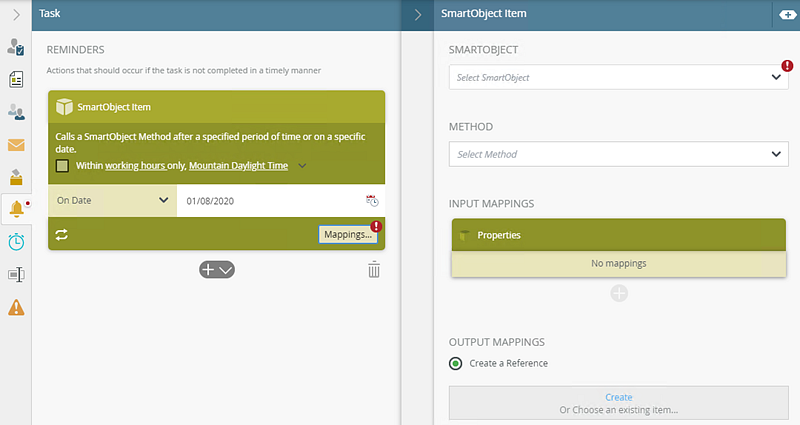
The following table explains the options available in the panel:
Option Explanation How to Use SmartObject Use this to select the SmartObject.
Click the menu and select Browse to browse to the SmartObject. Method In this section, select the method for the SmartObject. Click the menu and select the required method.
The methods available for each SmartObject depends on the methods created while designing the SmartObject.
Click the menu to select the applicable method from the list.
Identifier Use this to specify an identifier. When you select a SmartObject the workflow designer shows available methods in the Method field. Some methods, such as the Get List method, gives you the option to select an identifier to identify unique records for reference purposes.For information on using references, see Using References.
Click the menu and select the applicable identifier from the list. Filters The filter allows you to specify parameters and filters to return data.
Applying filters is optional. Use operators such as Equal, Not Equal, Starts With, Ends With, and Contains.
Parameters are sometimes required - it depends on the SmartObject method selected. If the method has parameters, you probably need to provide values for those parameters to execute the method.
Click the Add Filter link to add filters.
Select filter values from the drop-down menu.
Click the operator button to select the operator.
Click Add to add additional filter properties
Type values or create dynamic values by dragging Functions, Fields, SmartObjects and Workflow-related items from the Context Browser into the fields.
To delete properties, select them and click the Trash bin.
Input Mappings The Input mapping section maps SmartObject input fields to variables. Both input properties and parameters can be required or optional.
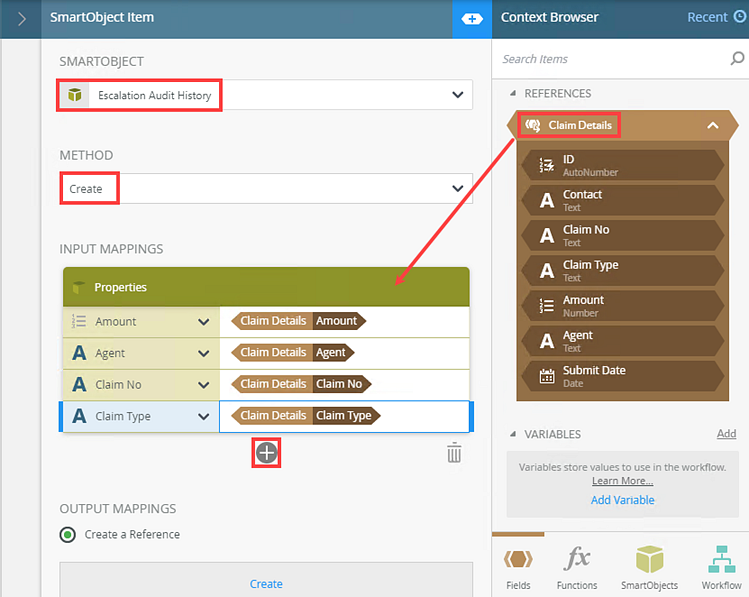
When you select the SmartObject and method, only required properties show in the Input Mappings section. A lock icon indicates these required properties. You can add additional properties of the SmartObject by clicking the add button and selecting them from the input mapping list as shown here.

Add data into the required properties. Click Add to show a list of available fields / parameters to add and configure.
In the property field, type a value, use inline functions, or dynamic fields, by clicking Add to expand the Context Browser. Within the Context Browser, select inline functions and fields from the Functions, Fields, SmartObjects and Workflow categories. Click and drag the function into the property field.
To remove an added property, select the property and click Trash bin.
Output Mappings Create Reference Use this feature to create a reference to the SmartObject to use from other steps within the workflow.
You can create a reference to a SmartObject using the Create Reference step, but it's recommended to rather create the reference using this option.
Select the radio button to enable this option.
Click the Create link to create a reference.
Click the Edit link to edit the reference name. If you edited the reference name and want to reset it, click the Reset Name link.
Map to Variables The Output mappings for the SmartObject are listed in this section. These mappings are used to store any return values from the SmartObject method. The return property can be mapped to a Variable, XML field or another SmartObject property.
By default, this option is not selected.Select the radio button to enable this option.
Click Add to add Variable Properties.
Click Add to display a list of available fields / parameters to add and configure. In the added property field, type a value, use inline functions, or dynamic fields, by clicking Add to expand the Context Browser. Within the Context Browser, select inline functions and fields from the Functions, Fields, SmartObjects and Workflow categories. Click and drag the function into the property field.
To remove an added property, select the property and click Trash bin.
Do not map outputs No output mappings will be set.
Select the radio button to enable this option.
Select this option if no output mapping is required
List Options Use this to specify what records you want to return from the selected method. Example: If a List method is selected you can select between All, First, Last and Index. The returned data can be ordered by a selected property within the SmartObject and sorted either ascending or descending.
Click the down arrow to expand this section. From the menu, select what data to return.
Check the Ordered By check box to enable this function.
From the menu, select the property to order by.
Click the Ascending or Descending radio button to select order.
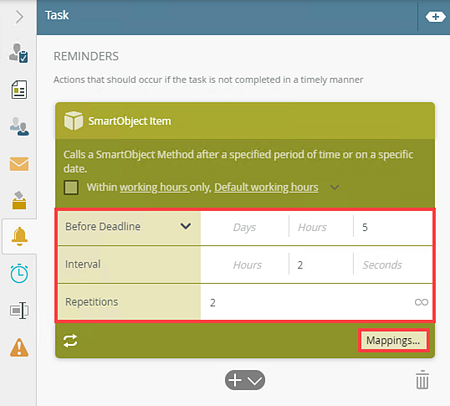
- Configure when and how many times to call the SmartObject method. For example, you might configure the SmartObject reminder to write an entry to a SmartObject five minutes before the deadline, and then in two-minute intervals thereafter, repeating twice. The example below shows the configuration of this particular requirement:
- Click Mappings... to configure the SmartObject, method and property values. For example, you may want to call the Create method of a Escalation Audit History SmartObject and use values from the Item Reference when creating the record. The example below shows the configuration of this particular requirement:
Using the example configuration of the Escalation Audit History SmartObject in Step 16 and 17, this is the eventual result of the reminder at runtime: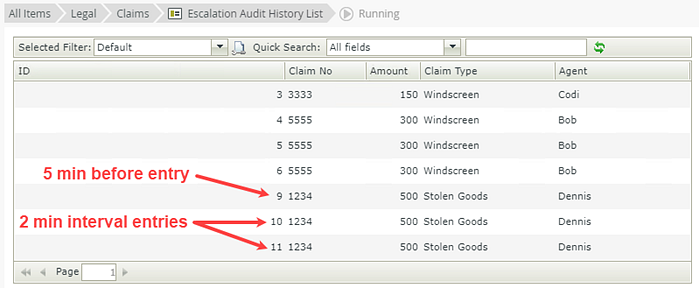
- Click Add to add additional reminders. Click the Trash bin to delete reminders.
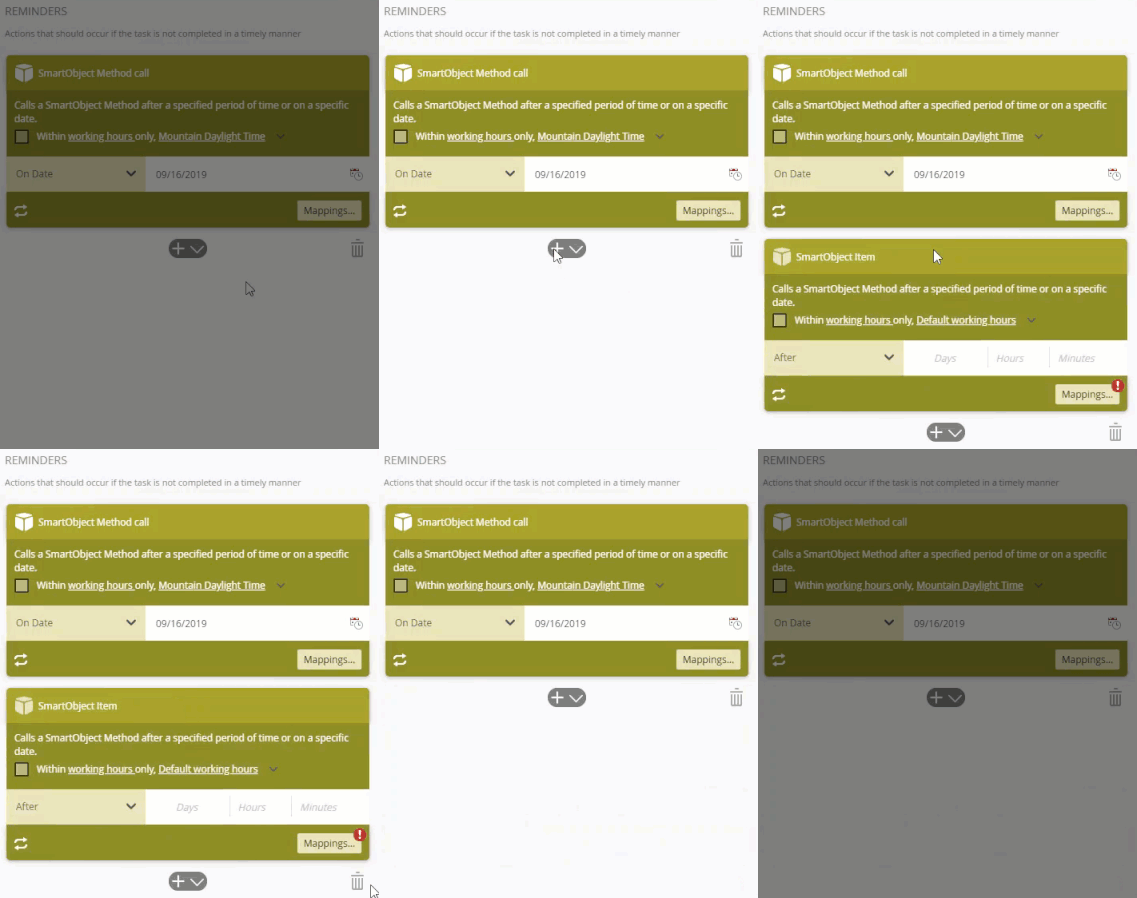
- Click the toggle button to add a different reminder.
-
Your changes are automatically saved.

