Workflow Designer overview for experienced workflow builders
If you’ve been working with the product a long time, you will find it very easy to become familiar with the new workflow design tool. To help you get up to speed with the new Workflow Designer, review this topic and watch the demos included here to familiarize yourself with the new terms and functionality.
To help you get familiar with the new workflow designer, we've divided this topic into the following sections:
The Basics
Use this section to learn the basics about the Workflow Designer and how to take advantage of its features and functionality.
Configuration-based design
Configuration-based Workflow Steps make it easy to layout and build your workflow. You will no longer use the wizard-based Next and Back buttons to configure workflow steps; instead, you use the Toolbox and Favorites bar to drag steps on, and the Configuration Panel (which gives you tabbed access to all settings) to configure the steps immediately or at a later time. To see an example of this configuration-based design experience in action, take a look at this video: Configuring the User Task.
The workflow designer is divided into different sections, as identified in the screenshot below. (The most important sections are described in more detail below the image)
Understanding the layout of the workflow designer
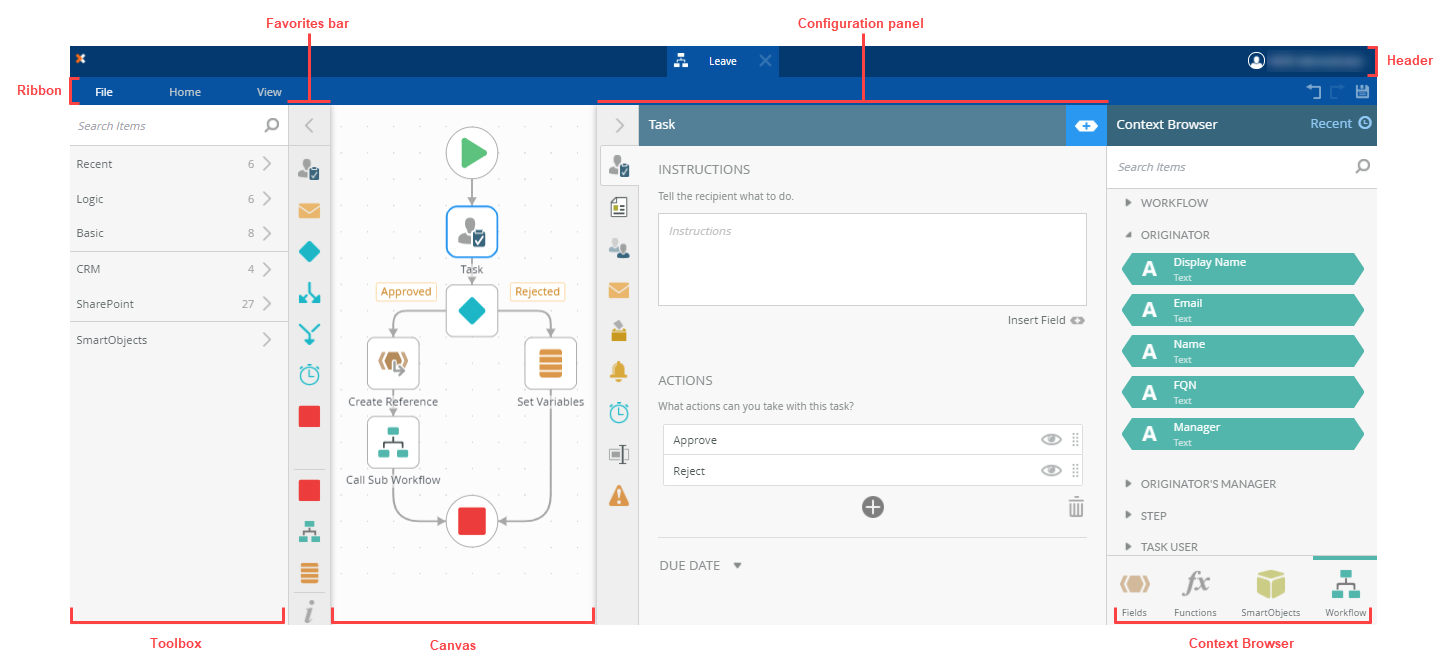
The Toolbox contains the various kinds of steps you use to build workflows, for example User Task Steps, Send email Steps, SmartObject steps and so on. You will recognize most of these steps from your previous experience. When building your workflow, you will drag steps from the toolbox into your workflow, and then configure these steps. These steps are organized into categories to help you locate steps faster, and the Favorites bar and Recently Used section let you access the most-frequently used steps easily. Read more about the toolbox…
You use the Configuration Panel to configure steps on the workflow canvas. The configuration panel is basically the replacement for the previous Next/Back-wizard steps and the right-click Properties method to access step properties. Now, all the configuration settings for a step are available from the Configuration panel. Note that the properties tab bar will change when you select a step (based on what that step is used for), and this is where you can configure the available settings for the step. Read more about the configuration panel…
The Context Browser, located on the right side of the canvas, is a more powerful version of the context browser you are familiar with. It allows you to drag context fields and functions into the configuration panel to configure steps. When you're configuring a step, click the expand icon to open the Context Browser. In this area, you have access to different types of values, such as workflow context, inline functions, SmartObjects, and References. Read more about the context browser…
Opening the context browser
Use the Rules Designer to create custom business logic to, for example, direct the flow of the workflow, build more advanced task routing logic, and build other logic into your workflow. Read more about the Rules Designer…
The Rules Designer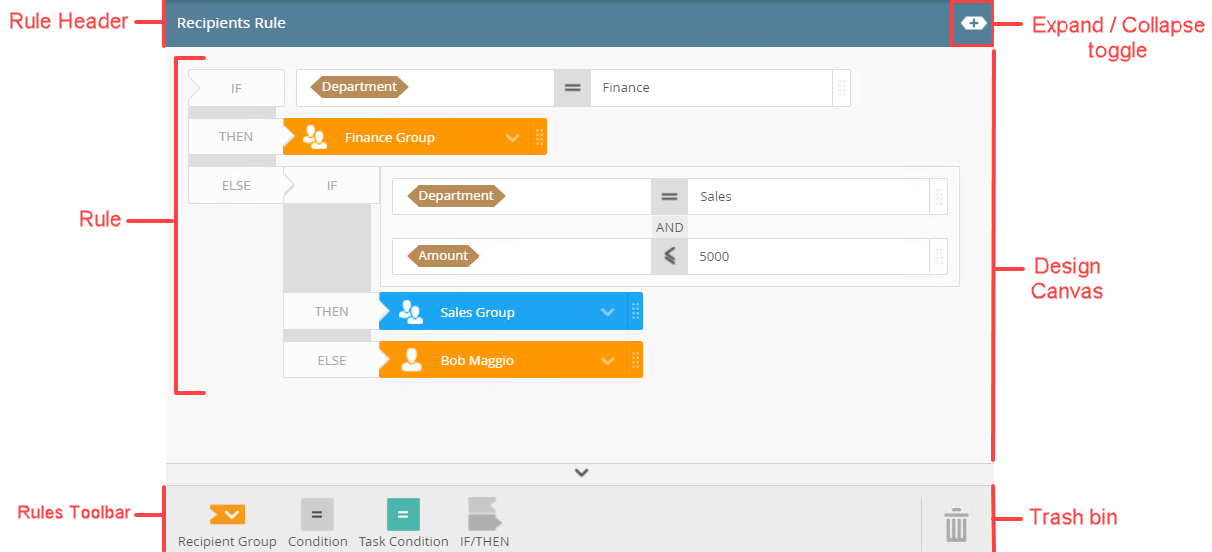
The SmartField Composer allows you to configure SmartFields with inline functions and SmartObject method calls in conjunction with the Context Browser. Drag inline functions and SmartObjects from the Context Browser into a SmartField (for example the body field of a Send Email step) and the SmartField Composer opens. Here you can build more complex statements using fields and functions. To see an example of the SmartField composer in action, take a look at this video: Using a SmartObject in the SmartField Composer. Then you can read more about the SmartField Composer...
New Colors and Shapes
When working with the context browser, you'll see different colors and shapes depending on the field type. This helps you to understand the type of objects that make up your SmartFields in your workflow. Read more about the use of colors in the workflow designer...
| Fields such as References, Variables and Environment Fields appear in brown and have angled edges. |

|
| Functions appear in gray and have rounded edges. |

|
| SmartObjects appear in green and have rounded edges. |

|
| Workflow context objects appear in teal and have angled edges. |

|
Working in the Designer
The designer automatically saves your workflow in the background as you edit, and you'll see the Save button activate while it's happening. You can also use the Undo and Redo buttons while building workflows. The ability to Copy, Paste and Cut steps is still available in the new design tool and can help you configure your workflow even more rapidly.
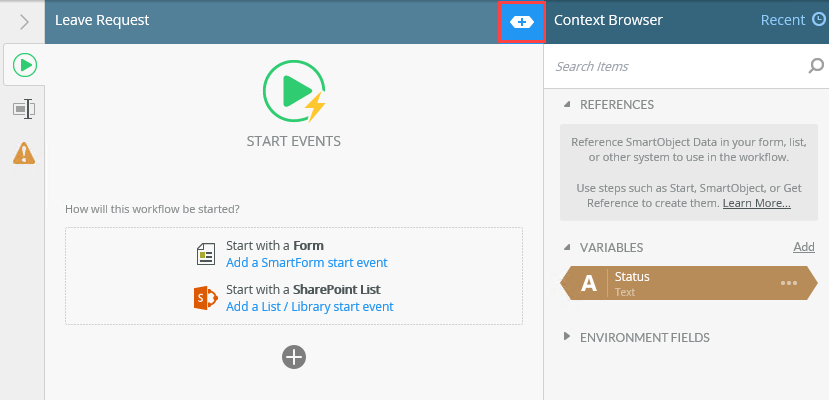
The Start Event
Like before, the Start Event determines how your workflow starts. On the Start Event's configuration panel, you can choose whether to start a workflow from a SmartForm event, or a SharePoint event triggered from a list or library. If your workflow doesn’t have a start event defined, you can also manually start the workflow or even schedule the workflow to start automatically, using the Management Site. Read more about starting a workflow.
Top 5 Differences
There are many changes to the workflow designer that you'll notice when you work with it. As an experienced workflow designer, here are the top five differences you need to be aware of:
-
Terminology: Although the new designer workflows are based on the same underlying workflow engine as the old designer workflows, some terminology and behavior is different.
- Activities and Events are now combined into a single item called Steps
- You can drag and drop Steps "on top" of each other to create a multi-step step, similar to how you may have had multiple Events in an Activity before.
- Escalations are now called Reminders
- Expiration is now called Deadline
- For Each loops are now simply called Loop
- Outcomes are now called Results
- Data Fields are now called Variables
- Item References are now called References
-
Accessing the Context Browser is a little different now, but still similar to what you're used to. When you're configuring a step, click the expand icon to open and close the Context Browser. Once the context browser opens, you have access to all the things you'd normally expect to see there, such as workflow context, inline functions, variables and references. For a demonstration of the context browser in action, watch this video: Customize the content of the Send Email Step.
The context browser
-
The new Rules Designer is where you build logic into your workflow. You can build fairly complex rules and nested if..else statements using this rule designer. For an example of the rules designer in action, watch this video that explains how to configure a more complex rule: Configure a voting scenario and then you can read more about the Rules Designer…
-
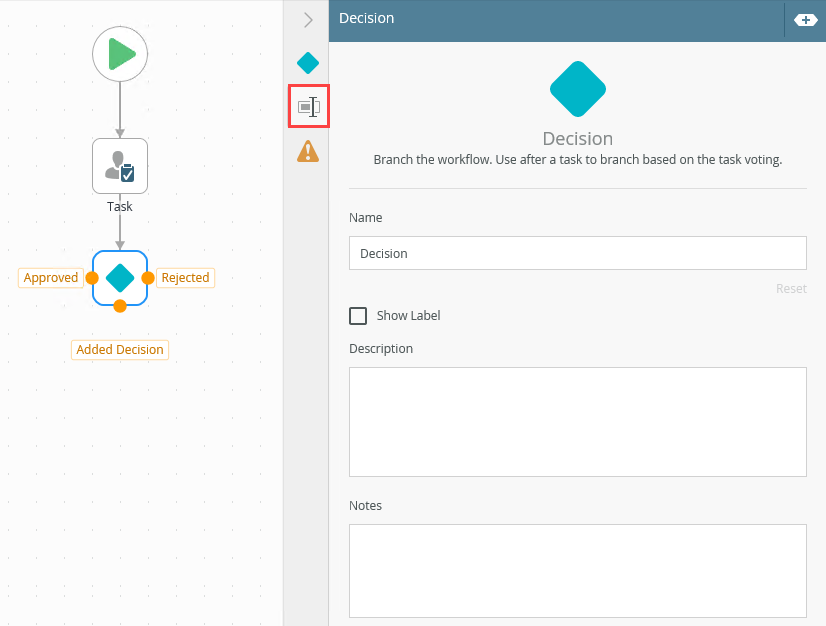
The Decision Step is a new way to represent decisions made in the workflow that affect the path of the workflow. If you need to branch the workflow, use the Decision Step. This new step allows you to keep all decision logic in one place, and makes the workflow diagram easier to read for those familiar with BPMN notation.
-
You can link this step with a Task step to automatically create lines for each Result (Outcome).
-
You can also connect the decision step to other steps if you want the workflow to branch based on some logic or criteria that can be evaluated at that point in the workflow. For example, an input value on a form.
-
-
New Capabilities: Take advantage of features that allow you to create more flexible and powerful workflows. These include:
- Task result logic and voting allows you to customize the logic to evaluate the outcome of other tasks in your decisions. Read more about task results...
- Multi-steps allow you to group two or more steps into a single, logical container. (If you are familiar with K2 Studio, this is similar to dragging multiple events into one activity.)
- Split / Merge steps: If you need to split the path of your workflow to do parallel tasks, and then bring them back together at a later point, use these steps. Read more about Split and Merge steps...
- The SmartField Composer allows you to configure inline functions and name them for later use. To see an example of the SmartField composer in action, watch this video: Replacing Text with the Replace Function and then read more about the SmartField composer...

Additional Information
Before you start working with the new designer, here are some other things you should know or might be wondering about.
- What happens to my existing workflows and other artifacts?
- Your existing workflows continue to run after upgrade, and all your existing artifacts will continue to work.
- You can maintain existing workflows using the design tool that you created them in, such as K2 Studio.
- There isn't an upgrade path to take existing workflows and convert them to workflows in the new designer automatically. You may want to take this opportunity to improve and streamline your existing workflows, or start by creating any new workflows you have planned with the new designer.
- Keep in mind that workflows you deploy using the Workflow Designer do not get Start/View/View Participate rights automatically assigned. Use Management after you deploy your workflow to allow users, groups, and/or roles to start and view workflow instances.
- What is different between the Visual Studio-based workflow designer and the new browser-based workflow designer?
See the Knowledge Base article KB002726: Comparison of capabilities between K2 4.7 Workflow Designers and K2 Five/K2 Cloud Workflow Designer for matrices that list the differences and equivalencies between the workflow design tools. - How do I know what’s been added, changed, or known issues there are in a release?
See the release notes