Workflow Designer overview for new application builders
You can use the Workflow Designer to rapidly build workflows and integrate these workflows with SmartForms and SmartObjects, to assemble powerful process-driven applications. Review this topic to get acquainted with the workflow designer, and familiarize yourself with its functionality.
To help you get familiar with workflows in the product, we've divided this topic into the following sections:
Introduction to workflows
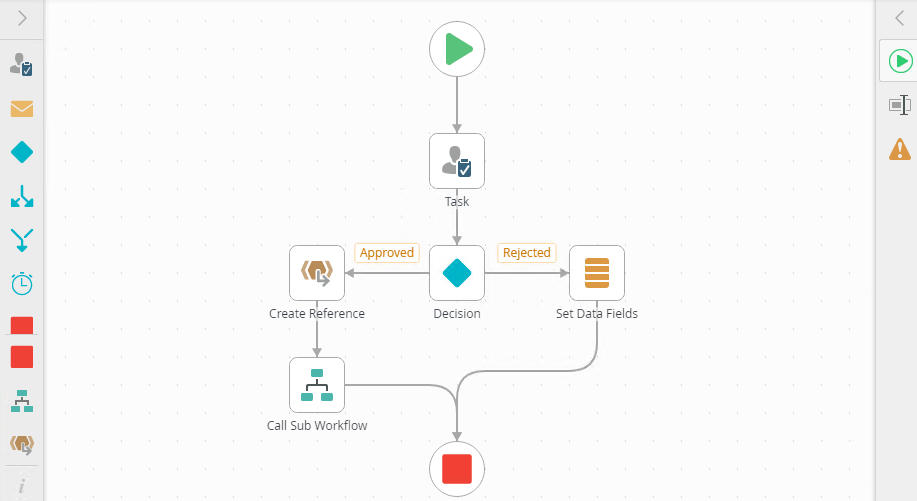
Workflows are essentially a defined sequence of steps that are performed by users and/or systems, and they provide the "business process" functionality in your application. The design of the workflow describes how tasks flow from one person to another (or from a person to a system), what decisions people can make in the workflow and how those decisions affect the "path" that the workflow will follow, when things need to happen, and how the product should perform server tasks in a workflow. You can build workflows with the Workflow Designer, which is a visual drag-drop-and-configure tool to build your workflow without writing any code.
An example of a workflow built with the workflow design tool
Basics of using the Workflow Designer
Use this section to learn the basics about the Workflow Designer and how to take advantage of its features and functionality.
Configuration-based design
Configuration-based Workflow Steps make it easy to build your workflow. You will use the Toolbox, Favorites bar, and the Configuration Panel to configure your workflow steps. To see an example of this configuration-based design experience in action, take a look at this video: Configuring the User Task
The workflow designer is divided into different sections, as identified in the screenshot below. (The most important sections are described in more detail below the image)
Understanding the layout of the workflow designer
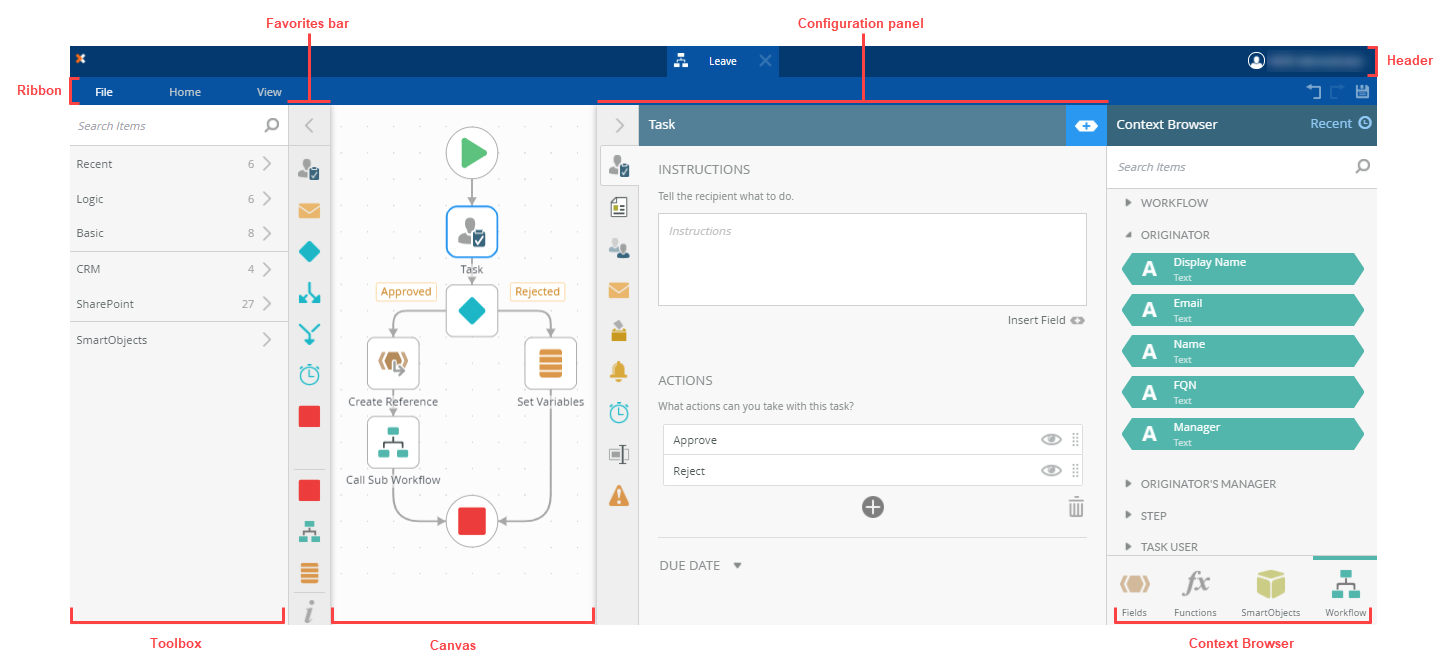
The Toolbox contains the various kinds of steps you use to build workflows, for example User Task Steps, Send email Steps, SmartObject steps and so on. When building your workflow, you will drag steps from the toolbox into your workflow, and then configure these steps. These steps are organized into categories to help you locate steps faster, and the Favorites bar and Recently Used section let you access the most-frequently used steps easily. Read more about the toolbox…
You use the Configuration Panel to configure steps on the workflow canvas. The properties tab bar changes when you select a step (based on what that step is used for), and this is where you can configure the available settings for the step. Read more about the configuration panel…
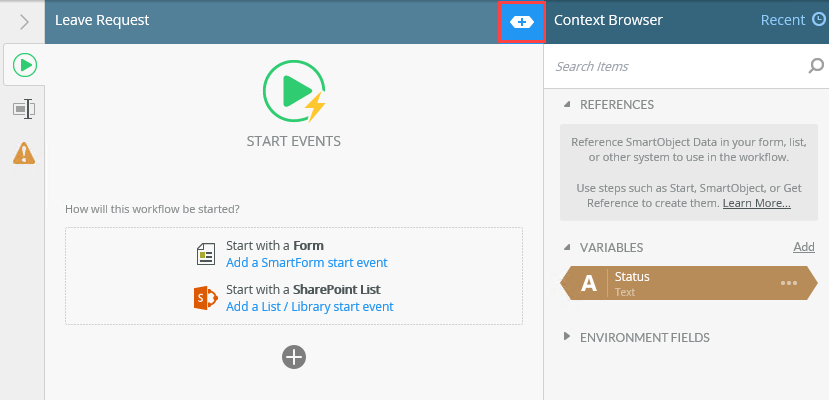
The Context Browser, located on the right side of the canvas, allows you to drag context fields and functions into the configuration panel to configure steps. When you're configuring a step, click the expand icon to open the Context Browser. In this area, you have access to different types of values, such as workflow context, inline functions, SmartObjects, and References. Read more about the context browser…
Opening the context browser
Use the Rules Designer to create custom business logic to, for example, direct the flow of the workflow, build more advanced task routing logic, and build other logic into your workflow. Read more about the Rules Designer…
The Rules Designer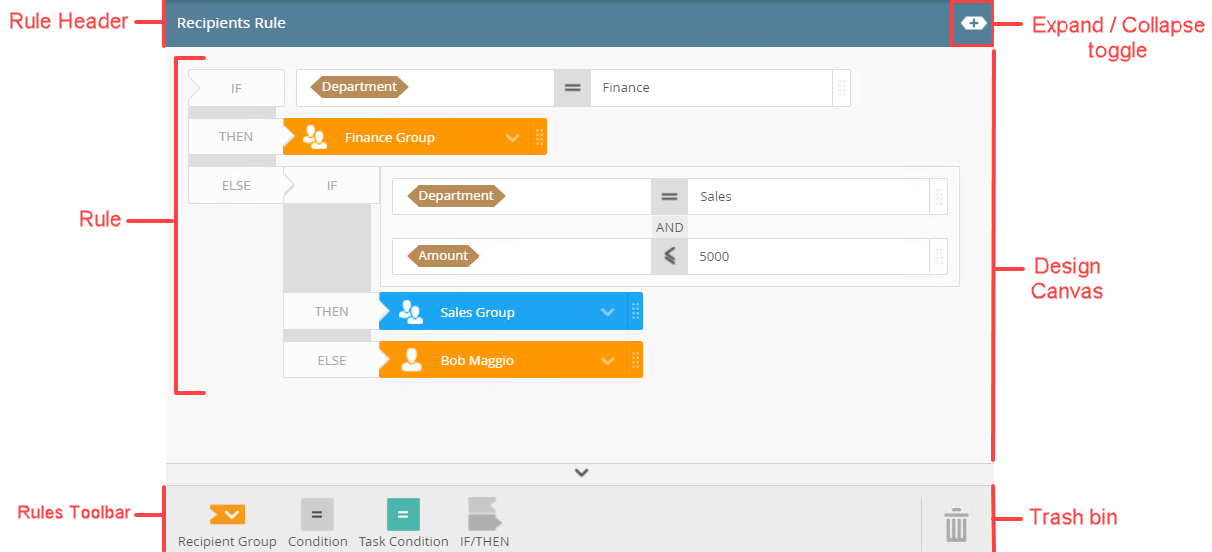
The SmartField Composer allows you to configure SmartFields with inline functions and SmartObject method calls in conjunction with the Context Browser. Drag inline functions and SmartObjects from the Context Browser into a SmartField (for example the body field of a Send Email step) and the SmartField Composer opens. Here you can build more complex statements using fields and functions. To see an example of the SmartField composer in action, take a look at this video:Using a SmartObject in the SmartField Composer. Then you can read more about the SmartField Composer...
Colors and Shapes
When working with the context browser, you'll see different colors and shapes depending on the field type. This helps you to understand the type of objects that make up your SmartFields in your workflow. Read more about the use of colors in the workflow designer...
| Fields such as References, Variables and Environment Fields appear in brown and have angled edges. |

|
| Functions appear in gray and have rounded edges. |

|
| SmartObjects appear in green and have rounded edges. |

|
| Workflow context objects appear in teal and have angled edges. |

|
Working in the Designer
The designer automatically saves your workflow in the background as you edit, and you'll see the Save button activate while it's happening. You can also use the Undo and Redo buttons while building workflows.
The Start Event
The Start Event determines how your workflow starts. On the Start Event's configuration panel, you can choose whether to start a workflow from a SmartForm event, or a SharePoint event triggered from a list or library. If your workflow doesn’t have a start event defined, you can also manually start the workflow or even schedule the workflow to start automatically, using the Management Site. Read more about starting a workflow.