Data connections
![]() Administrator role required.
Administrator role required.
The Data connections page displays the data connections associated with your subscription. The data connections that have been added and not added yet are shown in separate sections.
You must add data connections for your Nintex platform capabilities to display data in the Nintex Insights Dashboards. We recommend adding data connections for all of your Nintex platform capabilities in a single workspace An instance of Nintex Insightcs that consists of dashboards for the data connections you have added on your Nintex platform, which specified users can access. to get a full view of your Nintex platform data.
Currently you can add data connections for the following Nintex platform capabilities:
| Nintex platform capability | Data connection type |
|---|---|
| Nintex Automation Cloud | Nintex Automation Cloud |
| Nintex for Office 365 | SharePoint Online |
|
Nintex for SharePoint 2019 Nintex for SharePoint 2016 Nintex for SharePoint 2013 |
SharePoint |
-
Only Nintex workflow data currently displays in Nintex Insights.
-
You can add data connections for Nintex capabilities that are not associated with your customer account if you have the required access.
-
Nintex Insights updates data in near-time, between 2 to 4 hours on average. Data availability is also dependent on the size and volume of data sent to Nintex Insights. The process will take longer for larger data volumes.
Access the data connections page
- On the upper-right of your Nintex Insights workspace home page, click Settings.
- Click Data connections in the side navigation menu.
View unconnected tenants
At the top of the Data connections page, separate sections display information of how many possible connections have been established for each of the Nintex data connection types associated with your customer account.
Note: A data connection count is unavailable for SharePoint because manual activation is required for SharePoint tenants. To display a full view of your Nintex platform, we recommend adding data connections for all SharePoint tenants associated with your Nintex license.
To view unconnected tenants for Nintex Automation Cloud or Nintex for SharePoint Online and begin the add data connection process:
-
Click View unconnected tenants.
-
Click the tenant name you want to add a data connection for.
See Add a Nintex Automation Cloud data connection and Add a SharePoint Online data connection for the next steps.
Add a Nintex Automation Cloud data connection
- Click Add data connection.
- Select Nintex Automation Cloud for the Data connection type.
- Click Connect.
- The Nintex Automation Cloud sign in window is displayed. Sign in to Nintex Automation Cloud.
- Type your Email.
- Type your Password.
- Click Sign In.
Note: You must have the administrator role in Nintex Automation Cloud to add a data connection for Nintex Automation Cloud. See the User management Nintex Automation Cloud help topic.
The data connection is created and displays in the Data connections page. Nintex Automation Cloud data will display in your Dashboards.
Add a SharePoint Online data connection
- Click Add data connection.
- Select SharePoint Online for the Data connection type.
- Type the SharePoint Online tenant URL.
- Click Connect.
- Sign in to SharePoint Online.
- Type your Email address.
- Type your Password.
- Click Sign in.
Note: You must be a global administrator or SharePoint Online or Office 365 user with Sites.Read.All permissions for the SharePoint Online or Office 365 tenant for which you are creating a data connection. See the Applications permissions section of the Microsoft Graph permissions reference.
The data connection is created and displays in the Data connections page. SharePoint Online data will display in your Dashboards.
Add a SharePoint data connection
Before you can create a SharePoint data connection, you must activate Nintex Insights in your SharePoint tenant. When you activate Nintex Insights in your SharePoint tenant, note the Region, Isolation ID and Access Token, which you will need to add the data connection in Nintex Insights.
Important: If you have published workflows containing Nintex Insights Beacon actions that are currently sending data to Nintex Insights, you must republish the workflows to begin sending data to Nintex Insights. Once you republish the workflows containing Nintex Insights Beacon actions, data will no longer be sent to Nintex Insights.
- Right-click the Nintex for SharePoint installer and click Run as administrator.
- Follow the steps in the installer to install the latest Nintex for SharePoint version.
- When you get to the Nintex Insights step shown below in the image, do the following:
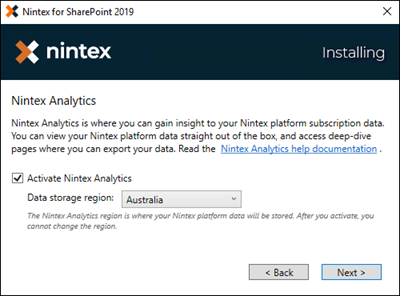
- select the relevant data region from the drop-down.
Note: The data region cannot be changed after you activate Nintex Insights in your tenant.
- Select the Activate Nintex Insights check box to activate Nintex Insights in your tenant during the installation process.
Note: You can clear the Activate Nintex Insights check box during installation, if you want to activate it later from the Central Administration page of your SharePoint tenant.
- select the relevant data region from the drop-down.
- After installation go to the Nintex Insights page in your SharePoint tenant to view the successful activation.
- In the Central Administration page of your SharePoint tenant, click Nintex Administration.
- In the Nintex Administration page, click Nintex Insights.
- In the Central Administration page of your SharePoint tenant, click Nintex Workflow Management.
- In the Nintex Workflow Management page, click Nintex Insights.
When Nintex Insights is successfully activated the following is displayed:
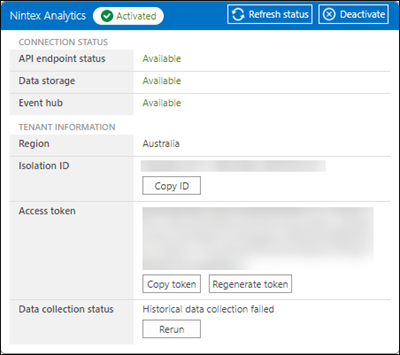
Nintex Workflow for SharePoint data will now be sent to Nintex Insights. For Nintex Workflow for SharePoint data to display in your Nintex Insights dashboard, you must add SharePoint data connection in Nintex Insights.
- Open the Nintex Insights page in your SharePoint tenant:
- In the Central Administration page of your SharePoint tenant, click Nintex Administration.
- In the Nintex Administration page, click Nintex Insights.
- In the Central Administration page of your SharePoint tenant, click Nintex Workflow Management.
- In the Nintex Workflow Managementpage, click Nintex Insights.
- Select your Nintex Insights Region from the Region selection drop-down.
Note: The data region cannot be changed after you activate Nintex Insights in your tenant.
- Click Activate Nintex Insights.
When Nintex Insights is successfully activated the following is displayed:
Nintex Workflow for SharePoint data will now be sent to Nintex Insights. For Nintex Workflow for SharePoint data to display in your Nintex Insights dashboard, you must add a SharePoint data connection in Nintex Insights.
Note: To copy the Isolation ID and Access token that is required to create the data connection, you must access the Nintex Insights page from the Central Administration page of your SharePoint tenant. For instructions, see Activate Nintex Insights in your SharePoint tenant.
- Click Add data connection.
- Select Nintex for SharePoint for the Data connection type.
- Type the Name for the connection.
- Select the Region.
- Paste or type the Isolation ID.
- Paste or type the Access token.
- Click Connect.
- The SharePoint sign in window is displayed. Sign in to SharePoint.
- Type your Email address.
- Type your Password.
- Click Sign in.
The data connection is created and displays in the data connections page. Nintex for SharePoint data will display in your Dashboards.
Note: You must be an administrator of the SharePoint tenant you are creating a data connection for.
| Selection (or column or field) | Description |
|---|---|
| Add data connection |
Displays the Add new data connection section with the Data connection type field. |
| Data connection type |
The connection for the Nintex platform capability you are creating a connection for. Select from one of the following options:
|
| Nintex Automation Cloud tenant name |
Displays when you select the Nintex Automation Cloud data connection type. The tenant name portion of your Nintex Automation Cloud URL:
|
| SharePoint Online tenant name |
Displays when you select the SharePoint Online data connection type. The tenant name portion of your SharePoint Online URL:
|
| Name |
Displays when you select the SharePoint data connection type. Name for the data connection which is displayed in the data connections list. |
| Region |
Displays when you select the SharePoint data connection type. The region selected to store Nintex for SharePoint data when you Activate Nintex Insights in your SharePoint tenant. |
| Isolation ID |
Displays when you select the SharePoint data connection type. The Isolation ID is a unique identifier created when activating Nintex Insights in a SharePoint tenant. You can retrieve your Isolation ID in the Nintex Insights page in the Central Administration page of your SharePoint tenant. See Activate Nintex Insights in your SharePoint tenant. |
| Access token |
Displays when you select the SharePoint data connection type. Unique access token created when activating Nintex Insights in a SharePoint tenant. You can retrieve your access token in the Nintex Insights page in the Central Administration page of your SharePoint tenant. |
| Cancel | Discards the data connection details you have entered and closes the Add new data connection panel. |
| Connect | Starts the authentication process for the data connection you are adding. |
| Options ( |
Lists the Deactivate or Connect, and Delete options. |
| Deactivate |
Displays when you select Options ( Stops data from displaying in your Nintex Insights dashboard for the data connection. |
| Activate |
Displays when you select Options ( Starts displaying data in your Nintex Insights dashboard for the data connection. |
| Delete |
Removes the data connection from the data connection list and any associated data from your dashboard. |