Step 1: Activate Nintex Insights
Are you using Nintex for SharePoint on-premises?
- No: Skip to Step 2: Access Nintex Insights.
- Yes: Follow the steps below.
Activate Nintex Insights in Nintex for SharePoint
You can either activate Nintex Insights during or after a Nintex for SharePoint installation.
- Right-click the Nintex for SharePoint installer and click Run as administrator.
- Follow the steps in the installer to install the latest Nintex for SharePoint version.
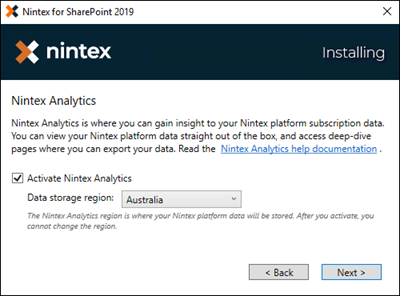
- When you get to the Nintex Insights step shown below in the image, do the following:

- select the relevant data region from the drop-down.
Note: The data region cannot be changed after you activate Nintex Insights in your tenant.
- Select the Activate Nintex Insights check box to activate Nintex Insights in your tenant during the installation process.
Note: You can clear the Activate Nintex Insights check box during installation, if you want to activate it later from the Central Administration page of your SharePoint tenant.
- select the relevant data region from the drop-down.
- After installation go to the Nintex Insights page in your SharePoint tenant to view the successful activation.
- In the Central Administration page of your SharePoint tenant, click Nintex Administration.
- In the Nintex Administration page, click Nintex Insights.
- In the Central Administration page of your SharePoint tenant, click Nintex Workflow Management.
- In the Nintex Workflow Management page, click Nintex Insights.
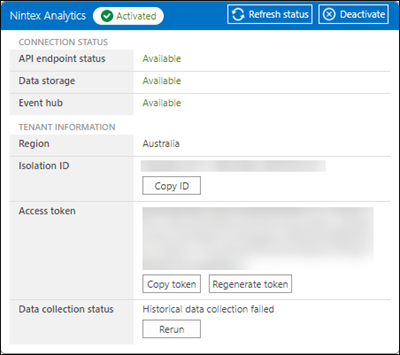
When Nintex Insights is successfully activated the following is displayed:

Nintex Workflow for SharePoint data will now be sent to Nintex Insights. For Nintex Workflow for SharePoint data to display in your Nintex Insights dashboard, you must add SharePoint data connection in Nintex Insights.
- Open the Nintex Insights page in your SharePoint tenant:
- In the Central Administration page of your SharePoint tenant, click Nintex Administration.
- In the Nintex Administration page, click Nintex Insights.
- In the Central Administration page of your SharePoint tenant, click Nintex Workflow Management.
- In the Nintex Workflow Managementpage, click Nintex Insights.
- Select your Nintex Insights Region from the Region selection drop-down.
Note: The data region cannot be changed after you activate Nintex Insights in your tenant.
- Click Activate Nintex Insights.
When Nintex Insights is successfully activated the following is displayed:

Nintex Workflow for SharePoint data will now be sent to Nintex Insights. For Nintex Workflow for SharePoint data to display in your Nintex Insights dashboard, you must add a SharePoint data connection in Nintex Insights.
Next step: