Jobs
You can create a job A configuration of Bots, Botflows, data sets, and scheduling designed to automatically complete a task. in Nintex RPA Central designed to run when manually started or run automatically on a preset schedule. The job completes the tasks and actions in the botflow A file that stores the actions and variables designed to automate tasks. associated with the job.
From the Jobs page, you can select the:
- Job name to view that job's details.
- Job's last run to view job instance details.
- Ellipses to:
- Edit the job.
- Delete the job.
- Manage the job schedule.
- Manually start the job.
View the Jobs page
To view the Jobs page:
- Select Dashboard from the top menu.
- Select Jobs from the left menu.
- All current jobs.
-
If a job is scheduled to run.
- When a job last ran.
-
The status of the Botflow.
- The associated data set file.
The Jobs page displays:

Create job
Using the Create job page, you can:
- Name the job.
- Select the botflow to run in the job.
- Optionally, select a data set A data set in RPA Central is a .csv format file containing tabulated data for use in a Botflow job run. for the job.
- Assign the bot ID to run the job.
- Optionally, create and add a job schedule.
View Create job
The Create job button is available from all Dashboard The default view of RPA Central where you can create and manage jobs, data sets, and instances. pages when you select Dashboard from the top menu.
Botflows saved in Nintex RPA can be published in your Nintex RPA Central system and display in the Drafts section of the Botflows page.
Note: You cannot publish botflows in excess of your licensed botflow entitlement.
To publish a botflow:
- Select the ellipses for the required Botflow in the Drafts section on the Botflows page. The sub-menu displays.
- Select Publish.
The selected Botflow displays in the Published botflows section on the Botflows page.
To create a data set:
- Click Data sets to display the Data sets page.
- Click Create new. The Create data set page displays.
- Type or select information for:
- Name: Enter a unique name for the data set.
- Upload new file: Navigate to the required existing data file.
- Click the Create button. The Configure import page displays.
- Optionally, select Has header row if the data file includes a header row and click Next. The Select columns page displays.
- Select the columns of data to include in the data file.
The Data table provides a preview of the data file.
The Data table provides a preview of the data file.
The Data table provides a preview of the data file.
- Column name: Accept the default column name from the data file or type a new name in the field.
- Data type: Use the drop-down to select a data type.
-
- String: The data type is a alphanumeric character string.
- Int: The data type is an integer.
- Boolean: The data type is a Boolean expression.
- Date: The data type is a date.
- Data format: Enter the data format for the selected data type.
- Selected: Select the check box to include the column in the job data file.
- Click Submit to create the data set.
To enable, disable, or reset a Bot:
- Select the ellipses for the required bot on the Bots page.
- Select Enable or Disable for the bot as required.

The sub-menu displays.
If the bot is enabled, you can disable that bot. If the bot is disabled, you can enable that bot.
Note: Select Reset if the bot status displays any error for Status.
The bot status displays OK for enabled Bots and Disabled for disabled Bots.
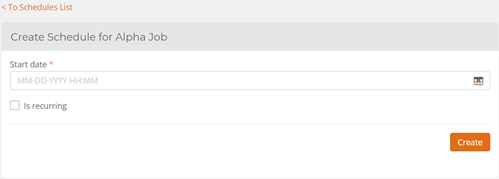
To add a schedule to a job:
- Click Create & add schedule on the Create job page for an new job or select Manage Schedules from the ellipsis drop-down menu for an existing job.
- Click in the Start date field and select a start date from the calendar.
- Optionally, select Is recurring to set a recurring schedule for the job.
- Click Create to create the job schedule.

The Create Schedule for <Job Name> Job page displays.
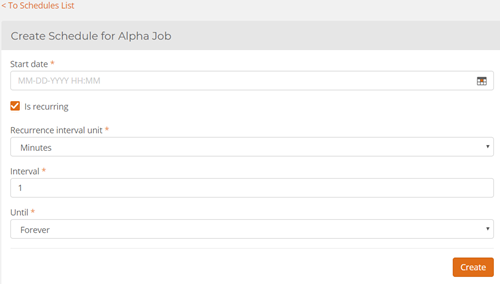
To make a job schedule recurring:
- Select Is recurring on the Create Schedule for <Job Name> Job page.
- Set the recurring schedule:
- Recurrence interval unit: Use the drop-down to select minutes (default), hours, days, weeks or months.
- Interval: Type the interval of runs for the job or hover over the end of the field and use the up/down arrows to adjust the interval.
- Select Weeks for Recurrence interval unit.
- Type 2 for Interval.
- Until: Use the drop-down to select:
- Forever: Select this option to run the job until turned off.
- End on a date: Click in the field and select an end date from the calendar.
- Exact Runs: Select this option to display the Exact Runs field. Type in the number of runs, or hover over the end of the field and use the up/down arrows to set the number of runs.
- Click Create to create the recurring job schedule.

The page expands to display the recurring schedule settings.
Example: To the job runs every 2nd week:
This example provides the steps necessary to create a job in Nintex RPA Central.
To create a job:
Click Create Job. The Create Job page displays.
- Type or select information for:
- Name: Enter a unique name for the job.
- Botflow: Select an available Botflow from the drop-down list.
- Data Set: Select an available data set from the drop-down list.
- Assigned bot IDs: Select an available bot ID from the list.
- Optionally, select Create & add schedule to set a Start Date or recurring schedule for the job.
- Click Create to create the job.
Edit job
Using the Edit Job page, you can:
- Edit job A configuration of Bots, Botflows, data sets, and scheduling designed to automatically complete a task. name.
- Change the selected Botflow A file that stores the actions and variables designed to automate tasks. to run in the job.
- Optionally, select or deselect a data set A data set in RPA Central is a .csv format file containing tabulated data for use in a Botflow job run. for the job.
- Change the assigned bot ID.
View Edit Job
To view the Edit Job page:
- Select Dashboard from the top menu.
- Select Jobs from the left menu.
- Select the ellipses for a Job from the Jobs page.
- Select Edit from the ellipses menu.
This example provides the steps necessary to edit a job in Nintex RPA Central.
To edit a job:
- Select Edit from the ellipses menu for a job. The Edit Job page displays.
- Type or select information for:
- Name: Enter a unique name for the job.
- Botflow file: Select an available Botflow from the drop-down list.
- Data set: Select an available data set from the drop-down list. Or choose Not selected if you are preparing to delete a data set.
- Assigned bot IDs: TBD
- Click Save to update the job.
Job details
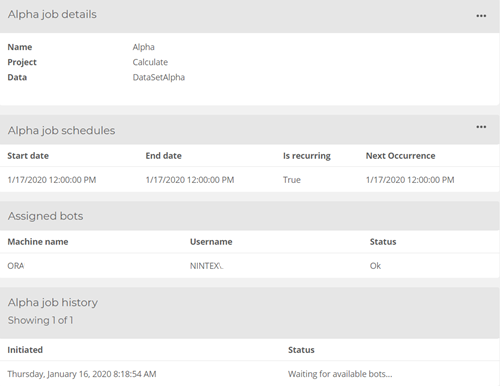
The Job details page displays the details for a selected job.
From the Job details page, you can:
- View the details for a job.
- Edit or delete the job, as described in Create job and Delete Job.
- Add or manage a job schedule, as described in and Manage Job Schedules.

View Job details
To view the job details page:
- Select Dashboard from the top menu.
- Select from Jobs the left menu.
- Select a job name from the Jobs page.
The Job Details page is divided into four sections:
- Job details: Provides the job details and an ellipses menu for Edit job or Delete job, and Manage job schedules.
- Job schedules: Provides the schedule details and an ellipses menu for Add schedule.
- Assigned bots: Lists the assigned Bot for the job.
- Job history: Lists the job history.
Delete job
Use the Delete Job page to delete a job.
View Delete job
To view the Delete job page:
- Select Dashboard from the top menu.
- Select Jobs from the left menu.
- Select Delete from the ellipses menu for a Job.

| Field or button | Description |
|---|---|
| Name | Lists the job A configuration of Bots, Botflows, data sets, and scheduling designed to automatically complete a task. name. Click the job name to view the Job details page. |
| Next run | Lists the next time the job is scheduled to run or if the job is not scheduled to run. |
| Last run | Lists the last time the job ran. Click the Last run date to view the Job Instance Details page. |
| Botflow status | Lists whether the associated Botflow is Published A Botflow that is available for a job and using a license slot. or Unpublished A Botflow that is not available for a job and is not using a license slot.. |
| Data set | Lists the name of the associated data file. |
| Ellipses |
Click to view these options:
|
| Field or button | Description |
|---|---|
| Name | Type a job name into the required field. |
| Botflow | Select a Botflow from the drop-down menu for this required field. |
| Data set | Select a dataset from the drop-down menu for this optional field. |
| Assigned bot IDs | Displays a list of all enabled Bots. Listed Bots need not to be connected to be listed. Optionally, select one or multiple bots. If multiple bots are selected, but the parallel checkbox has not been checked, the first available bot runs the job. |
| Create and add schedule | Select to display the Create schedule page to set a date and time for the job to run. All required fields must be filled. |
| Create | Creates the job. All required fields must be filled. |
| Field or button | Description |
|---|---|
| Name | Type a job name into the required field. |
| Botflow | Select a Botflow from the drop-down menu for this required field. |
| Data set | Select a dataset from the drop-down menu for this optional field. |
| Assigned bot IDs |
Displays a list of all enabled Bots. Listed Bots need not to be connected to be listed. |
| Save | Saves the job. All required fields must be filled. |
| Section | Field or button | Description |
|---|---|---|
| Job details | Name | Lists the job name. |
| Project | Lists the associated Botflow. | |
| Data | Lists the associated data file. | |
| Ellipses |
Click to view these options:
|
|
| Job schedules | Start date | Lists the job scheduled start date and time. |
| End date | Lists the job scheduled end date and time. | |
| Is recurring | List whether the job schedule is (True) or is not (False) recurring. | |
| Next occurrence | Lists the next scheduled job occurrence. | |
| Ellipses | Click to Add schedule for the job. | |
| Assigned bots | Machine name | Lists the machine name for the Bot An autonomous program on a network that interacts with computer systems or users.. |
| User name | Lists the associated user name for the Bot. | |
| Status | Lists the bot status. | |
| Job History | Date created | Lists the date the job was created. |
| Status |
Lists the status for the job:
|