Data - SQL
Use Data - SQL to import records from a SQL Server database or MySQL database into a data file. The data file is used in a botflow A file that stores the actions and variables designed to automate tasks. to access the imported records.
Import records:
- From database tables.
- From database views (queries).
- Using custom SQL statements.
The first time you try to use Data - SQL or SQL to connect to a MySQL database you will be prompted to install the MySQL Connector if it is not already installed.
- Navigate to the connector download.
- Select Product Version 8.0.17 and select the 393.4M download.
- When running the installation, select Custom.
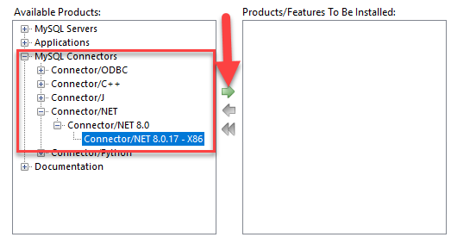
- Select Connector/NET 8.0.17 - x86 from the Available Products list and move it to the Products/Features To Be Installed list.
- Click Next and Execute to complete the installation.
- Navigate to C:\Program Files (x86)\MySQL\Connector NET 8.0\Assemblies\v4.5.2.
- Select and copy Rence.SshNet.dll.
- Navigate to C:\Program Files (x86)\Nintex\RPA and paste Renci.SshNet.dll.

Create a Data - SQL connection
To create a Data - SQL connection:
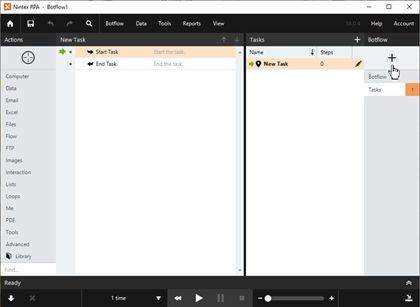
- Click Add Item (
 ) on the Botflow Pane.
 - Click Data - SQL.
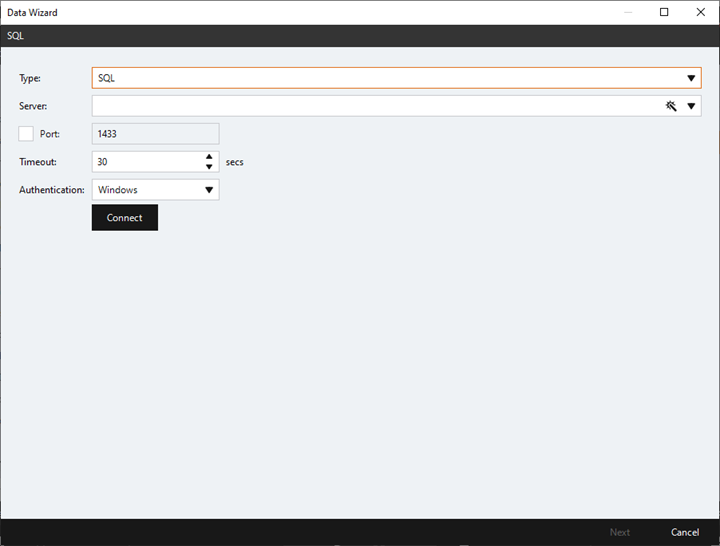
- Select the SQL type from the Type drop-down:
- SQL - Select to use with a SQL database.
- MySQL - Select to use with a MySQL database. Requires that MySQL be installed.
- In the Server field, do one of the following:
- Enter the required server name.
- Click the Expression Builder to build the server name using variable or other token values.
- For SQL, click the down button to retrieve a list of available SQL Servers.
- Check the Port box to enter a port number or accept the default (1433).
- Enter a timeout value in the Timeout field or use the up and down buttons to incrementally change the value by one second.
- For SQL: Select the authenticate type from the Authentication drop-down:
- Windows - Uses your Windows log in credentials.
- SQL - Uses the authentication credentials set for the SQL server.
- Click Connect to connect to the SQL database server or MySQL database server and retrieve a list of available databases.
- Select an available database from the Database drop-down.
- Select the record source from the Records drop-down:
- Table - Retrieves database table records.
- SQL - Retrieves database records based on an entered SQL query records statement.
- View - Retrieves database query view records.
- Enter a timeout value in the Timeout field or use the up and down buttons to incrementally change the value by one second.
- Select a table, table view, or enter an SQL statement depending on your selection in Records.
- Page through the Data Wizard to import the records into a data file and display that data in the Data view in the Botflow Pane.

The SQL Data Wizard window displays.

For MySQL: Enter the username and password associated with the selected MySQL server.
- Navigate to the Data - SQL server connection on the Botflow Pane.
- Right-click a data field in the SQL - data information.
- Use the Context Menu to:
- Edit - Displays the Field screen with the existing Value information available for editing.
- Copy Value - Copies the field value from the selected field.
- Paste Value - Pastes the field value into the selected field.
- Clear - Clears the field value from the selected field.
The Context Menu displays.
Data - SQL connection window field and button descriptions
| Field or button | Description |
|---|---|
| Type |
Select the SQL type:
|
| Server |
In the Server field, do one of the following:
|
| Port |
Check the Port box to enter a port number or accept the default (1433). |
| Timeout |
Enter a timeout value in the Timeout field or use the up and down buttons to incrementally change the value by one second. |
| Authentication |
For SQL: Select the authenticate type from the Authentication drop-down:
|
| Username | Enter the username associated with the selected SQL or MySQL server. |
| Password | Enter the password associated with the selected SQL or MySQL server. |
| Connect | Click Connect to connect to the SQL database server or MySQL database server and retrieve a list of available databases. |
| Database |
Select an available database from the Database drop-down. |
| Records |
Select the record source from the Records drop-down:
|
| Timeout | Enter a timeout value in the Timeout field or use the up and down buttons to incrementally change the value by one second. |
| Table/ Table View/ SQL Statement |
Select a table, table view, or enter an SQL statement depending on your selection in Records. |
| Next/Cancel | Click Next to proceed to the next page of the Data Wizard or click Cancel to discard the Data - SQL connection or any changes. |