Move Highlight
This article provides information on the following topics:
Note: The Actions Quick Reference provides a complete list of actions that you can print for easy reference.
What is the Move Highlight Action?
Nintex RPA LE works with one table cell at a time. To instruct Nintex RPA LE which cell to work with, you must highlight the cell. The Move Highlight Action moves the highlight, allowing Nintex RPA LE to interact with that cell.
Note: The Move Highlight Actions can only be used with tables residing on a web page. To learn more about highlights, read the Understanding Web Tables section in the Understanding Targets article.
Creating a Move Highlight Action
Note: Read the Start Highlight Action article before reading this article. It explains why and how to highlight a table cell.
Before using a Move
Highlight Action, a Start Highlight Action must
be used to begin the highlight process. For demonstration purposes,
we will assume that a Start
Highlight Action has already been used to highlight the cell in
the first row and first column ![]() :
:


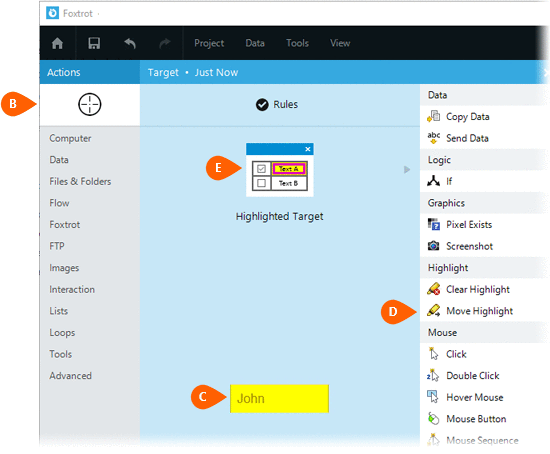
To move the highlight, drag and drop the Selector onto the currently highlighted table cell to display
the Target Preview
  .
Choose the Move Highlight
  Action to display
the Action Builder.
Note: You
must use a Start
Highlight Action to choose the cell where the highlight will
begin. The Move
Highlight Action is only available when the Highlighted
Target  is selected.
To learn more about highlights, read the Understanding
Web Tables section in the Understanding
Targets article.

Select the Rules
 to modify how Foxtrot will find the target.
Both the Timing
  and
Error
  settings
for this action may be configured to fine tune the how the Action will
run.
Note: For more information about Timing and Error settings, read the Action Builder article.
Nintex RPA LE
will provide information about the table such as the Table
Size  , and the Current
Location of the Highlight
  . You will also be provided with the Targeted
Cell
 .
.
Specify where you would like to move the highlight.
Vertical options include:
- No change
- Move down
- Move up
- Move to first row
- Move to last row
When choosing the Move
up or Move down options,
you will be able to provide the Number
of vertical moves .
.
Horizontal  options include:
- No change
- Move to first column
- Move right
- Move left
- Move to last column
When choosing the Move
left or Move right options,
you will be able to provide the Number
of horizontal moves .
.
The Move Options allow you to tell Nintex RPA LE
how to move the highlight. You can move the highlight up, down,
left or right. In this example, we want to move the highlight down
one row and keep the highlight in the same column.

Optionally add Notes
 to the Action to document any special instructions
or functionality. When the Run Switch
 is set to Run, the action
will be executed after clicking OK.
Note: The run switch is set to Run by default. To create or modify this action without executing it, click the slider to change the option to Don't Run. For more information, see Action Builder.
Click the OK
button  to
save the Action.
Running a Move Highlight Action
Once the Move
Highlight Action is executed, the highlight ![]() will be moved to the new cell:
will be moved to the new cell:

Note: In rare cases Nintex RPA LE may not be able to change the color of the cell. However, Nintex RPA LE will still maintain knowledge of which cell should be highlighted. If this occurs, continuing writing the script as if the cell was highlighted.