Action Builder
The Action Builder window provides access to the tools needed to add and modify actions or instructions within a botflow A file that stores the actions and variables designed to automate tasks..
Each action has a unique Action Builder window with its own settings. Additionally, an Action Builder window will have some or all of the elements defined below.
Some actions have rules required to locate a target and vary based on the targeted application.
Rules of a targeted application element are configured and saved with the action. The rules are then used to locate the proper targeted element, such as an Microsoft Excel workbook.
To set the most common rules type:
- Click Rules from the Build Pane Area to add new actions and edit existing actions. or the Action Builder The Action Builder window provides access to the tools needed to create and modify Actions or instructions within a botflow. window.
- Adjust the available rules as required.
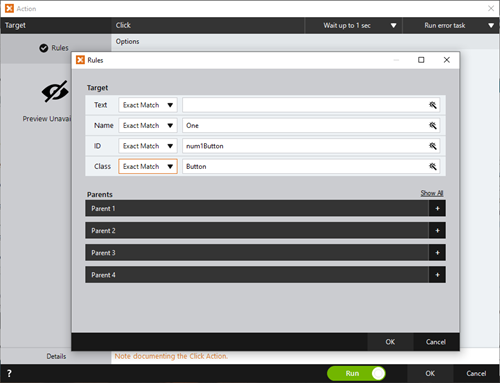
The Rules window displays the Rules available for the selected targeted application.
- Click OK to save the Rules.
- Some targets provide no rules.
- Most targets provide at least the text of the target, such as 'Log in' for a log in screen action.
- Some targets provide a name to identify the target (a unique developer-defined control name).
- Some targets provide an ID (a unique identifier that locates an item based on how it appears in the target).
- All targets use the following rules:
- Ignore: Ignores the value of the selected rule.
- Exact Match: Uses an exact match when considering the value of the rule.
- Best Match: Uses a best match when considering the value of the rule and uses a variety of information to locate the target.
- Left Match: Uses leading characters when considering the value of the rule based on a specified number of leading characters.
- Right Match: Uses trailing characters when considering the value of the rule based on a specified number of trailing characters.

Rules used when targeting tables in a web environment may interact with dynamic collections of data within the web tables.
Actions for web tables often require adjustments to the Rules to properly locate the target.
To adjust web table rules:
- Click Rules.
- Show Less/Show All: Toggles the table display.
- Bridge: No (default) select Yes: TBD
- Ignore Position (default): The default setting is set to ignore the position of dynamic positoned web tables. Click the drop-down to change to Exact Position if the target web table position is static, which could increase the Action speed. Click the X to close the drop-down and save the setting.
- <number> Columns: The number of columns of the targeted web table displays by default. Click the drop-down to change from Exact Count to Ignore Count if the number of web table columns could change.
- Left Match (default): Click the drop-down to Ignore (should table headers contain dynamic information) or Ignore (column). Otherwise, use Left Match to define the Column Header Length.
- Length: Enter the required Column Header length, or use the up and down arrows to adjust the required value.
- Click OK to save the settings.
The Rules window displays with additional Table rules.
Rules used when targeting a terminal emulator control the Connection Letter to the targeted emulator.
To change the Connection Letter:
- Click Rules
- Enter the required Connection Letter.
- Click OK to save the Rule with the Connection Letter.
The Emulator-specific Rules Window displays.
Rules used when targeting an FTP Action control the Connection Letter to the targeted FTP Action.
To change the Connection Letter:
- Click Rules
- Enter the required Connection Letter.
- Click OK to save the Rule with the Connection Letter.
The FTP-specific Rules Window displays.
Rules used when targeting an Adobe Form control the Connection Letter to the targeted Adobe Form.
To change the Connection Letter:
- Click Rules
- Enter the required Connection Letter.
- Click OK to save the Rule with the Connection Letter.
The Adobe-specific Rules Window displays.
When directed by Nintex Support, click Details from the Preview Panel of the Action Builder. If needed, Nintex Support will supply additional information.
Some actions have timing settings and vary based on the targeted application. The timing settings of a targeted application element are configured and saved with the action. The timing settings are then used to control when the action starts.
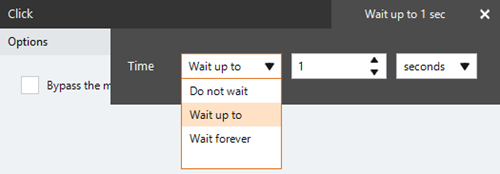
- Click Wait up to 1 sec.
- Open the Time drop-down list and select the required setting:
- Do not wait: Immediately attempts to execute the action and applies any error settings or rules.
- Wait up to: Waits up to one (1) second to execute the action per any configured rules. The time specified is the wait time prior to continuing the botflow. In the event of an application being unavailable, the action adheres to the error settings. Time units include numeric settings for seconds, minutes, and hours.
- Wait forever: Waits until the target application is in a ready state and applies any error settings or rules.
- Click X to close the drop-down list and save the setting.

Some actions contain options or settings that are used to set action behaviors and vary from action to action.
The topic for each action includes information about using that action's options or settings.
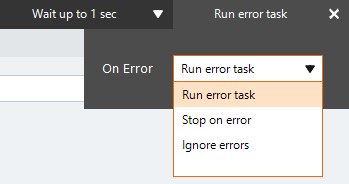
- Click Run error task.
- Open the On Error drop-down list and select the required setting:
- Run error task: A botflow containing an error task automatically runs the error task in the event of an error. If the botflow does not contain an error task, the botflow stops in the event of an error.
- Stop on error: The botflow stops in the event of an error.
- Ignore errors: The action is skipped in the event of an error and the botflow attempts to execute the next action
- Click X to close the drop-down and save the setting.

(Optional) Type a Note to document any special instructions or functionality.

The Run Switch toggle controls how Nintex RPA LE runs an action when adding or editing an action in a botflow.
- Run: To run the action automatically when you click OK, turn the toggle to Run.

- Don't Run: If you do not want to run the action automatically when you click OK, turn the toggle to Don't Run.

| Field or button | Description |
|---|---|
| Rules | Some actions have rules required to locate a target and vary based on the targeted application. |
| Preview | All actions created using the Selector Tool include a Preview of the targeted element. |
| Details | Some actions have details that provide technical information about a target and vary based on the targeted application. |
| Options/Settings |
Some actions contain options or settings that are used to set action behaviors and vary from action to action. The topic for each action includes information about using that action's options or settings. |
| Wait |
Some actions contain timing settings used to set the wait time when executing an action. Instead of executing an action as soon as possible, an action can be set to wait to execute until a target becomes available. |
| Run error task |
Some actions contain run error task settings that are used to set a response when an action fails. |
| Note |
Optionally, add a note to an action to document any special instructions or functionality. |
| Run (Default) |
The Run Switch toggle controls how Nintex RPA LE runs an action when adding or editing an action in a botflow. |
| OK/Cancel | Click OK to save the action or click Cancel to discard the action or any changes. |

