Open Data
The Open Data action opens the following databases:
-
Access 97-2003 Database (*.mdb)
-
Access 2007-2010 Database (*.accdb)
-
dBase III Table (*.dbf)
-
Comma-Delimited Text File (*.csv, *.txt)
Note: The Actions Quick Reference provides a complete list of actions that you can print for easy reference.
Create a template
You can create a template that you can use to import data with the same changes every time.
-
Click Data in the Actions menu.
-
Click Open Data.
-
Select the Source Database File. For example, a Comma-Separated Value (*.csv, file).
-
Follow the data wizard. For detailed instructions, see Create an Open Data action.
-
On the Data Source window, do not select a template.
-
On the Import Template Creation window (the last window in the data wizard), click the Save icon to save the template. The template is saved as a FoxData file type.
-
Click Done. Your data will import.
-
-
Verify your template is correct in the Nintex Bot Botflow Pane.
-
Close the data.
Create an Open Data action
-
Click Data in the Actions menu.
-
Click Open Data.
-
Select the Source Database File.
-
If you selected a dBase III Table (*.dbf) file, click OK to save the action.
-
If you selected an Access Database (*.accdb, *.mdb) file, enter or select the Table to open and then click OK to save the action.
-
If you select a Comma-Separated Value file (*.csv, *.txt) file, follow these instructions in the data wizard:
Note: Because Nintex RPA LE does not work directly with Comma-Separated Value (*.csv, *.txt) files, you must import the data into a Microsoft Access Database file (*.accdb) through the data wizard.
-
(Optional) Select a template. For more information, see Create a template.
-
Specify the delimiter . This is how Nintex RPA LE knows where to split the data. The default is Comma.
-
Click Next.
-
Select the Start and End rows for parsing the data.
-
(Optional) Select to Include the field names in the original data source.
-
(Optional) Select the columns that you want to remove. When selected, the columns turn gray.
-
Click Next.
-
(Optional) Deselect the fields that you want to exclude.
You can also change the data type for each column of data. For example, if you have a column with numbers in it, but you want them to be treated as text because some numbers have a zero in front of them and you want the zero to be displayed, then change the column to Text by clicking the row you want to change. Then click the arrow that is only displayed when you highlight the row. In the pop-up window, change the Type to Text. Any data types that you do not change will remain as they are displayed. Note that the data type is determined by Nintex Bot at runtime.
-
Click Next.
-
Select the location to save the Access Database. The default is the same as the source data file with the .accdb file extension. If the file already exists and you want to overwrite it every time, select the Overwrite check box. If you do not select to overwrite the file, Nintex Bot will ask you each time if you want to overwrite the output file from the last run, if a file exists.
-
Click Next.
-
(Optional) Import a template. For more information, see Create a template.
-
Click Done. Your data will import.
-
If the action is inside of a Before Task, from the Run drop-down list, select to run All records or to run Once when the action is executed. If the action is outside of a Before Task, inside of an After Task, or inside of a Normal Task, it will only run once when it is executed.
-
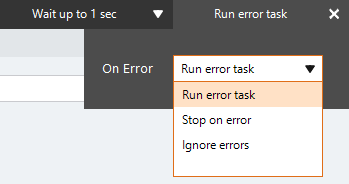
If needed, adjust the Run Error Task settings to fine tune how the action runs:
- Click Run error task.
- Open the On Error drop-down list and select the required setting:
- Run error task: A botflow containing an error task automatically runs the error task in the event of an error. If the botflow does not contain an error task, the botflow stops in the event of an error.
- Stop on error: The botflow stops in the event of an error.
- Ignore errors: The action is skipped in the event of an error and the botflow attempts to execute the next action.
- Click X to close the drop-down and save the setting.