Exporting from the Discovery Console
Nintex Process Discovery lets you export actionable information in an immediately usable format. This chapter will examine the quick steps for generating Nintex Process Discovery files and reports.
Downloading Files from Nintex Process Discovery
How to download a file of a selected process and its variants
Exports are available to download from:
-
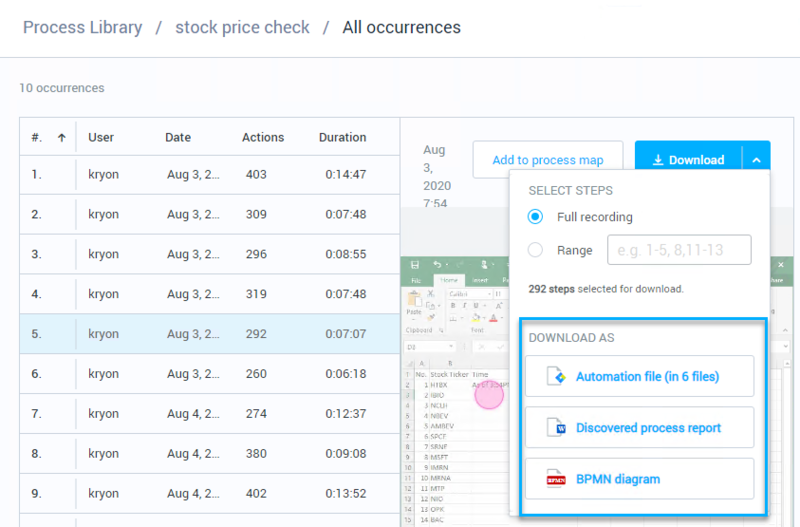
Process Library > select a process > click Download:

-
Process Library > select a process > click View all occurrences > Select an occurrence > click Download:

Types of Files Available for Download
| File type | Description |
|---|---|
|
Automation file |
Exporting a process as an automated wizard file. This file is used for direct import into NintexRobotic Process Automation Studio for RPA development and implementation. A file named |
|
Discovered process report |
You can download a selected process and its variants into an editable MS Word document called the Discovered Process Report (DPR). This editable MS Word document records each step of the selected process and its variants. You can review the process, visualize all variants, add in-depth knowledge, and send it to the RPA developers for automation along with its corresponding automated wizard files. |
|
Event log |
For selected processes and variants to work with a Process Mining Tool if utilized. You can easily combine Nintex Process Discovery with Process Mining techniques by downloading an Event Log (in csv format) to apply to an external process mining tool. The Event Log file contains information from every recorded occurrence ("case") of the process and its selected variants. Each milestone action ("activity") is represented by a row in the Event Log. For reference, see Configuring the Event Log File Structure |
|
BPMN diagram |
A Business Process Model and Notation diagram to provide a graphical notation for specifying business processes. |
Rename each exported file with a relevant name
Organize your exported automations into folders – one folder for each end-to-end business process to be automated
Transfer your organized folders to the Automation Developer(s) for upload to Studio and additional development
Importing an Automation to Studio
To import a process you downloaded from Nintex Process Discovery to Studio:
-
Open Studio
-
Create a new wizard in the Catalog
-
Open the wizard in the Wizard Editor
Creating, opening, and editing wizards
For detailed instructions and information about creating, opening, and editing wizards, see the Studio User Guide (Creating Wizards). -
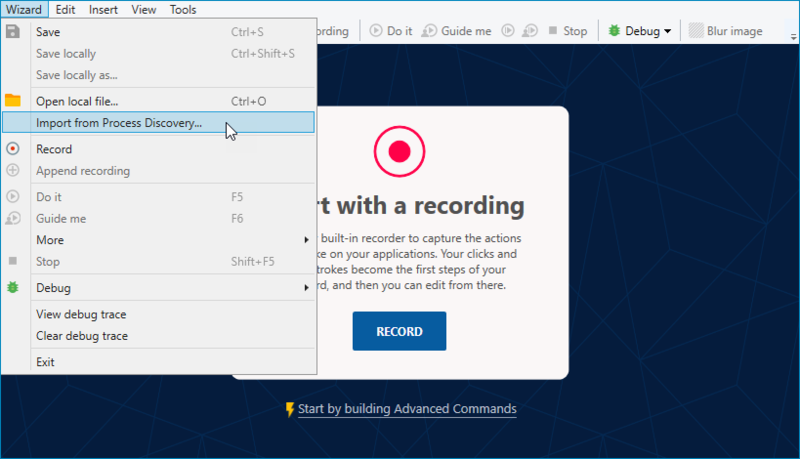
From the menu bar, click Wizard, then Import from Nintex Process Discovery

-
Navigate to the location in which you saved the exported *.PD file, select it, and click the
 button
The import will begin. When complete, the process downloaded from Nintex Process Discovery will populate the open wizard in the Wizard Editor.
If you attempt to import a process that contains applications and/or websites that are not yet defined in Nintex Process Discovery Admin, you will receive a warning.
If you choose to import the process, you will be able to view it (and even edit it), but you will not be able to run it or save it as a wizard. So you won't be able to save any changes you have made.
To enable a complete import, ask your organization to add the necessary apps and/or websites. Then import the process again.
Event Log Structure
To learn how to download an event log, see Downloading Files fromNintex Process Discovery .
| Column name | Type | Definition |
|---|---|---|
|
case-id |
Number |
All rows of the same process instance have the same case ID |
|
activity |
Number |
Algo action ID. Same ID number appearing for different occurrences represents the same user action. |
|
activity description |
Text |
[app name] > [window title] > [action description*] |
|
start |
Date time |
Start time of activity |
|
end |
Date time |
End time of activity |
|
process-ref |
URL |
Link to the process page in PD console |
|
User |
String |
Name of recorded user (or the hashed name if user-hashing is enabled) |
|
activity-type |
String |
Click Keyboard |
|
app-name |
String |
App name as appears in Console |
|
window-name |
String |
Window title / URL if available |
|
window-id |
Number |
Window cluster ID |
|
window-title |
String |
Window caption |
|
web-page-url |
String |
For web pages only - page URL |
*Action descriptions include: Click , Press [keys]
Event log csv format:
By default, the Event Log's file structure uses comma-separated values. Some process mining tools require semicolon delimiters instead. You can change the delimiter used, see the Configuring the Event Log File structure section in the Installation and Upgrade Guide.