Masking Usability
You can hide sensitive recorded information collected by Process Discovery by enabling Image Masking.
By default, Image Masking is disabled. For more information about how to enable Image Masking, see: Image Masking.
Two new improvements were added to enhance masking usability:
RegEx Codex
Regex, short for Regular Expression, is a string of text that is used to search for patterns in text. By building in the dynamic Regex Codex, you won't have to write any regular expressions by yourself, and it will minimize security risks.
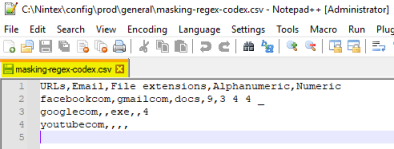
The Regex Codex enables you to reveal email domains, URLs, file names, and uniquely formatted numbers, such as phone numbers and account details. All regular expressions are stored in a CSV file called masking-regex-codex. It is formatted as categories with each expression placed beneath its relevant header.
Supported Syntax
| Syntax | Description |
|---|---|
| URLs |
Domain and TLD (top-level domain) Make sure to exclude the period in between them (E.g., |
| Email Domains |
Domain and TLD Make sure to exclude the @ symbol and the period in between them (E.g., |
| File Extensions |
Extension name This will reveal file names with these extensions (E.g., |
| Alphanumeric |
Desired alphanumeric expression length For expressions that include a separator, divide the expression into different sub-lengths and the separator (separated by spaces). Example: The minimum length of the alphanumeric expression is 6. Any shorter phrase will be ignored.
|
| Numeric |
The same syntax as Alphanumeric expressions (E.g., The minimum length of the numeric expression is 6. Any shorter phrase will be ignored.
|
To enable the Regex Codex and upload the codex to MongoDB:
-
Open the file
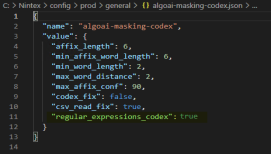
C:\Nintex\config\prod\general\algoai-masking-codex.jsonto edit. -
Change the
regular-expression-codexparameter toTrue.
-
Save the changes.
-
Restart the “Kryon Server - Process Discovery Service” Windows service.
-
Update the
masking-regex-codex.csvfile found at:C:\Nintex\config\prod\general.Follow the syntax rules from the table above.
-
Open a Command Prompt.
-
Go to the admin-cli folder:
C:\Nintex\PDServer\Support\kryon-admin-cli. -
Run
set NODE_ENV=prod. -
Run the
uploadCodexcommand execution path:CopyuploadCodex
node bin\cli.js --provider=mongodb --command=uploadCodex --collectionName=masking-codex --fileName=masking-private-codex.csv --regexFileName=masking-regex-codex.csv --tenantName=default --upsert=true-
Use the CLI command above, with the
tenantNameset todefault, to update the default codex for all tenants (Regex and regular). -
Use the CLI command above, with the
tenantNameset to a specific team ID, to create an additional codex that can be updated as needed for the specified tenant. Do not delete the default codex, the masking service will not work without it.
-
-
Confirm that the command ran successfully.
Admin CLI Command: "getOcrStats"
When image masking is enabled, every word that the Optical Character Reader (OCR) finds, is masked. All the words that you don't want masked will be found in an encrypted codex CSV file. A Nintex Process Discovery Admin can now export a list of words in the recordings of a specified tenant, found by the OCR, to update the codex file.
The getOcrStats command generates two text files that contain textual data and numbers of repetitions:
-
Density file: The number of images a word appears in.
E.g., The word
Appswas visible in 250 images. -
Frequency file: How many times a word appeared overall.
E.g., The word
Appswas used 345 times.These files can give you a better understanding of how the masking codex should be built.
E.g.,If one screen has a Gmail account that appears 400 times, it does not bring any business value. If it appears on multiple screens repeatedly, that information is more valuable for the organization.
To generate the OCR text files:
-
Open a Command Prompt.
-
Go to the admin-cli folder:
C:\Nintex\PDServer\Support\kryon-admin-cli. -
Run these commands:
set CONFIG_DIR=C:\nintex\configset NODE_ENV=prodset KRYON_ENC_CFG=C:\nintex\config\prod\general\kryon-decrypt.jsonset NODE_PATH=C:\nintex\PDServer\MicroServices\node_modulesset CACHE_AUTH=Nintex2022!set PRODUCT=pd -
Run these command execution paths:
You need to define the tenantId.
This is found in the Nintex Process Discovery Console. Select Settings > Cog icon > Teams > copy and paste the TeamId into the command execution paths.

-
getOcrStats: Extract textual data from a recording.node bin\cli.js --provider=algoData --command=getOcrStats --tenantId=3cd2b0c0-61ad-11ec-9b55-67c89939575d --savePath=C:\Kryon\tmp\data\ -
getTranscripts: Exports the OCR transcripts to SQLite files.node bin\cli.js --provider=algoData --command=getTranscripts --tenantId=3cd2b0c0-61ad-11ec-9b55-67c89939575d --savePath=C:\Kryon\tmp\data\
-
-
Confirm that the commands ran successfully.
-
Open the files in Excel to identify the textual data that is relevant to your organization's needs.
- Update the codex file with the new values from the OCR files:
-
Open the
masking-codexwith Excel and modify it. -
Use the Codex Analyzer.
For details, see Codex in MongoDB.
masking-data (NOT the raw-data) and it will trigger masking again.