Nintex Gateway Troubleshooting
Use the following information to help you troubleshoot Nintex Gateway authentication issues and to trace HTTPs communication to help locate or debug issues.
Issue
When authenticating your Nintex Gateway connection, the built-in Windows browser sometimes does not show, so you are unable to enter your authentication details.
Work around
If you experience issues when authenticating your Nintex Gateway connection, follow these steps to set the authentication browser option to manual, so you can use your internet browser to complete the authentication:
-
Activate the Auth0BrowserOption key in the Nintex Gateway App.config file
-
Open your text editor and load your /OnPremises.Gateway.ConfigurationApp.exe.config file
-
Locate the <!--<add key="Auth0BrowserOption" value="Default" />--> line and remove the comment out code
-
Change value="Default" to value="Manual"

-
Save the file
-
-
Authenticate your Nintex Gateway connection manually
-
Open the Nintex Gateway application
-
Enter your Nintex Gateway hostname and tenant name
-
Click Authenticate Nintex Gateway
-
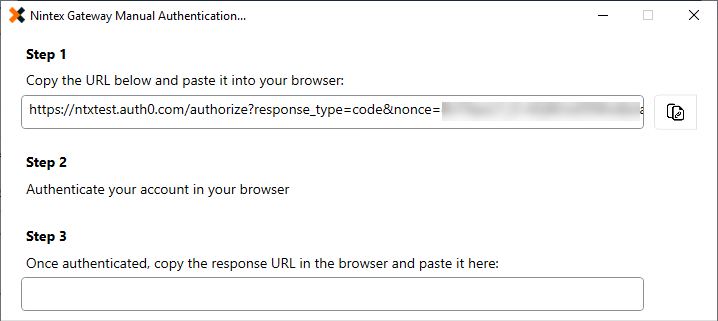
The manual authentication configuration screen opens
-
Copy and paste the authentication string URL from Step 1 into your internet browser address bar and press Enter
-
You can now enter your authentication details
-
When your authentication is complete, copy and paste the resulting authentication string from your internet browser address bar back into the Step 3 text box at the bottom of the configuration screen
-
Once the URL is pasted in, the manual authentication automatically completes
Note: If your URL is missing information you see the Please provide a valid response URL error message.
-
Issue
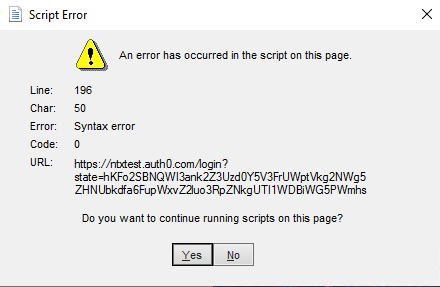
A change to Nintex Workflow authentication causes Nintex Gateway to provide an error message in the authentication step of the registration process. The error states An error has occurred in the script on this page as shown below:
Work around
Upgrade to version 2.2.85 or higher of Nintex Gateway, which uses the Webview 2 implementation for authentication. See Nintex Gateway release notes for download links.
Issue
When Nintex Gateway is running on Windows Server 2019 and TLS 1.3 is enabled, you may see the following error:
“Nintex Gateway API could not be reached. Please, try again later”
Work around
Follow these steps to check if TLS 1.3 is enabled on Windows Server 2019:
-
In the registry, navigate to the following path:
HKLM:\SYSTEM\CurrentControlSet\Control\SecurityProviders\SCHANNEL\Protocols\TLS 1.3\Client
-
If this entry exists, check the following keys and their values:
-
Enabled DWORD value is 1
-
DisabledByDefault DWORD value is 0
If these values are correct then it's likely that your Windows Server 2019 is configured to run with TLS 1.3 and this protocol is not supported by the Operating System.
-
-
Please contact your system administrators to find out if you can disable TLS 1.3 on Windows Server 2019 and use a supported protocol such as TLS 1.2.
The Nintex Gateway Windows services communicates with Azure Service Bus, as well as with local resources. All this traffic is primarily HTTP traffic and can be intercepted with Fiddler for troubleshooting and debugging purposes.
As Nintex Gateway’s Windows service is a .NET Core application that runs as a system account, you must use environment variables to tell the service to use Fiddler. This can only happen after Fiddler is configured.
Configure Fiddler
You must install Fiddler on the machine that Nintex Gateway is installed on. Please note that Fiddler is an HTTP proxy, and some organizations might identify it as a network sniffing/tracing tool.
Enable HTTPS
Fiddler needs to be configured correctly to allow it to capture traffic from any application on the machine.
-
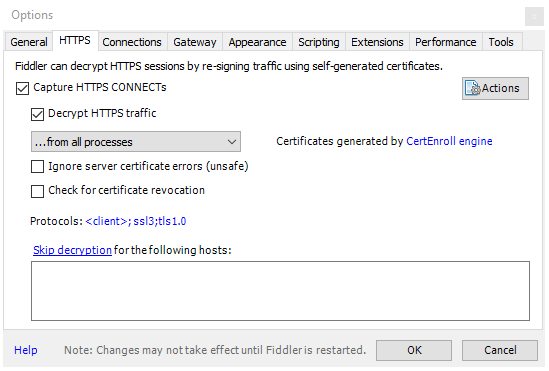
In Fiddler, go to Tools -> Options, and then click the HTTPS tab
-
Enable Capture HTTPS CONNECTs
-
Enable Decrypt HTTPS traffic
-
Select …from all processes in the drop-down
During these steps you will be prompted by several security notifications. These are important to read. Essentially, they install a certificate on the machine which is used to decrypt the HTTPS traffic. You must accept all these steps.
You can later remove the certificates using the Actions menu at the right top of the HTTPS tab.
Enable remote computers
To make sure Nintex Gateway can use Fiddler, configure it to allow other processes and computers to connect.
-
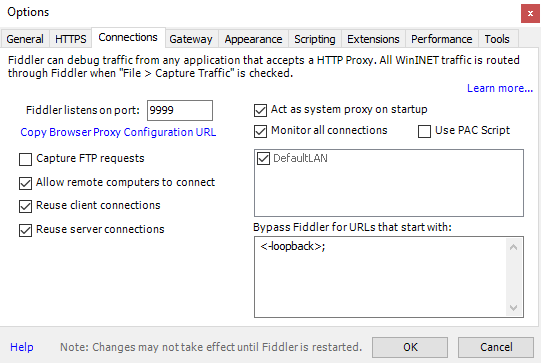
In Fiddler, go to Tools -> Options and then click the Connections tab
-
Enable Allow remote computers to connect
-
Enable Act as system proxy on startup
-
Enable Monitor all connections
-
Make a note of the port that fiddler is listening on (in this example it is 9999). You will use this in the environment variable.
Create environment variables
To allow a .NET Core application (which the Nintex Gateway windows service is) to use a Fiddler, you must configure the machine to use a proxy server. You do this by creating environment variables.
-
In Windows, navigate to the System configuration (Control Panel > System and Security > System)
-
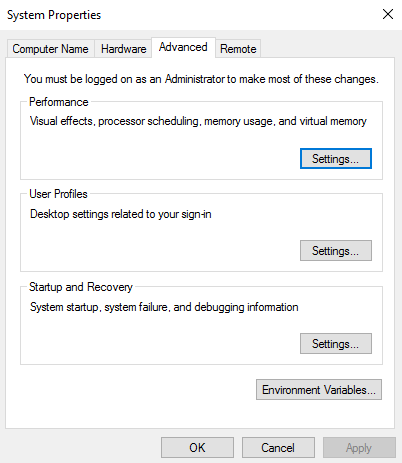
Select Advanced system settings on the left side. The following screen shows:
-
Click Environment Variables...
-
Add a new system variable with the name ALL_PROXY and provide the address of Fiddler (in this example it is http://localhost:9999)

The resulting configuration should look like this: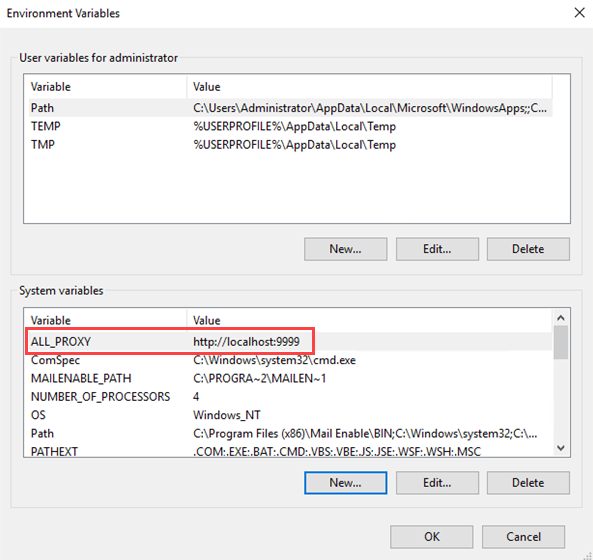
Verify Fiddler is working
Confirm the browser is using Fiddler
You can verify that Fiddler is working by starting a new browser instance and accessing an HTTPS site. The result should look like this: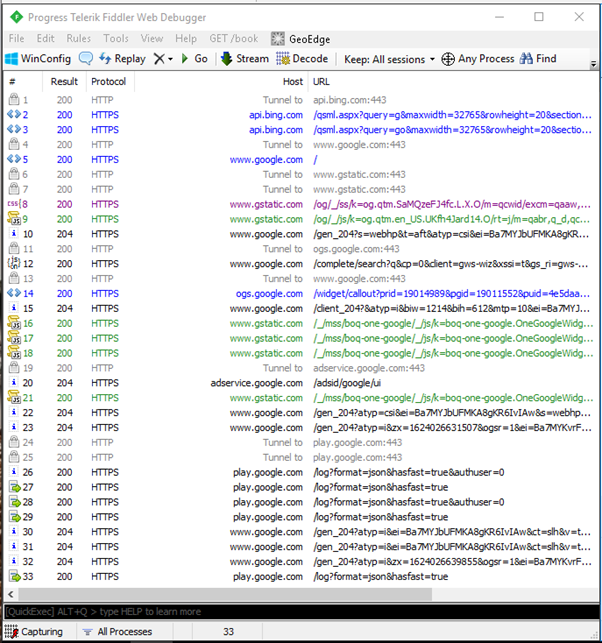
Make sure you can see the Tunnel to and that you have entries where the Protocol is HTTPS.
Note: This step ONLY confirms that your browser is using Fiddler.
Confirm Nintex Gateway is using Fiddler
System wide environment variables unfortunately only apply properly after a reboot. You must restart the machine to apply these settings. After the machine is restarted, make sure you start Fiddler again.
Then restart Nintex Gateway (or pause and resume it). You should see the following output in Fiddler:
This confirms that Nintex Gateway is using Fiddler.
Next steps
You can now reproduce whichever product issue you have and save the Fiddler trace using the menu File -> Save -> All Sessions. Saving it as a SAZ file is fine.