Add document generation action to page
The Document generation actions in Nintex Apps allow you to quickly generate a document from a page, all without needing to manually input any information into the document.
For example, let's say you are using a form for case management and need to generate a document for record keeping purposes. On this case management form you can add a button that users can click and quickly generate a document related to the information on that form automatically, with no need to manually type the data into the document. This generated document can then be sent off through email or routed through a workflow.
One of the most common ways to utilize the Document connection is to add a button to a page that a user can click and generate a document.
However, adding a button is only one part of the process. In order to fully set up a document generate action you need to do the following:
-
Create a form, or use an existing form, and add a Documents connection.
-
Create a new action flow using one of the document actions.
Before adding a new action to a page, it is important to understand the different actions and their associated behavior. You will also need to have an existing document package created that contains an uploaded document with field tags added to it.
A document package is where a document used for document generation can be uploaded and managed. Inside of the document package you can upload a document that can then be tagged with fields related to information on a form or from a connected data source through a model. The document package name is referenced by the document actions when generating the document to quickly grab the uploaded document and fill in the information related to the fields tagged in the document.
For more information on document actions and the models related to the Documents connection, refer to Document generation actions.
The following scenario walks you through adding a button to a page and then creating a new action flow based on the Click interaction, using the Generate Document action type.
Scenario - Add a document generate button to a form and create a document generation action
The most common action type to use when generating a document is the Generate Document action type. This action type is good for simple document creation, but also allows for a lot of customization when it comes to how a document behaves once the generation process completes. The Generate Document action type is useful for generating documents around proposals, contracts, and NDAs just to name a few use cases.
In the following scenario we will look at adding a "Generate Document" button to a page using the apps page designer.
This scenario is assuming the following:
Add the Generate Document button to a form
-
Go to Apps open an existing app or click Create app.
-
Select one of the following options:
Note: The option to add to a solution or create as a standalone is available only when you are using the new Nintex CE Platform Experience. Switch to the new experience to use this option. If you are not using the new experience, it's created as a standalone. See, Opt in to the new Nintex CE Platform.
-
Add to existing solution: To add the app to an existing solution. Select the solution.
-
Create a new solution: To create a new solution within which you can create an app.
-
Do not add to a solution: To create a standalone app that is not part of a solution.
-
-
If you selected Create a new solution, add a Name and Description and select a Color and Icon for the solution.
-
On the Create new app page, enter an App Name and other details.
-
Click Create.
-
Once the Form designer loads, select the Components option.
-
From the components list, locate the Button Set component. Click and drag the Button Set option to the desired point on the page.
Note: If intending to use a model or connected data source ensure that the button set is referencing the correct model. This can be done by selecting the button set added and checking the Model field on the General tab. In this case you want to make sure the model selected is the model that contains the UI fields that the Generate Document action is going to be referencing for the available tags.
-
Click Save.
-
Click Interactions > Add > Add action flow.
-
In the pop-up window, click Create new action flow.
Create new action using the Generate Document action type
-
In the Create action flow window, under Settings, name the action flow (required) and provide a description of the action (optional). For example, name the action flow 'Generate & Download'.
-
Click Save to complete the process.
-
In the Action flow designer window, click the + icon to add a new action.
-
In the Select an action window, select Document to display all of the action types related to document generation.
-
Select the Generate Document action.
This adds the Document action "Generate document" action to the flow.
-
Select the Documents action box to display the settings related to that action. We need to configure different settings here in order to connect this action to an existing document package.
Set up the Document action
-
In the Settings menu we need to configure the following options:
-
Action - The document action you selected displays in this field automatically and does not need to be selected.
-
Behavior - Select Wait and download.
-
Package - Select the document package that needs to be associated with this action. This option is going to determine what document is used when the you or the document generator clicks the "Generate Document" button.
Note: If the document package you created does not display in the list, save the page and then refresh your browser.
Once you select a document package, each of the tags that have been added to the document package display under the Package field.
-
This is going to show you each tag and you can set the associated field that needs to be used to display the data.
Note: It is important to note that fields such as Dates, Times, Currencies, and Numbers need to be formatted through the tags placed in the document.
-
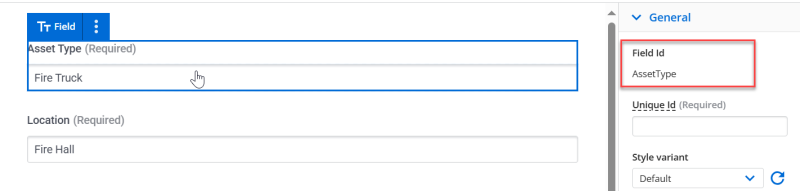
For example, if you have a field on the page called Asset Type, and you added the Asset Type tag to your document, you can use merge syntax to add the data into the document dynamically.
In this example, the Asset Type is a UI field coming from the UI-Only model, and the Id associated with that field is AssetType. In order to use merge syntax here you would type "{{AssetType}}"
-
-
After setting the fields for each tag, click Save to save the form.
Preview the page and generate the document
To test that the action and button is set up correctly you can test the page.
-
Click Preview.
-
Once the page loads, click the Generate Document button.
The document then is generated based on the document package selected. Depending on the size of the document and the scope of the action flow, you may need to wait around 20 seconds for the process to complete.
-
Open the downloaded document and check to see if the tags are now displaying information based on the form the document was generated from.
Nintex Apps documentation for reference
If you are new to Nintex Apps, or looking for a reference for the different components that can be used in apps page designer, refer to the following topics: