
|
 |
|
 |
|
 |
|

|
This workflow action provides a construct to define a number of states that the workflow can be in. Each state contains actions that will execute when the workflow is in that state. The workflow moves between states until it is instructed to end the state machine.
To use the workflow action:
- Locate the action in Workflow Actions Toolbox (located on the left hand-side);
- Click on the Category listings to reveal the actions; OR
- Search for the action using a keyword.
- Select the action, drag it onto the design canvas and drop it onto a design pearl.
Alternatively
- Left-clicking the pearl, mouse-over Insert Action and then the Categories to reveal the actions, click the required action from the list.
To change the settings used by the action:
- On the action’s title click the down arrow to activate a drop-down
- Select Configure; OR
- Double-click the action's icon.
For more information on the other options in the drop-down, please refer to the Getting started with the Nintex Workflow designer.
Note: The State machine workflow action cannot be copied.
Action Settings
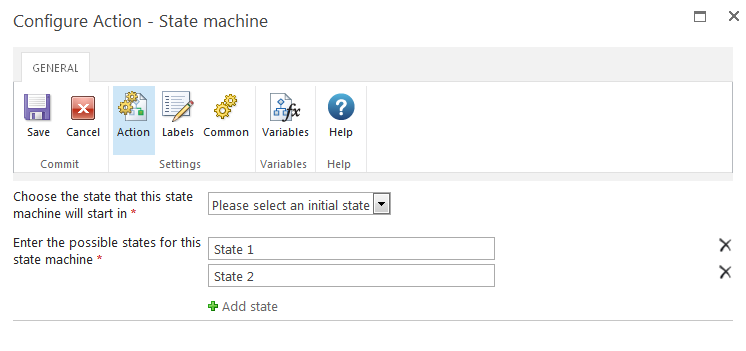
Select a state from the drop-down to determine which will be used first when the workflow is run.
States
The State Machine supports the configuration of a number of states. States can be added, deleted and renamed. Deleting a state will delete all actions currently added to it.
The state machine construct uses Change State actions to set which state to run next. The actions in a state are repeated until a Change State action is encountered and all actions in the state have completed executing. Workflow execution does not move to the next state instantly when the Change State action is run. The workflow moves to the next state once all actions in the current state have completed executing.
Note: The Change State action must be the last action within a state. Adding actions below the Change State action may cause unexpected behavior.
The states can be made to run in any order and conditions in one state can cause another state to be re-run. The workflow continues executing actions in the state machine until it encounters a Change State action set to "End State Machine." The workflow then exits the state machine and continues with any actions defined below the state machine.
Note: To end a state machine, use the Change State action set to "End State Machine." Errors result from attempting to end state machines using End Workflow or other actions.
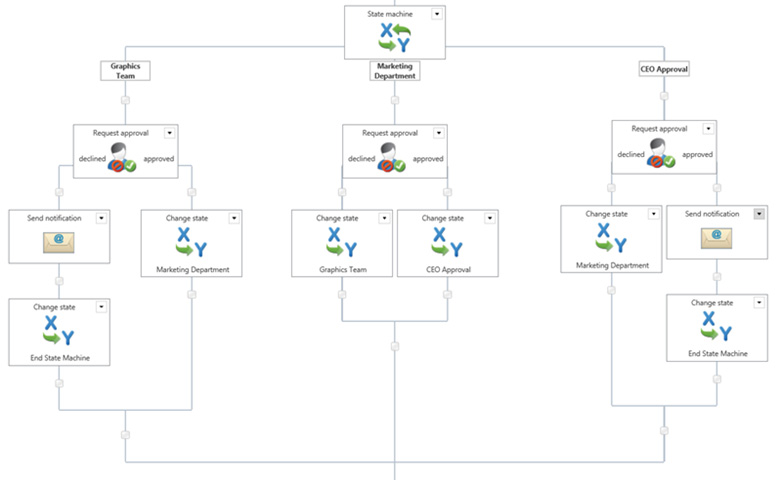
The following example image shows a state machine containing three states for each group's approval during an advertisement review cycle: Graphics Team for artwork review, Marketing Department for both content and artwork review, and CEO Approval for review of the entire advertisement. The workflow uses the Change State action to determine the next state. If the Marketing department rejects the artwork, the artwork returns to the Graphics department. If the CEO rejects the advertisement then it returns to the Marketing department.
Nintex Workflow state machine construct is very different from a Visual Studio created State Machine. Nintex workflows' are Windows Workflow Foundation sequential workflows. Nintex made the ‘state machine’ by wrapping up loops, parallel branches, if statements and variables to control it. It’s not a real state machine, but rather a construct to provide the ability to jump around between steps and mimic some of the scenarios that a state machine might be used for.
.NET 3.0 workflows come in 2 varieties. Sequential (like a flow chart) and state machines. With SharePoint declarative workflows (like the ones Nintex Workflow designs), these can only be sequential. To achieve the effect of a state machine in a sequential workflow, under the covers there is some clever logic made up of a while loop, parallel actions and various conditions.
With each iteration of the loop, a common workflow variable, used to store the current state, is evaluated to see if it should exit. Otherwise, it begins down each branch of the parallel action. At the top of each branch (state) is a condition to determine if the workflow should process actions in this branch. (if state = current state) The change state action sets the value of the current state workflow variable. Upon the next iteration of the loop, this determines which branch (state) to execute.
Each 'state' may have complex logic within it to determine the next. Using the 'wait for item update' action, or 'request approval', will ensure the state machine wait on user input before deciding which state to process next.
For 'states' that transitioned based on mutually exclusive inputs, it may be better off having several workflows that run when the item is modified. At the start of each workflow, use the filter action to check if the input conditions are met. If it is not, the workflow will end. In this scenario, each workflow essentially becomes a state.