2. Create an Item View and Add Controls
In this step you will create an item view that will become the user interface for the Hello World application. You will create a new view from scratch, then add a label, a text box and a button control. You will configure a rule to validate the text box has an entry and if it does, you will show a confirmation message. In a later step, you will add this view to a Hello World Form to allow users to work with the view.
-
Begin by adding a new view to the Views category. This view is the user interface for the Hello World application. In K2 Designer, add a new item view and name it Hello World.
-
Begin by adding a new view from the Views category. The view is saved in the category. This is the user interface where you will enter a name, then click the button to submit your entry.
Right-click the Hello World SmartForms > Views category and select New View.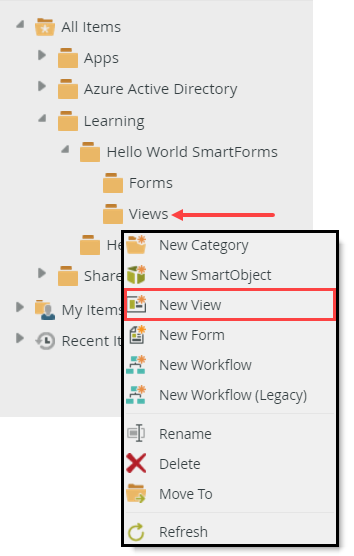
- Name the new view
Hello World
then confirm Item View as the view type. Click CREATE. (You do not need to change any of the other options on this screen. The category is correct since you created the view directly from the category. For this application, you do not have a data source.)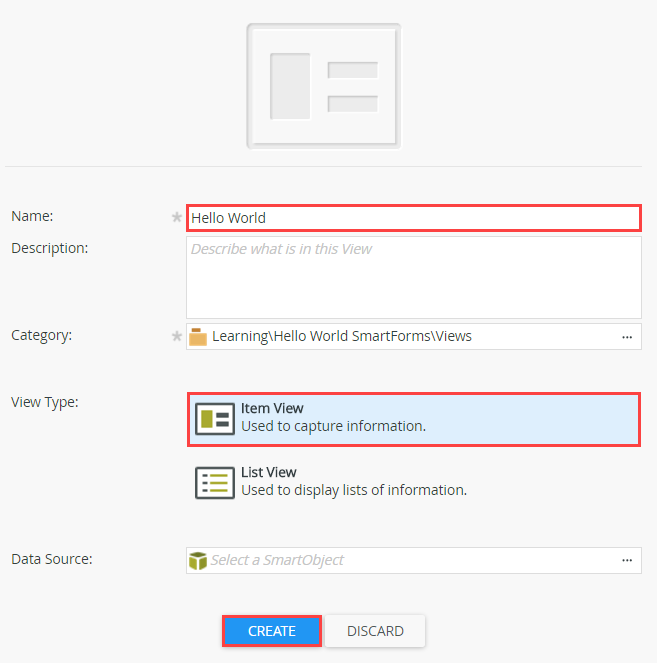
-
Begin by adding a new view from the Views category. The view is saved in the category. This is the user interface where you will enter a name, then click the button to submit your entry.
- Next, you will design the view. You will add an empty layout table, then add a label control, a text box control and a button control to the table. You will name each control from the Properties pane. On the LAYOUT screen:
- Select Create Layout Table Only, then set the number of columns to 2 and the number of rows to 2.
- Add a label control to the first table cell and change the Name to Name Label and change the Text property to Enter your name:.
- Add a text box control to the top row, second table cell and name it Name Text Box, then change the width of the text box control to 200px.
- Next, you will begin designing your view. First, an empty layout table is added, where you will specify the table to have two rows and two columns. The layout table cells keep your controls aligned with one another, so that your view has a nice flow to it. You can add and remove rows and columns at any time if you need to. After the layout table is created, you will add the label, text box and button controls to the table cells.
On the layout screen, click Create Layout Table Only.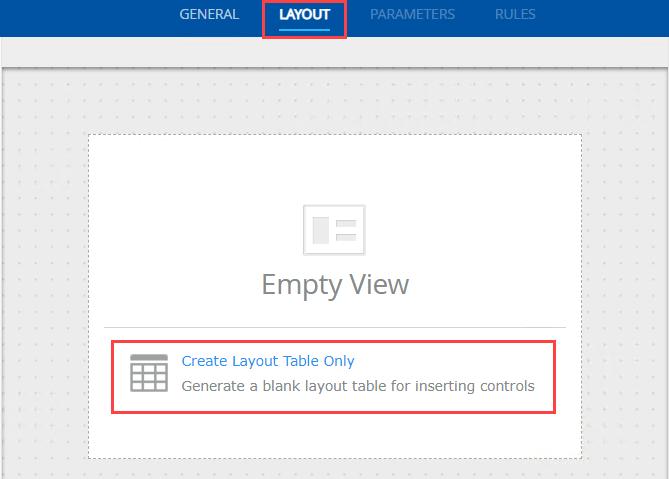
- Set the number of columns to
2
and the number of rows to
2
then click OK. - Expand the Toolbox pane on the left side of the screen, then drag a Label control into the first table cell.
Click the label control once to highlight it. In the Properties pane, change the Name to
Name Label
then change the Text to
Enter your name: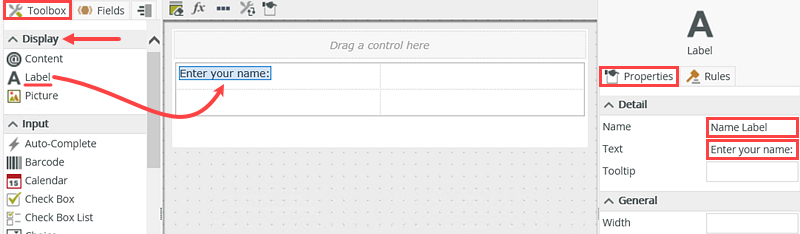
The Name property in the Properties pane is the control's identity. Controls are referenced by their name value, in rules, for example. The Text value is what the user sees; it is the control's display value. - Now you will add the text box control that you will use to enter a value. In the Toolbox pane, drag a Text Box control into the second table cell. Click to highlight the text box. From the Properties pane, change the Name to
Name Text Box
then confirm the Text property is empty. (You do not need a pre-populated display value for this field.) Scroll down in the Properties pane until you see the General heading. Change the Width to
200px
so that the text box is a reasonable size for entering data.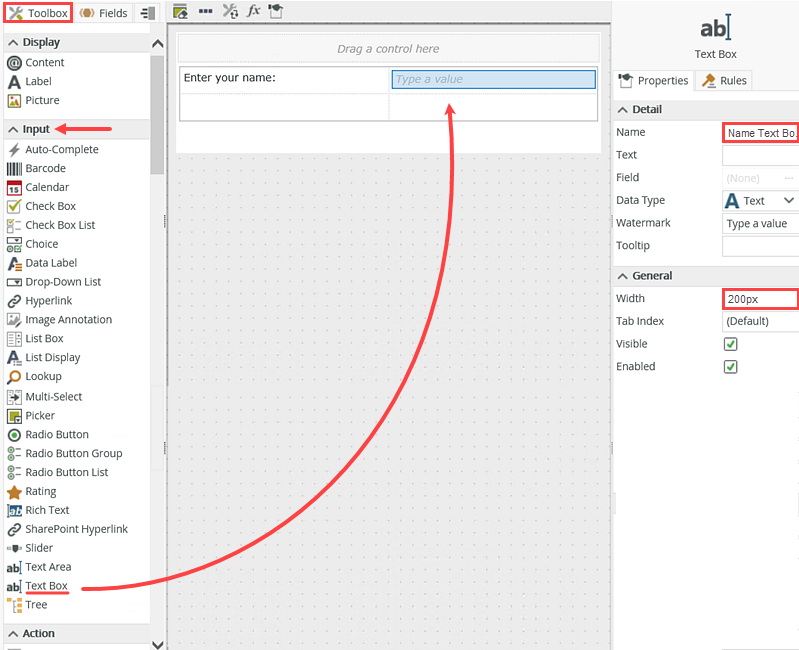
-
Next, add the button control that you will click to submit your Hello World entry. Add a button control to the second row, first table cell and name it Submit Button then change the text to Say Hi!.
- Next, you will add a button control. This control is the submit button that you will click to submit your Hello World entry. You will configure a rule in a later step so that a message pop-up appears when you click this button.
From the Toolbox pane, drag a Button control into the first table cell on the second row.
Click to highlight the button control. In the Properties pane, change the Name to
Submit Button
and change the Text to
Say Hi!.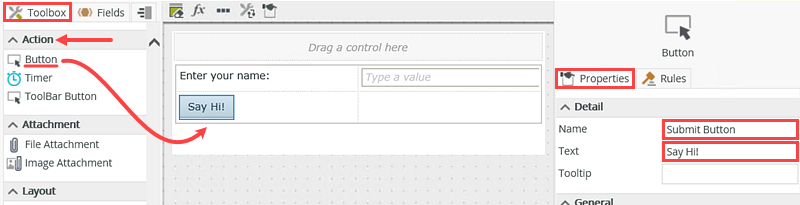
- Next, you will add a button control. This control is the submit button that you will click to submit your Hello World entry. You will configure a rule in a later step so that a message pop-up appears when you click this button.
-
Next, make the first column in the layout table narrower so that the text box control is closer to the label. This makes the view flow smoother from control to control. Adjust the width of the table’s first column so that it aligns closer to the Enter your name: label.
- Adjust the width of the table’s first column by dragging the table column resize bar to the left so that it aligns with the Enter your name label.
This improves the flow of the view as you scan from control to control.
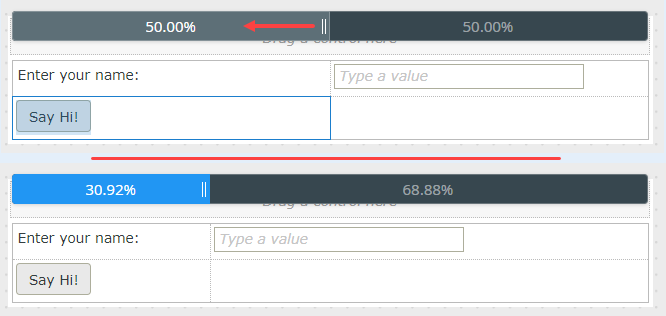
- Adjust the width of the table’s first column by dragging the table column resize bar to the left so that it aligns with the Enter your name label.
This improves the flow of the view as you scan from control to control.
-
Next, you will add and configure a rule for the Submit Button control. This rule executesfires after you click the button. First, you will add a condition that validates that there is a value in the text box, then you will add an action that displays a message box. Add a new rule and configure it as follows:
- the rule should fire when the submit button is clicked
- there is a condition that requires the Name Text Box control
- there is an action to show a message
- With your view created and formatting applied, you will now focus on rules. You will add a rule that fires when you click the submit button. You can add rules to forms, views and controls. To add a rule to a form or view, access the rules screen via the RULES tab found at the top of your screen in the breadcrumb bar. To add a rule to a control, you can also use the Rules tab found next to the Properties tab for the control.
You want the rule to execute fire when you click the submit button, so you will apply the rule directly to the submit button.
Click the Say Hi! button to select it. Click the control’s Rules tab (next to the Properties tab), then click Add Rule.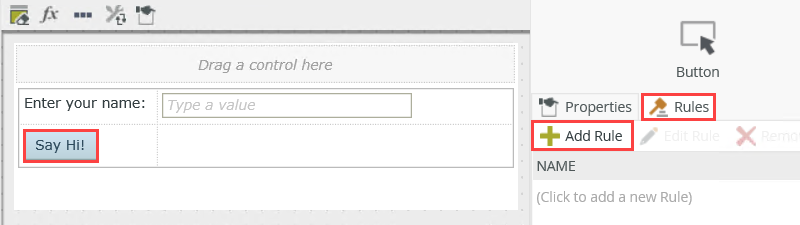
The first step is to add the event. Recall that an event is when something happens. In this case, it is when you click the submit button. Notice just below the rule title that the event has been added already (when the control is clicked). Because you had the submit button selected when you added the rule, the default control method is automatically added for you.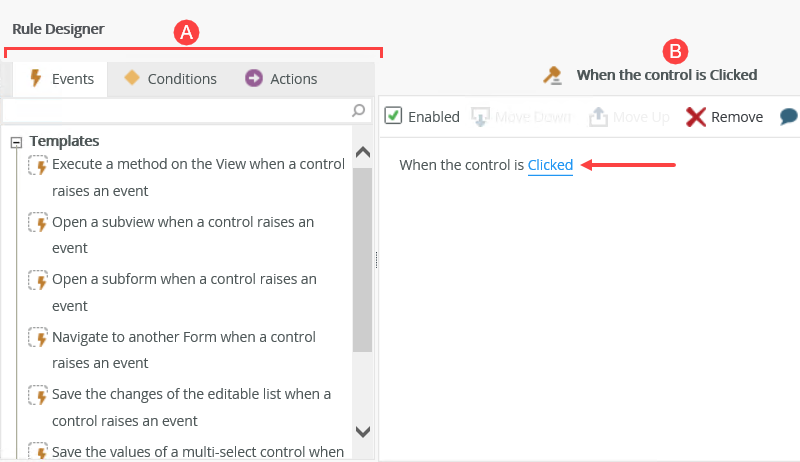
- Events define when the rule should run, such as when a button is clicked, or when the form loads. (Events are optional, you can define "event-less" rules that you can call from other rules.)
- Conditions define whether the rule should run. If the criteria are true, continue the rule, and if the criteria are not met, stop the rule. For example, a condition might evaluate a form to confirm that required fields have content. (Conditions are optional - not all rules will require conditions.)
- Actions define what the rule should do. For example, show a message, start a workflow, or enable a form field. Rules can contain multiple actions that are run in sequence or in parallel.
-
Now that you have added the event (when the submit button is clicked) you will add a condition. Recall that a condition evaluates if the criteria is true. You add the condition next because if the condition is not met, you don't want the action to fire. In this case, the condition will specify that the Name Text Box must contain a value. If it does not contain a value, then the condition is false and the action should not take place. You will add the action to show the user a message in later steps.
Click the Conditions tab. Scroll down through the available conditions until you reach the Validation heading.
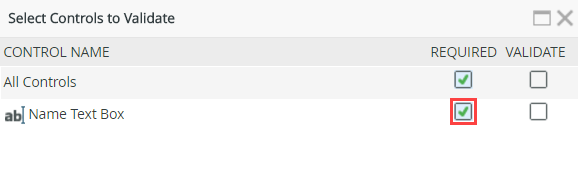
Click once on the View passes validation condition to add it to the When the control Clicked rule, then click the (configure) link.
-
Check the box to require the Name Text Box, then click OK.
-
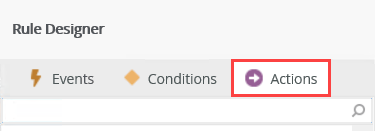
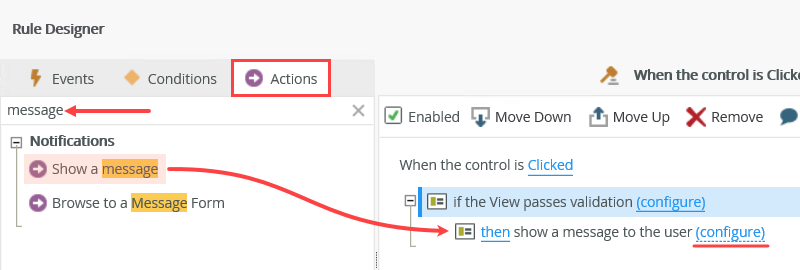
Now that you have configured a condition to require the Name Text Box, the second configuration to your rule is to add an action to show a message. Begin by selecting the Actions tab.
- To help you find the message action quicker, you can search for keywords to filter the actions. Enter
message
in the search box. The actions are filtered as you type. -
Click once on the Show a message action to add it to the rule definition pane. Click the (configure) link.
- Now you will configure the message you want to show to the user. You will be using properties found in the Context Browser. In the steps below, you will be dragging the Name Text Box into your message. At runtime, this value is replaced with the name entered into the text box. You will also add the current date to your message. The Current Date system value is replaced with the actual current date
. (See the image below the instructions for reference on what the completed message should look like.)
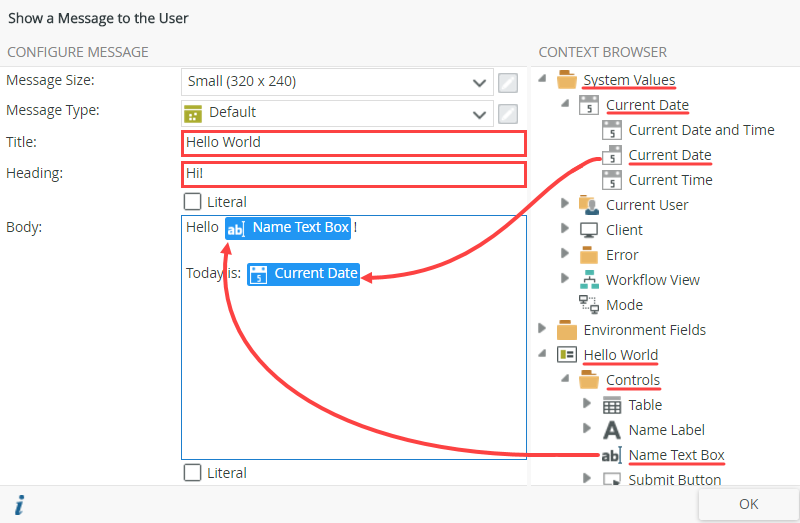
For the Title that should appear at the very top of the message box, enter
Hello World.
For the Heading that will appear at the top of your message, enter
Hi!.
For the Body (the actual content of the message box), enter
Hello
and then, from the Context Browser, expand the Hello World view, then Controls. Append the Name Text Box control to the end of the line (replacing [Name Text Box] with the context browser property).
After the Name Text Box, enter two new lines and enter
Today is:
then drag the Current Date from the System Values after the Today Is: text. (At runtime, this field is replaced with the current date).
The screenshot below is an example of the final configuration of the show a message action. -
Click OK to close the message configuration screen, then OK once again to close the Rule Designer. Click FINISH in the upper right corner of your screen to save and exit the view designer.
Rules consist of events, conditions and actions. A valid rule contains at least one action. - Test that the view behaves as expected. Run the Hello World view. Confirm the message box appears with the name you entered in the Name Text Box and current date after you click the submit button.
-
You will test the basic functionality of the view by running it directly from the K2 Designer. Click to highlight the Hello World view. Click Run from the Properties pane.
-
Enter your name and click Say Hi!. Confirm the confirmation message comes up with your name and today’s date.
(You are testing your view by running it from within K2 Designer. Testing from with the designer provides a convenient method for testing view functionality. However, you should note that other users cannot access or submit views from with the designer. Users can only access forms and in the next step, you will create a form, then add this view to the form. By doing so, your users will be able to access and submit the form that contains the view that you just created)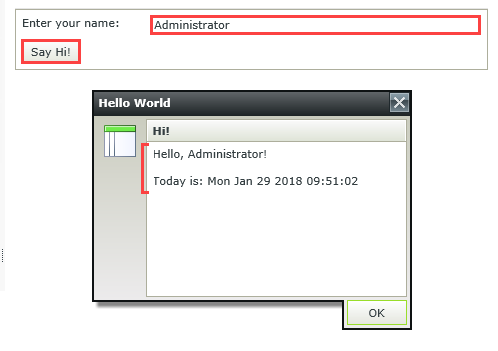
- Click the Hello World view title in the explorer to close the test run.
-
You will test the basic functionality of the view by running it directly from the K2 Designer. Click to highlight the Hello World view. Click Run from the Properties pane.
Review
In this step, you created the Hello World view. You added a label control, a text box control and a button control. You formatted the layout by setting the width of the text box control and by adjusting the layout table column width. You added a rule that fires when you click the submit button. You added a condition to require the Name Text Box and an action to show a message if the condition is true (or met). In the next step, you will generate a new form from the Hello World View.