11. Edit the Contact List Form
In this step you will edit the Contact List Form and add a rule that opens the Contact Details Form when you click a row in the contact list. Remember, the Contact List Form is the point of entry for contact management. This list is read-only, so you cannot edit contact records from the list itself. You will add a rule that launches the Contact Details Form when you click a line item on the Contact List Form. The Contact Details Form loads with the selected contact's details.
-
Edit the Contact List Form. Add a new rule that fires when the Contact List View raises an event. For the event, select list item click. Change the rule name to
Contact List Item Clicked. This is the rule that fires when you click a row in the list view.
- Now you will add the rule that passes the Contact SmartObject > ID value to the Contact Details Form. This is the form you created in the last step. This action populates the item (header) view on the Contact Details Form with the record selected.
In K2 Designer, right-click, then Edit the Contact List Form. Click the RULES button in the breadcrumb bar. Click Add Rule. - From the Events tab, click When a View raises an event to add it to the rule definition pane. Click the select View link and select Contact List View. Click the select method link and select List item click. Rename the rule
Contact List Item Clicked
so that you can tell at a glance what the rule does. This event fires an action when you click a row on the Contact List View.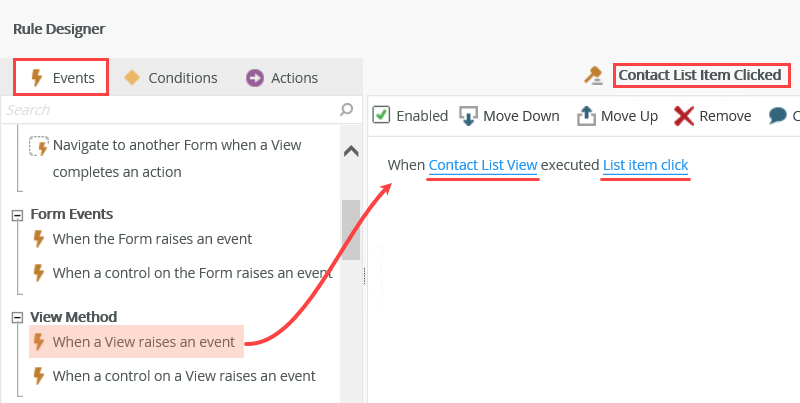
- Now you will add the rule that passes the Contact SmartObject > ID value to the Contact Details Form. This is the form you created in the last step. This action populates the item (header) view on the Contact Details Form with the record selected.
- Add an action to navigate to, then execute the load method for the Contact Details Form > Contact Item View. This is simply saying to open the Contact Details Form after you click a row on the Contact List Form.
- Now you will configure the action that fires after you click a row. First, you are going to open the Contact Details Form. Then, you going to load the header view with the selected contact's header information.
Switch to the Actions tab. Search for
navigation
then click Navigate to another form and execute a View method to add it to the rule definition pane. Click the select Form link. Select the Contact Details Form. Click the select View link and select the Contact Item View. Click the select method link and select Load. Click (configure).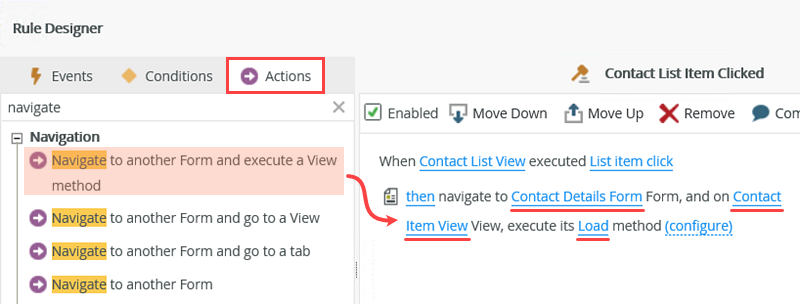
- Now you will configure the action that fires after you click a row. First, you are going to open the Contact Details Form. Then, you going to load the header view with the selected contact's header information.
-
Map the Contact Details Form > Contact Item View > Contact SmartObject > ID to the ID input property. You are passing the ID of the selected contact, over to the header view on the Contact Details Form. The header view loads with the selected contact's information.
- This rule takes the ID of the contact you clicked, then passes it to the Contact Details Form > item (header) view. The header loads with the selected contact's information.
Map the Contact List Form > Contact List View > Contact SmartObject > ID property to the ID input property. Click FINISH.
To summarize the last step and this step, you are mapping the ID of the record from the Contact List Form that you clicked, to the Contact Details Form > Contact Item View. The item view now has the contact record loaded, and the rule you configured in the previous step takes that ID and uses it to retrieve the correct details records.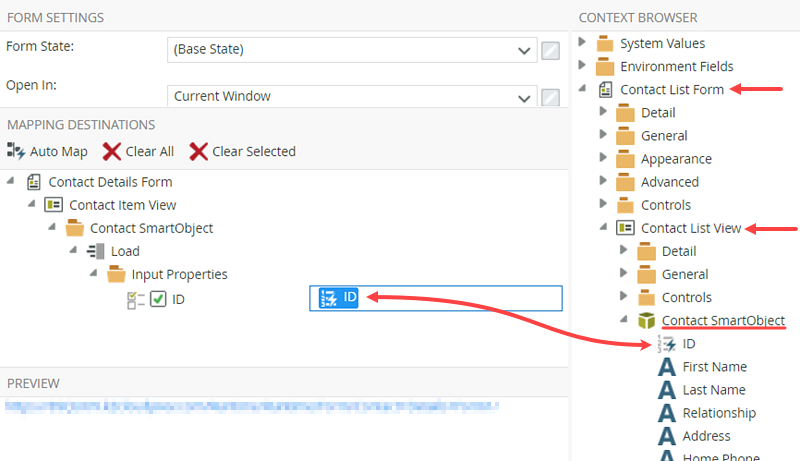
The Contact List Item Clicked rule should look like the image below.
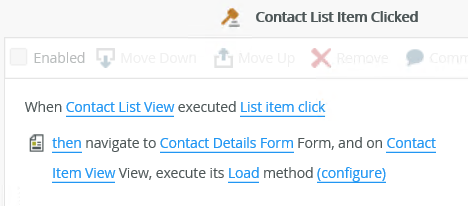
- Click OK to close the rule designer. Click FINISH to save and exit the form.
- This rule takes the ID of the contact you clicked, then passes it to the Contact Details Form > item (header) view. The header loads with the selected contact's information.
Review
In this step, you added a rule that opens the Contact Details Form when you click a row in the contact list. You could not add this rule when you first created the Contact List Form, because the details form did not exist yet! When you click a row, the details form launches, then uses the Contact List Form record ID as the input property for the item (header) view. After the item view loads, the rule you created in the last step kicks in and loads the list (details) view records. Congratulations! You have completed building the Contact Management application. In the next step, you will test the application by adding, editing and deleting contact records.
We are done creating our application, so now you can test it!