10. Add Rules to the Contact Details Form Buttons
In this step you will add rules to complete the functionality of the Save, Delete and Cancel buttons. The Cancel button simply returns you to the Contact List Form. The Delete button deletes the header record and associated details records, then returns you to the Contact List Form. The Save button has multiple steps, before returning you to the Contact List Form:
- updates changes to the header record
- updates changes to associated details records
- adds new details records
- deletes removed details records
-
Begin with the Button Cancel control. This rule returns you to the Contact List Form. Add a new rule for when Button Cancel is clicked. Add an action to navigate to the Contact List Form and execute the Get List method.
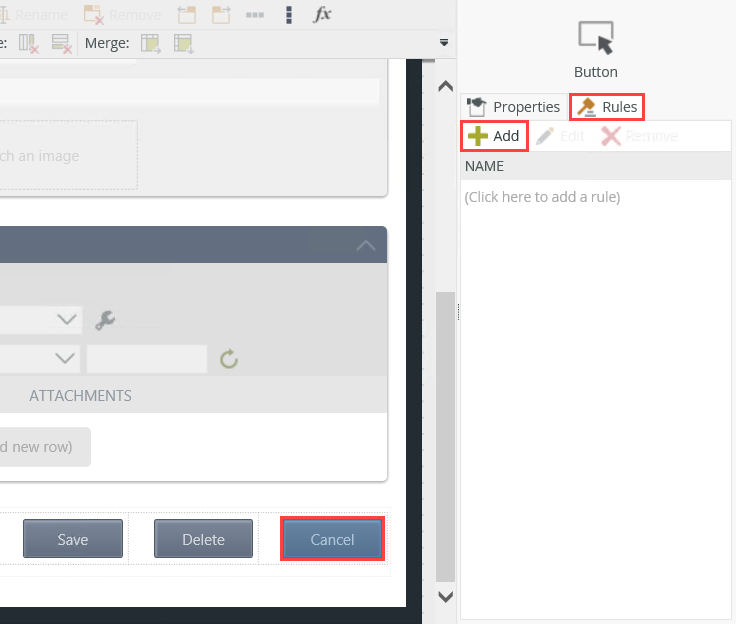
- Click to highlight Button Cancel. Click the Rules tab (next to the Properties tab) and select Add. You are adding a new rule, specific to the Cancel button.
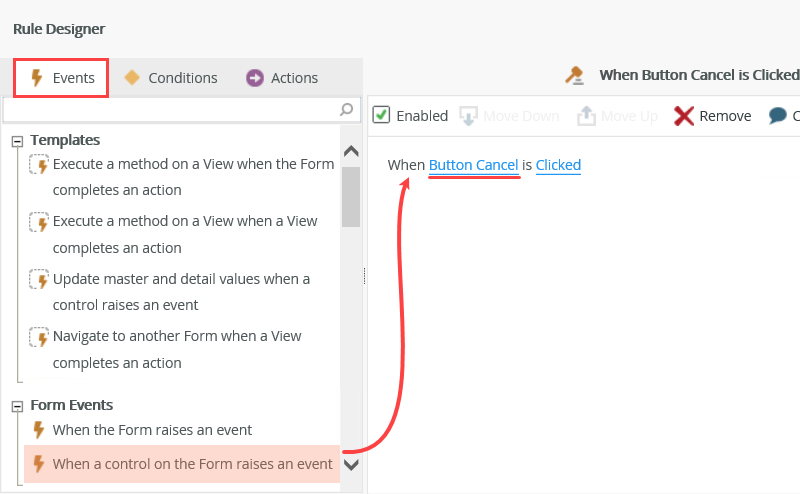
- Confirm the Events tab is active, click once on When a control on the Form raises an event to add it to the rule definition pane. Click the select control link and select Button Cancel.
- Switch to the Actions tab. Search for
navigate
then add the Navigate to another Form and execute a View method action to the rule definition pane. Click the select Form link and select the Contact List Form. Click select View and select Contact List View. Click select method and select Get List. You do not need to configure this action any further. The Get List method returns all contact records to the list form, which is what you want.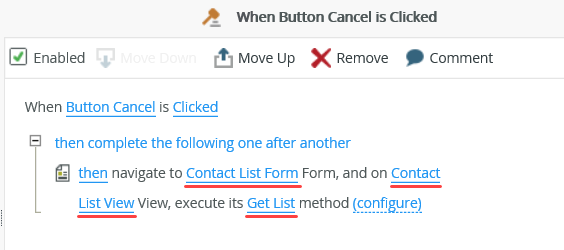
The Cancel Button rule should look like the image below.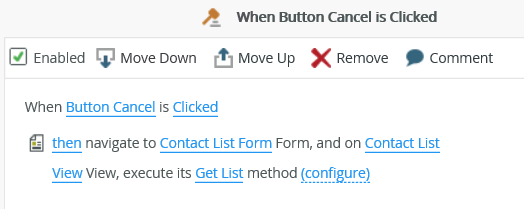
- Click OK to exit the rule designer.
Next, you will add an action that redirects you back to the Contact List Form, then refreshes the list.
- Click to highlight Button Cancel. Click the Rules tab (next to the Properties tab) and select Add. You are adding a new rule, specific to the Cancel button.
-
Next, you will configure the rule for the Button Delete control. Add a new rule for when Button Delete is
clicked.
- Click LAYOUT in the breadcrumb bar to return to the design canvas. Click to highlight the Button Delete control. Click the Rules tab (next to the Properties tab on the right-side of your screen), then click Add. Click When a control on a Form raises an event to add it to the rule definition pane. Select Button Delete as the control.
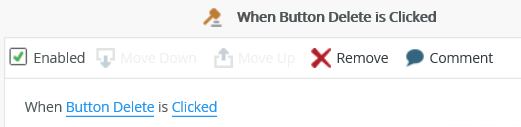
- Click LAYOUT in the breadcrumb bar to return to the design canvas. Click to highlight the Button Delete control. Click the Rules tab (next to the Properties tab on the right-side of your screen), then click Add. Click When a control on a Form raises an event to add it to the rule definition pane. Select Button Delete as the control.
-
Now you will add a confirmation action to confirm you really want to delete the contact record. Add a confirmation asking Are you sure you want to delete this contact?
- Click the Actions tab. Search for
confirmation
then add the Get confirmation from user action to the rule definition pane. Click the specify heading link and enter
Confirm Delete
then click OK. Click the specify message link and enter
Are you sure you want to delete this contact?
then click OK.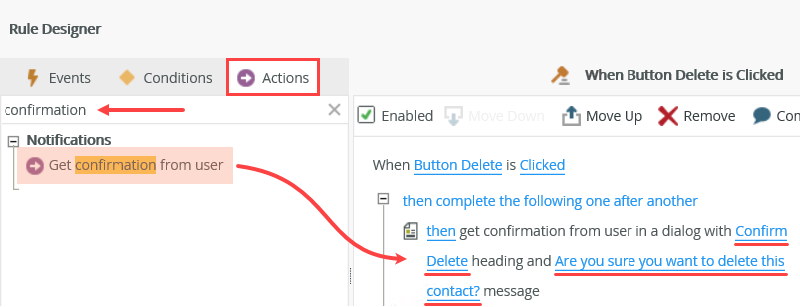
- Click the Actions tab. Search for
-
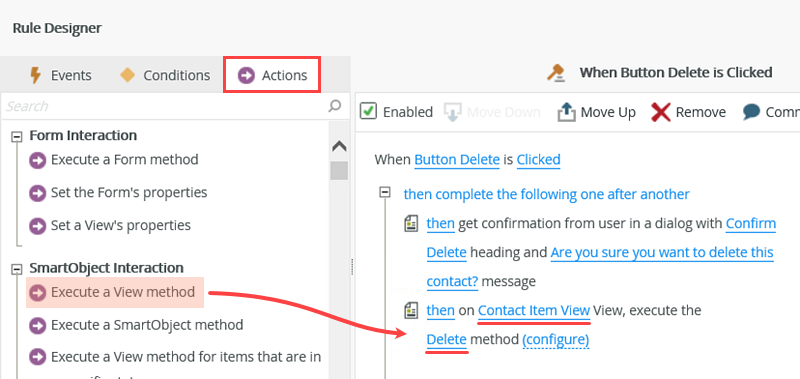
Next, you will execute delete methods for the Contact Item View and the Contact Notes and Attachments List View to remove the header and details records.
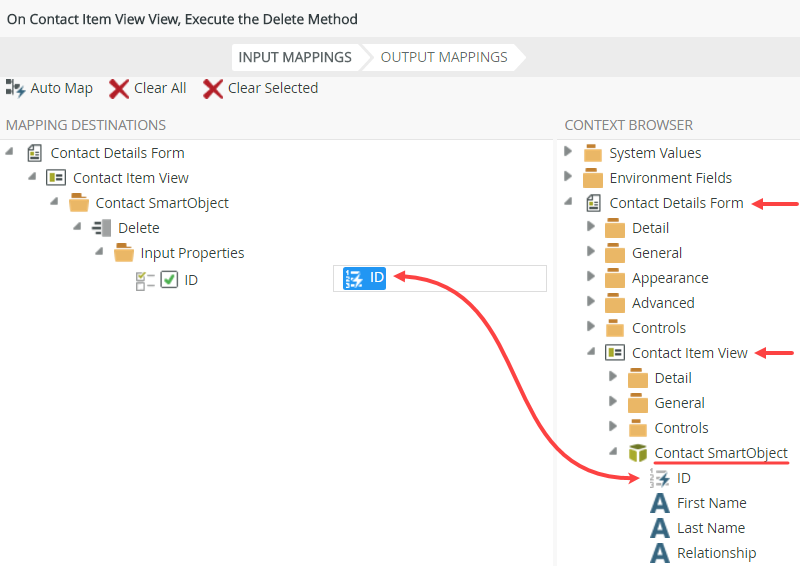
Execute the Delete method for the Contact Item View. Map the Contact Item View > Contact SmartObject > ID to the ID input property. This step deletes the header record.- Clear out the confirmation search keyword and press <ENTER> so you can see all actions. Click Execute a View method to add it to the rule definition pane. Click the select View link and select the Contact Item View. Click the select method link and select Delete. Click (configure).
- The only input property you need is the ID of the record you want to delete. Drag the Contact Details Form > Contact Item View > Contact SmartObject > ID property into the ID input property. Click FINISH.
- Clear out the confirmation search keyword and press <ENTER> so you can see all actions. Click Execute a View method to add it to the rule definition pane. Click the select View link and select the Contact Item View. Click the select method link and select Delete. Click (configure).
-
Next, you will add the action to delete the child records. Remember, the records form a list. There could be many child records for each parent record. Therefore, you need the delete action to loop through each of the child records and delete them. You do this with a for each condition.
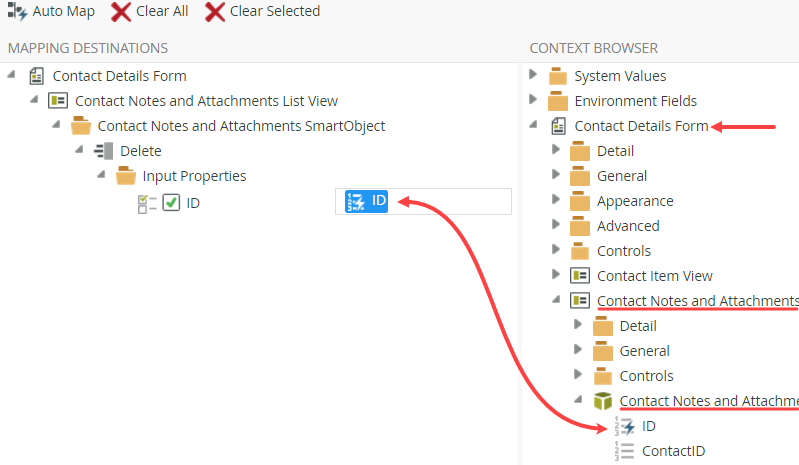
Add the action to delete the child records. First, add a condition, For each item in a List View, and set the item state to All. Under the condition, execute a view method on the Contact Notes and Attachments List View, Delete method. Use the Contact Notes and Attachments Item View > Contact Notes and Attachments SmartObject > ID for the ID input property.- Click the Conditions tab. Search for
for each
then click to add the For each item in a List View to the rule definition pane. Click the select item state link and select All. The view should be set by default, Contact Notes and Attachments List View. Remember when the Contact Details Form loads, you have rules in place to load the item (header) view, then load the list (details) view. The list view contains only the records for the contact you selected. So, you want this condition to apply to all rows in the list.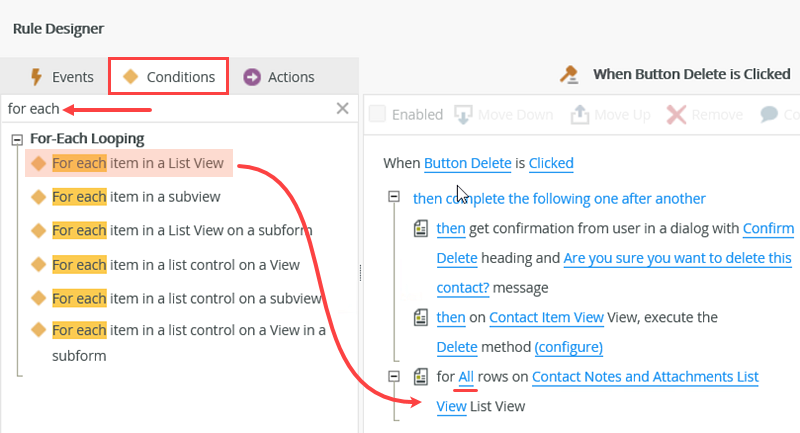
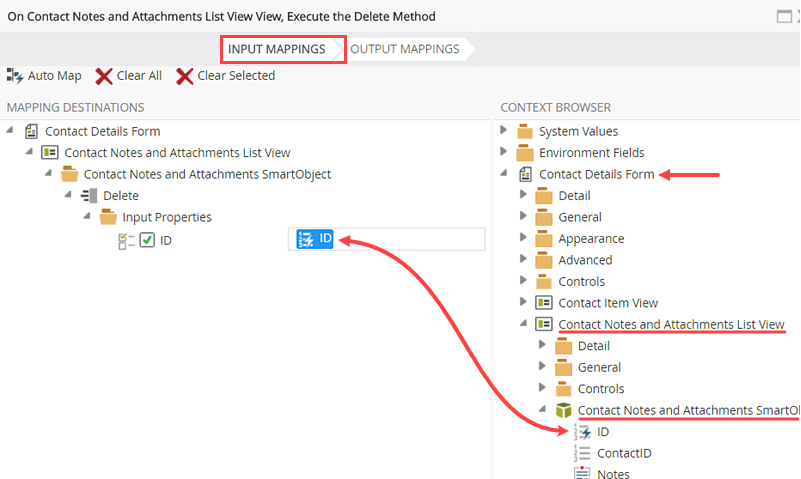
- Switch to the Actions tab. Click Execute a View method to add the action to the rule definition pane. Click select View and select Contact Notes and Attachments List View. Click select method and select Delete. Click (configure). Here, you are saying to delete all the items in the list.
- On the INPUT MAPPINGS screen, drag the Contact Details Form > Contact Notes and Attachments List View > Contact Notes and Attachments SmartObject > ID property to the ID input property. Click FINISH. And finally, you are mapping the SmartObject record IDs to loop through and delete.
- Click the Conditions tab. Search for
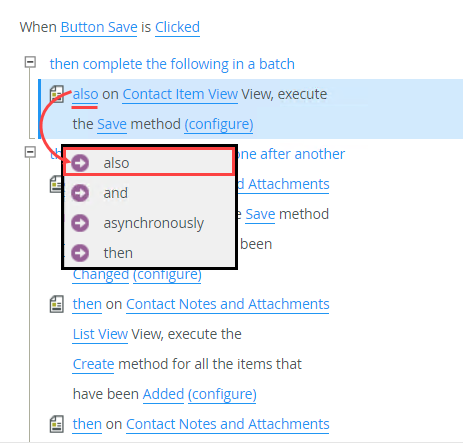
- Next, you will change the action processing order so that the two delete actions run as a batch. By default, each action fires independently one after another. You want them to fire as a batch, in other words processing all the changes before moving on to the next rule.
Change the processing order so the two delete actions run as a batch.- Locate the first delete action for the Contact Item View. Click then and change it to also.
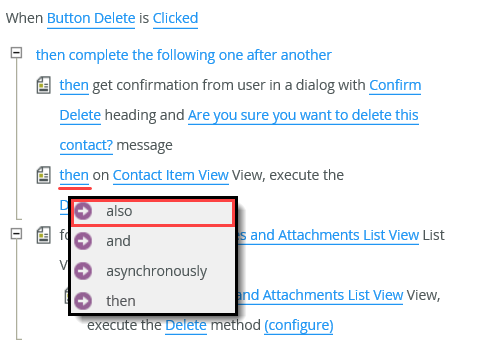
- Locate the second delete action for the Contact Notes and Attachments View. Click then and change it to also.
- Locate the first delete action for the Contact Item View. Click then and change it to also.
-
Next, you will add an action to return to the Contact List Form.
Add an action to navigate back to the Contact List Form, then execute the Get List method on the Contact Item View.- Search for
navigate
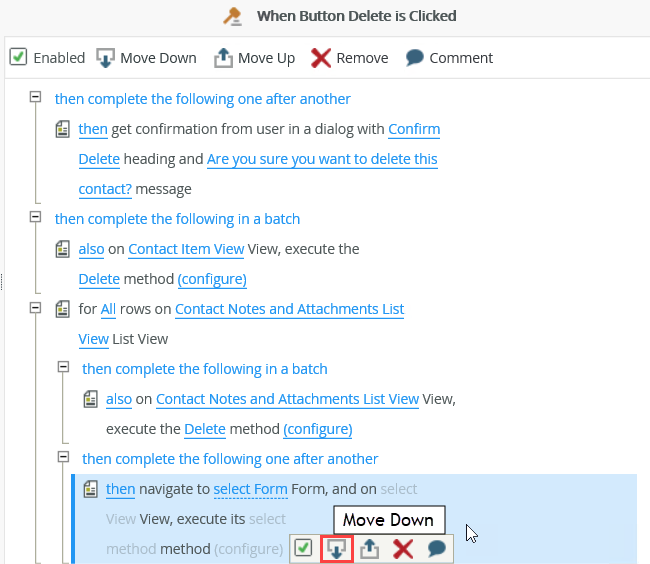
then click Navigate to a another Form and execute a View method to add it to the rule definition pane. - Click to highlight the navigate action, then use the down arrow to move the action down a step. (When an action or condition is highlighted, hover over the line to expose the controls.)
- For the form, select Contact List Form. For the view, select Contact List View. For the method, select Get List.
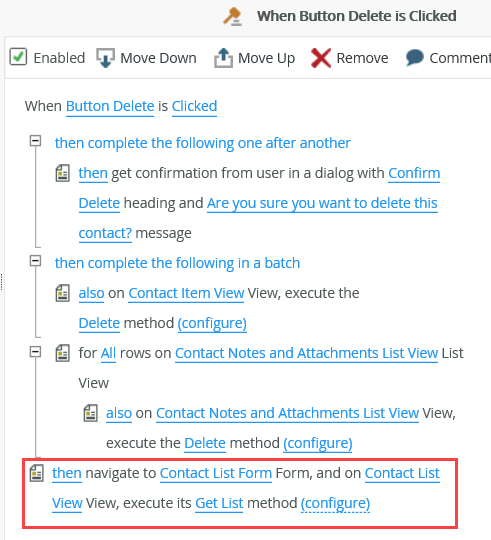
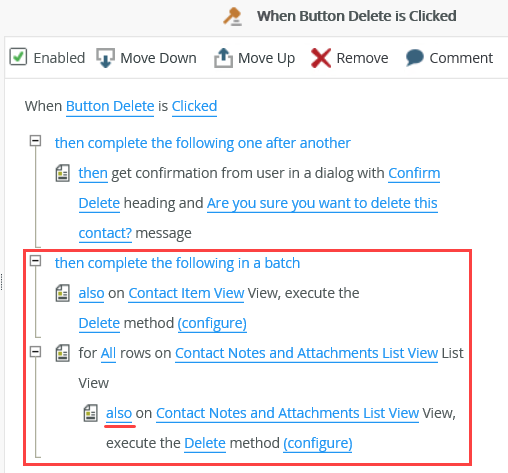
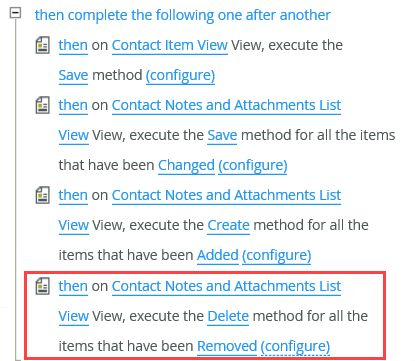
The Delete Button rule should look like the image below.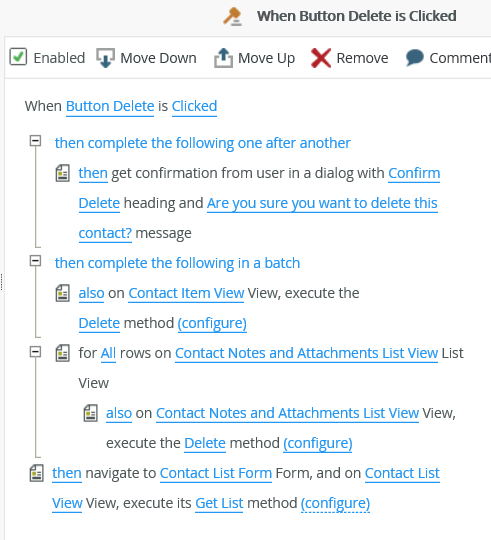
- Click OK to exit the rule designer.
By default, the action is placed at the bottom, nesting it into the batch processing node. This action does not need to be a part of the batch processing, so you will move it down a step.
- Search for
-
The last rule configuration is for Button Save. This button is more complex, as you will save any changes to the header record first, then save changes, additions and removals for the details records. Begin with saving the header record changes.
Add a new rule for when Button Save is clicked. Execute the Save method for the Contact Item View view. Auto-map the input properties, then replace the ID input property. with the Contact SmartObject > ID property. Do not skip this step! You are likely to see errors if the correct record is not updated.- Click Button Save. Click the Rules tab, then Add. Add the event When a control on the Form raises an event, and select Button Save.
- Switch to the Actions tab, then add an Execute a View method to the rule definition pane. Select the Contact Item View, then the Save method. Remember "save" is the equivalent of "update". Click (configure).

- To save time, you will auto-map the input properties. There is an adjustment you must make, however. You want to update an existing record. Therefore, the record ID already exists. You must delete the ID created by the auto-mapping and replace it with the existing Contact SmartObject ID.
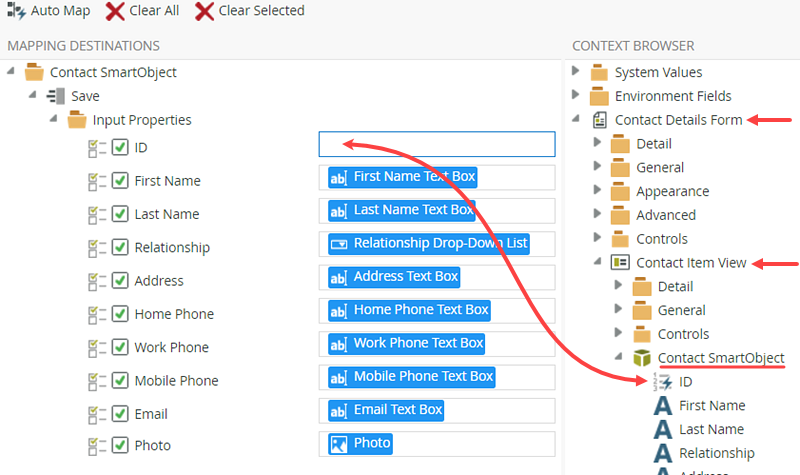
Click Auto-Map. Notice the ID input property. Click once to the right of the property, then use your <BACKSPACE> keyboard button to remove it.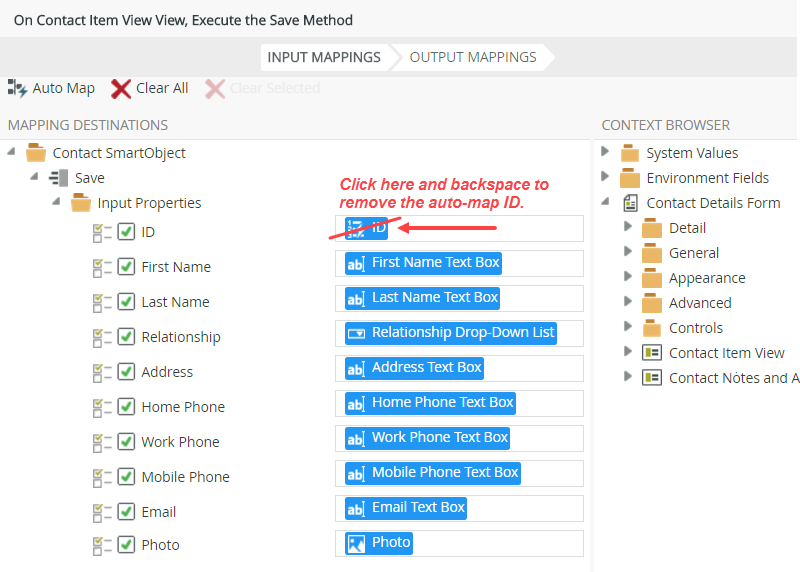
- Drag the Contact Details Form > Contact Item View > Contact SmartObject > ID property into the ID input property text box. You have now mapped the input properties to the current record ID. Click FINISH.When you auto-map the input properties, the form controls are mapped to the Contact SmartObject properties. An ID is mapped as well. This ID is a "new" record ID, so if you click save, a new record is created. This is not what you want. You want to update an existing record. So you map the "existing" SmartObject ID to the input property ID. Now, when you click save, the existing record is updated with the matching ID.
-
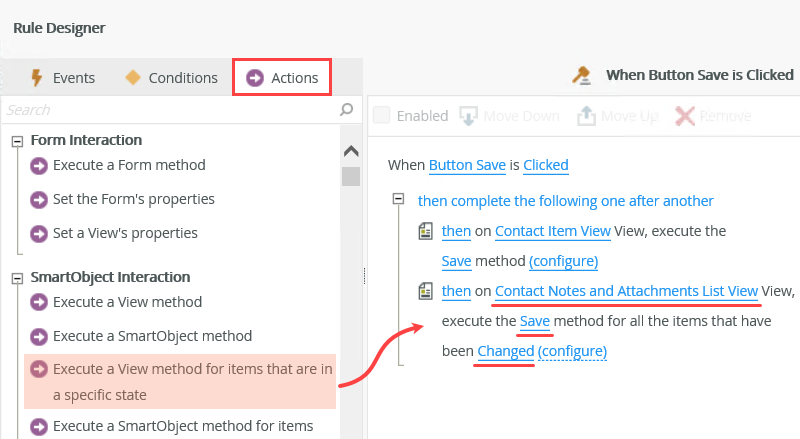
Add an action to execute the Save method for items that have changed on the Contact Notes and Attachments List View. Map the Contact SmartObject > ID to the ContactID input property. Map the Contact Notes and Attachments SmartObject properties to the remaining input properties.
- Add an Execute a View method for items that are in a specific state action to the rule definition pane. Select the Contact Notes and Attachments List View, then select the Save method. For the state, select Changed. Click (configure).
- On the INPUT PROPERTIES screen, drag the Contact Details Form > Contact Item View > Contact SmartObject > ID property into the ID input property. Remember, the ID property and ContactID property are the common properties that bind the parent and child records together.
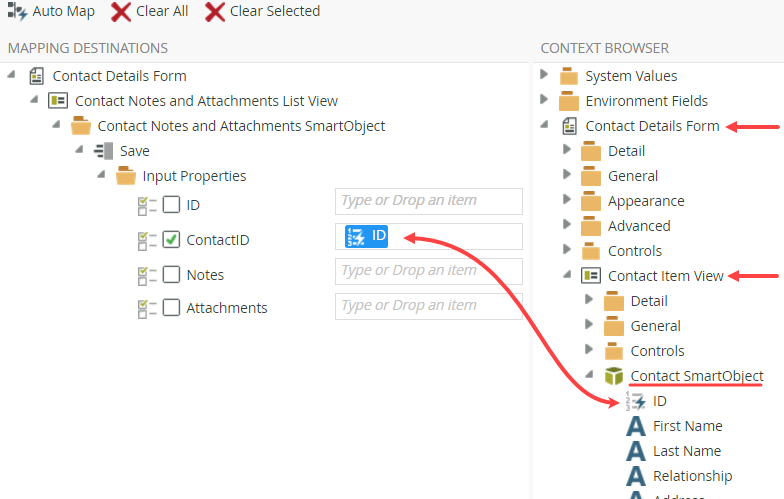
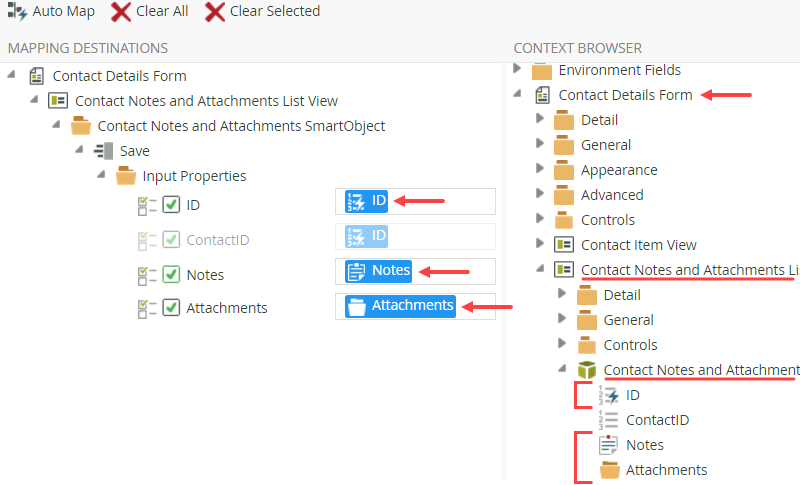
- Expand the Contact Details Form > Contact Notes and Attachments List View > Contact Notes and Attachments SmartObject nodes. Drag the ID, Notes and Attachments properties into their respective input property properties. Click FINISH.
- Add an Execute a View method for items that are in a specific state action to the rule definition pane. Select the Contact Notes and Attachments List View, then select the Save method. For the state, select Changed. Click (configure).
- To add new notes/attachments to an edited contact, execute the Create method for items that have been added on the Contact Notes and Attachments List View. Map the Contact SmartObject > ID property to the ContactID input property. Map the remaining input properties from the Contact Notes and Attachments SmartObject.
- Add another Execute a View method for items that are in a specific state action to the rule definition pane. Select the Contact Notes and Attachments List View and the Create method. For the state, select Added. Click the (configure) link.
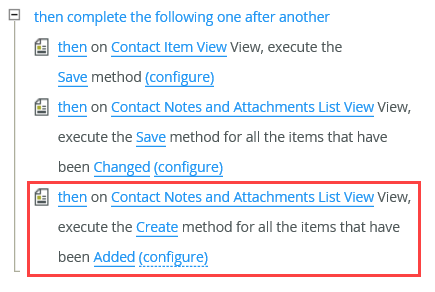
- Map the Contact Details Form > Contact Item View > Contact SmartObject > ID property to the ContactID input property.
- Map the Contact Details Forms > Contact Notes and Attachments List View > Contact Notes and Attachments SmartObject > Notes and Attachments properties to their respective input properties. You do not need to map the ID since this is a new record. The IDs will be created for the records. Click FINISH.
- Add another Execute a View method for items that are in a specific state action to the rule definition pane. Select the Contact Notes and Attachments List View and the Create method. For the state, select Added. Click the (configure) link.
-
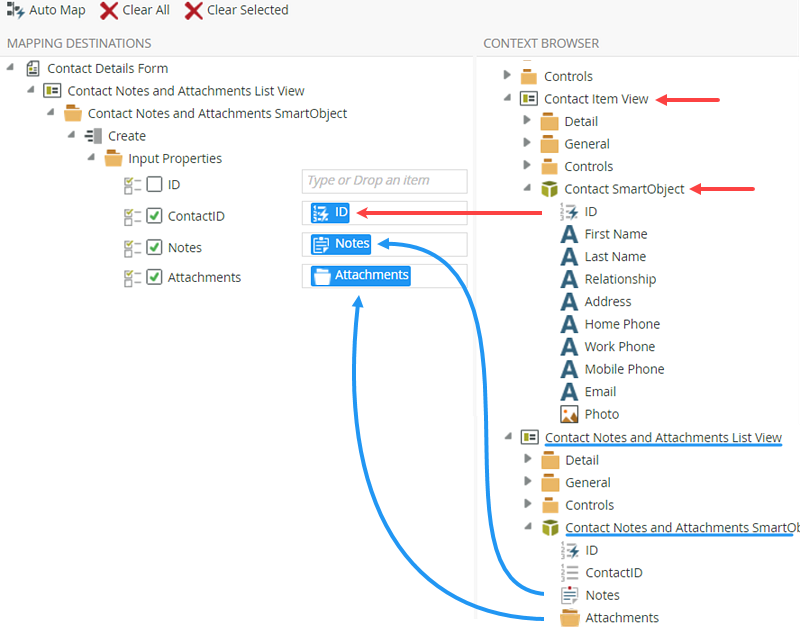
Add an action to execute the Delete method for items that have been removed from the Contact Notes and Attachments List View. Map the Contact Notes and Attachments SmartObject > ID property to the ID input property.
- Add a final Execute a View method for items that are in a specific state action to the rule definition pane. Select the Contact Notes and Attachments List View and the Delete method. For the state, select Removed. Click (configure) link.
- Map the Contact Notes and Attachments List View > Contact Notes and Attachments SmartObject > ID property to the ID input property. Click FINISH.
- Add a final Execute a View method for items that are in a specific state action to the rule definition pane. Select the Contact Notes and Attachments List View and the Delete method. For the state, select Removed. Click (configure) link.
-
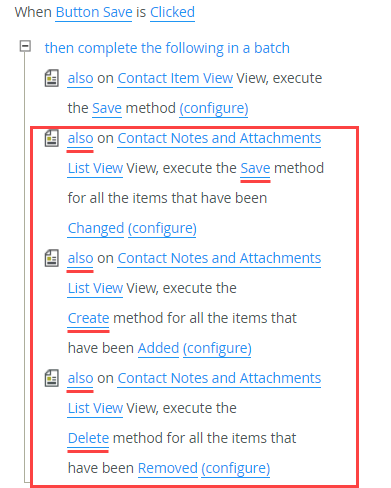
The next configuration for the Button Save rule is to change the processing order for the create, save and delete actions. Change all of the above actions to process as a batch.
- Locate the Save action for the Contact Item View. Click then and change it to also.
- Repeat the step above and change the remaining Contact Notes and Attachments List View actions to also. (Save, Create, Delete)
- Locate the Save action for the Contact Item View. Click then and change it to also.
-
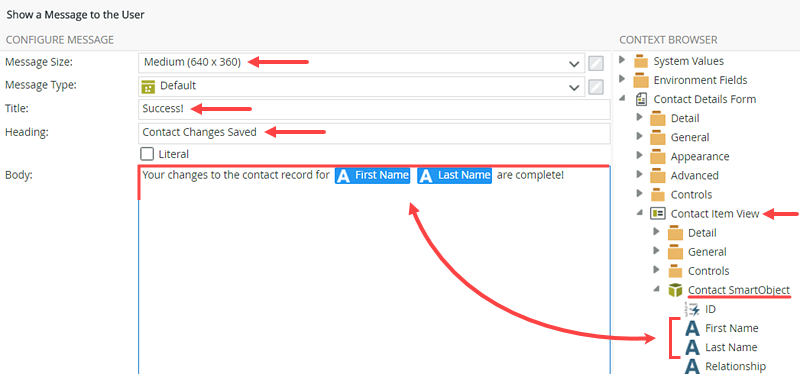
Next, you will show a message so that you know the changes were processed. Show a message confirming the changes to the contact record.
- Search for, then add a Show a message action to the rule definition pane. Click the configure link.
- Configure the message using the image below for reference. You can add your own content as well, if you prefer. Click OK.
-
Next, you will add an action to navigate back to the Contact List Form. Add an action to navigate back to the Contact List Form, then execute the Get List method on the Contact Item View.
- Search for
navigate
then click Navigate to another Form and execute a View method to add it to the rule definition pane. For the form, select Contact List Form. For the view, select Contact List View. For the method, select Get List.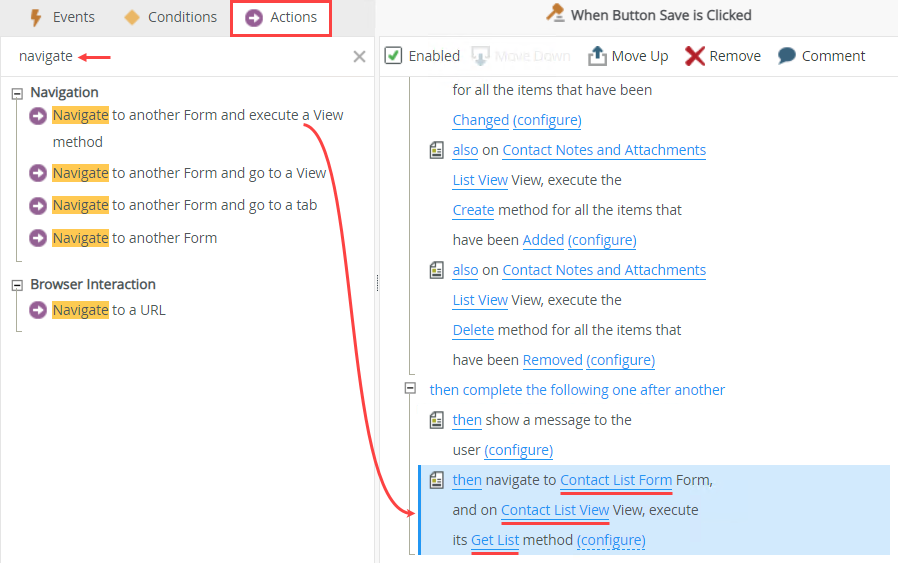
Your Button Save rule should look like the image below.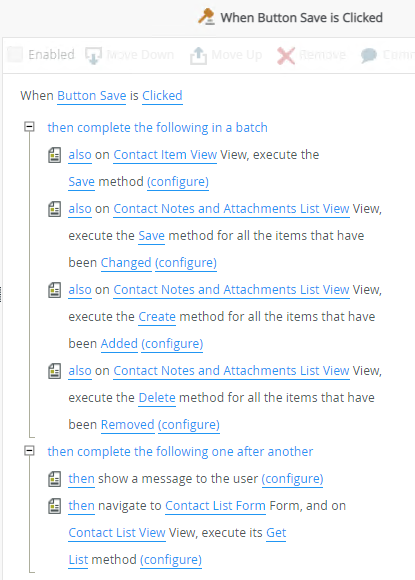
- Click OK to complete the Button Save rule.
- Search for
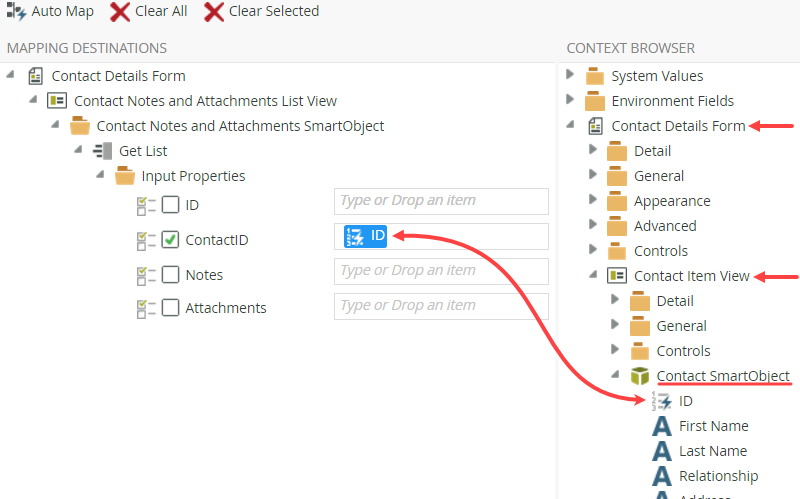
- Before leaving the Contact Details Form, there is one last rule you need to add. In a later step, you will configure a rule that launches the Contact Details Form when you click a list item on the Contact List Form. Looking at the details form, you have the header (Contact Item View) and the details (Contact Notes and Attachments List View). When you click the list item on the Contact List Form, the record ID passes to the Contact Item View > ID property on the Contact Details Form. The list view (Contact Notes and Attachments List View) does not know which records to load because the ID was not passed to this view. The result is the list view loads with no records. The rule you will add passes the appropriate ID to the details records.
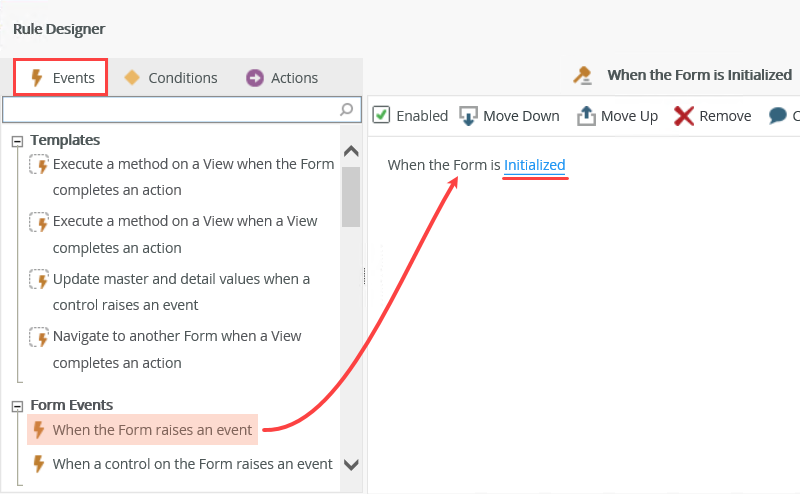
Add a new rule for when the Form raises an event. The event is Initialized. Change the rule name to Form Load After List Item Click, then execute the Contact Notes and Attachments List View, Get List method. Map the Contact Details Form > Contact Item View > Contact SmartObject > ID property into the ContactID input property.- Still on the RULES screen, click Add Rule.

- With the Events tab active, click When the Form raises an event to add it to the rule definition pane. Click the select event link and select Initialized. This is to start the subsequent action if the form loaded.
- Next, you will change the rule name so that it is clear what the rule does. Click the exiting title When the Form is Initialized in the tab (once) to select the name. Change When the Form is Initialized to
Form Load After List Item Click
then switch to the Actions tab.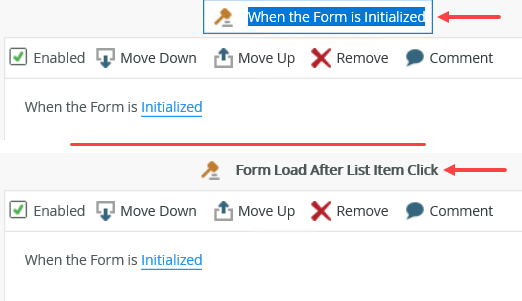
- Click Execute a View method to add it to the rule definition pane. Click the select View link and select Contact Notes and Attachments List View. Click select method and select Get List. Click (configure).
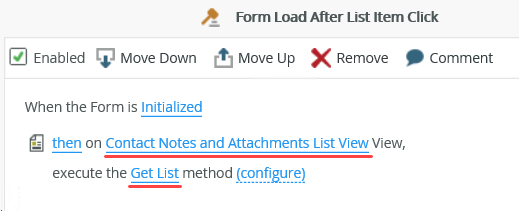
- Drag the Contact Details Form > Contact Item View > Contact SmartObject > ID property into the ContactID input property. Click FINISH. Click OK to exit the rule designer. Remember that the header (Contact Item View) loaded the record of the list item clicked on the Contact List Form. Therefore, the header record ID is stored in the Contact SmartObject. You are taking this ID and passing it through to the details records. The associated child records will be loaded.
- Click FINISH (upper right corner of your screen) to save and exit the Contact Details Form configuration.
- Still on the RULES screen, click Add Rule.
Review
In this step, you completed the rules for the three button controls: Save, Delete and Cancel. The Cancel button rule returns you to the Contact List Form. The Delete button rule removes the header and details records, then returns you to the Contact List Form. The Save button rule is more complex as you must configure actions for both the header view and the details view. First, you save any changes to the header record. Next, you save any changes to existing details records. Next, you create new details records for new line items added, then delete details records for line items removed.
In the next step, you will edit the Contact List Form and add the rule that launches the details form after you click a list item.