12. Configure the Start Step
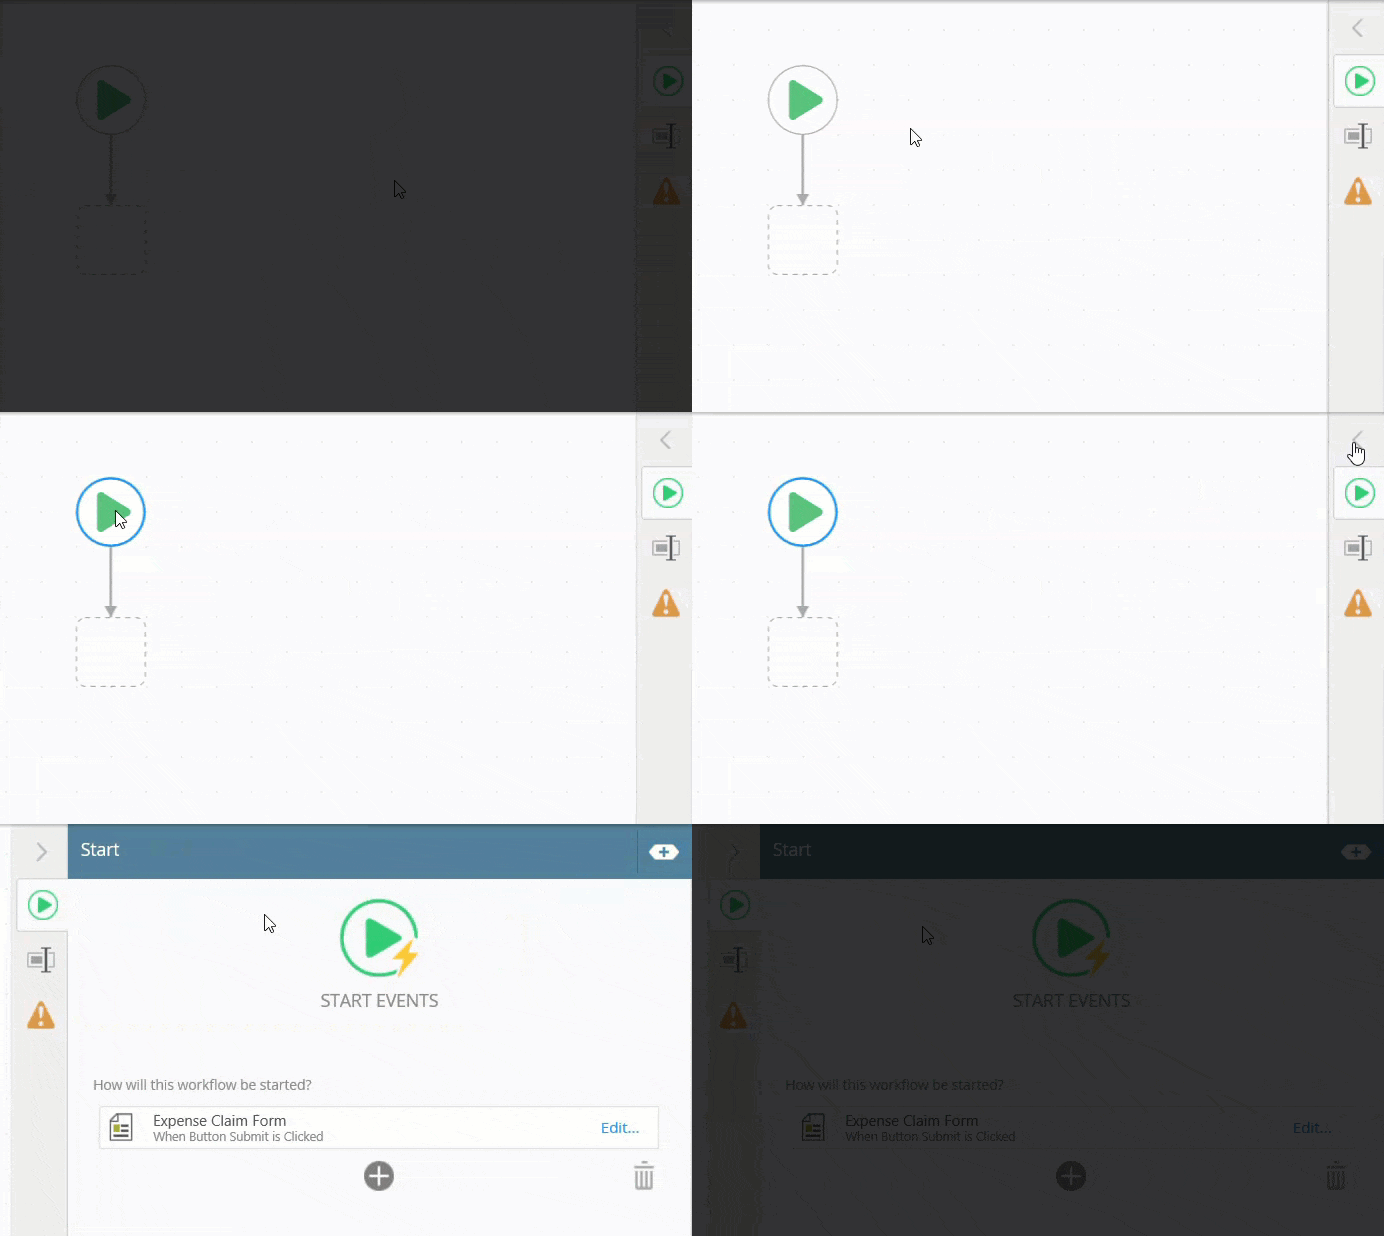
In this step, you begin construction of the Expense Claim workflow by configuring the Start step. Here, you set the SmartForm you will use as the form associated with the workflow (Expense Claim Form) along with how and when you want the workflow to start (when you click the submit button). This creates a bond between the workflow and the SmartForm. From here, K2 "discovers" the SmartObjects associated with the form, then makes them available in the workflow as references. This is the core setup for your workflow.
- Begin by configuring the Start step rules in the Configuration Panel. Select the Add a SmartForm start event link to get started. Navigate to, then select, the Expense Claim Form. The Start Workflow from a Form wizard launches. Use the settings in the table below to configure the wizard. If you need help, expand the "Show me how..." section.
Screen Setting Notes REFERENCES Data sources discovered There are no changes on this screen.
START RULE Help me configure it (selected) This option steps you through each setting. FORM STATE Create new
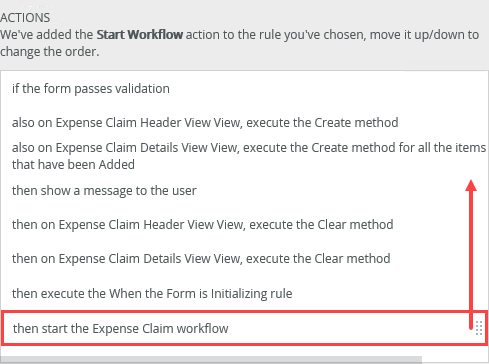
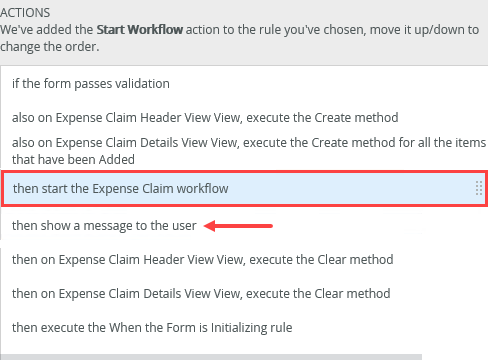
Originator StateCreate a new state. Rename the state for clarity. Confirm it is set as the default. FORM RULES When Button Submit is Clicked (default) Move the then start the Expense Claim workflow action so that it falls just before the then show a message to the user action. If this action remains at the bottom, you will see errors later on. Summary Save and finish the wizard There are no changes to this screen. - You will find step rules and settings in the Configuration Panel. To access the configuration panel, select a step, then click the Configuration Panel toggle.
Select the Start step (it has the green triangle), then expand the Configuration Panel. (When you select a step, it has a blue border. This is how you tell which step is selected.)
- The first setting is to select a form you want associated with the workflow. Click the Add a SmartForm start event link under the START EVENTS heading.

- Browse to the K2 Learning > Expense Claim > Forms category, then select the Expense Claim Form. Click OK.

- On the REFERENCES screen, notice that K2 discovers the SmartObjects (data sources) associated with the views and controls on the Expense Claim Form. K2 creates references for the SmartObjects. References allow you to easily use the SmartObject properties throughout your workflow. We will keep these references, so click NEXT.

- On the START RULE screen, you will configure your own start rule, so click Help me configure it. Click NEXT.

- On the FORM STATE screen, keep the default, Create a new State. Change the state name to
Originator State
then confirm it is the default state. Look for the Make this state the default for the form setting near the bottom of the screen and make sure it is CHECKED. Click NEXT. (You will learn more about states and their function in a later step.)
- On the FORM RULES screen, you want to confirm the rule that starts the workflow is in the correct order of rule actions. The default start event is already set to When Button Submit is Clicked. Scroll through the list of ACTIONS. Notice that the then start the Expense Claim workflow action is at the bottom of the list, after the two "clear" actions. The workflow must start before the properties are cleared, or you will see errors. Move the start workflow action up, so that it falls just above the show a message to the user action. After you submit the claim, you will see the confirmation message. You know that the header and details records were created and the workflow started. (Otherwise, you would not see the message...) Click NEXT.


- The last screen is the summary screen. Review the changes that K2 makes on your behalf, then click SAVE AND FINISH. When you see the success check, click OK to exit the wizard.

- Under the START EVENTS heading, you see that the Expense Claim Form starts the workflow when the submit button is clicked.

The Start Workflow from a Form wizard launches.
- You will find step rules and settings in the Configuration Panel. To access the configuration panel, select a step, then click the Configuration Panel toggle.
Review
In this step, you configured the Start step rules. You bound the workflow to the Expense Claim Form. The wizard steps you through creating a new state and setting up your start rule actions. In this case, you configured the workflow to start when the Button Submit is clicked. You rearranged the order of the start rule actions so that the start workflow action takes place before the clear view actions.
In the next step, you will update the Request Status property to show that the claim has been submitted but not approved yet.