Create a Reference to a User's Direct Reports
This wizard is found in the Azure Active Directory node in K2 Studio and the K2 Designer for Visual Studio.
What does it do?
Use this wizard to create a reusable reference to a user’s Direct Reports for a user in Azure Active Directory. The reference can be used in any subsequent workflow steps where you would want to refer to the user’s Direct Reports.
Use Case Examples
- Send an email to the Direct Reports of the user who completes a workflow task.
- Notify all company employees of a new manager and who their Direct Reports are.
- Display the details of a manager’s Direct Reports in the body of an email using reference data fields (Display Name, Job Title, Telephone Number, etc).
Permissions
The user designing the workflow must have AAD Read permission.
Additional Considerations
- The “Username” input field requires a User Principle Name. The general format is bob@denallix.com. This field does not support “begins with” or “contains”.
How is it used?
To utilize reference data in a text field (e.g. in an email), navigate to the Context Browser, expand the Item References category, expand the Reference you created with a Get Reference wizard, and drag an item to the text field. This data gets populated dynamically after you deploy the workflow and start up a new instance.
If the user chosen in the wizard has more than one Direct Report, this wizard will create a single reference to all of those people. When a reference contains multiple objects like this, the reference will be structured as an array of objects. In order to insert spaces, commas or semicolons between each object, you will need to use the inline Join function. To do this, navigate to the Context Browser, expand the Inline Functions category, expand the Text category, and drag the Join function to the text area where you want to use the reference. In the Join menu, drag the reference data object to the Values textbox, and specify a Separator.
Specify the user - by User Name in AAD or User Reference previously created for this workflow - who’s Direct Reports are to be referenced.
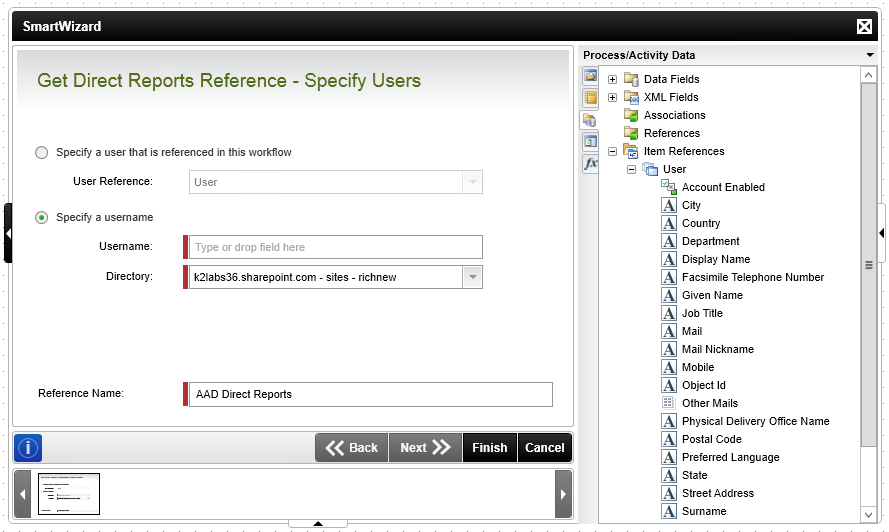
| Field | Description | Sample Value |
|---|---|---|
| User Reference | This drop down menu auto-populates with any references that have already been created in previous steps. For example, if you already used the Get User Reference wizard to create a reference to a specific user, you will be able to choose that reference here. | Select a value from the drop down. |
| Username | The User Principal Name (UPN) of the user. The UPN is an Internet-style login name for the user based on the Internet standard RFC 822. By convention, this should map to the user's email name. The general format is alias@domain.xyz, where domain must be present in the tenant’s collection of verified domains. | Type a value, or drag a value from the Context Browser such as a pre-configured Data Field, Item Reference or a SmartObject Load method. Note that when a SmartObject Load method is used, an input property is required for the correct data to load. |
| Directory | Specify the Azure Active Directory containing the user/s. | Select a value from the drop down. |
| Reference Name | The name of the reference the wizard will create. | Type a value, or drag a value from the Context Browser such as a pre-configured Data Field, Item Reference or a SmartObject Load method. Note that when a SmartObject Load method is used, an input property is required for the correct data to load. |