Configure the Get Confirmation from User Action
You can use the Get confirmation from user rule action to perform additional actions based on the form user's input. For example, you can use the Get confirmation from user action when you want your users to select one of two buttons (OK or Cancel) on a dialog pop-up.
There are two ways you can configure the Get confirmation from user rule action:
- If the user clicks OK do something, if they click Cancel do nothing
- If the user clicks OK do something, if they click Cancel do something else
Some examples:
- Clicking OK deletes a file and then shows a confirmation message, while clicking Cancel returns the user to the form
- Clicking OK uploads a new file, clicking Cancel clears the form for new input
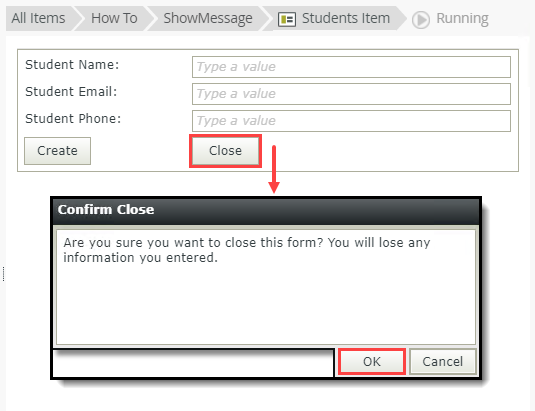
The confirmation dialog you configure in this how-to

You can find the Get confirmation from user action in the Notifications group.
Rule Breakdown
In this how-to, a view (Students Item) contains text box controls for new students to enter their information. The view contains two buttons: Create and Close. Students click the Create button to submit their registration. This how-to walks you through two different configurations for the Close button using the Get confirmation from user rule action:
- The first configuration closes the browser window when you click OK and does nothing when you click Cancel. In this case, you are only adding one set of actions that execute when the OK button is clicked.

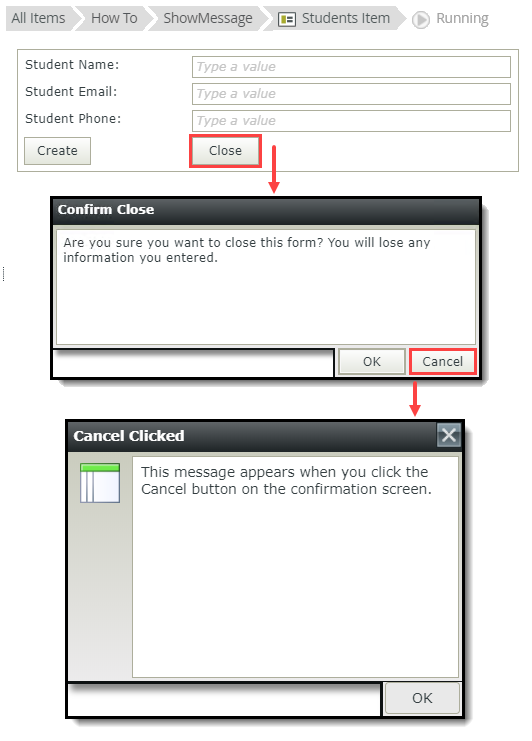
- The second configuration closes the browser window when the form user clicks OK, or displays a message when the form user clicks Cancel. In this case, you are adding different sets of actions for each response, and a condition that determines whether to run the OK actions or the Cancel actions.

- Events define when the rule should run, such as when a button is clicked, or when the form loads. (Events are optional, you can define "event-less" rules that you can call from other rules.)
- Conditions define whether the rule should run. If the criteria are true, continue the rule, and if the criteria are not met, stop the rule. For example, a condition might evaluate a form to confirm that required fields have content. (Conditions are optional - not all rules will require conditions.)
- Actions define what the rule should do. For example, show a message, start a workflow, or enable a form field. Rules can contain multiple actions that are run in sequence or in parallel.
In this example, you add a rule action that closes the browser window when the form user clicks the OK button on the confirmation dialog. If the form user clicks the Cancel button on the confirmation dialog, the dialog closes and nothing else happens. This step demonstrates how to add the Get confirmation from user action with basic configuration.
- Edit the Students Item view and click the Rules tab. Click Add Rule. First, you add an event, or when the rule should run. In this case, the event is when someone clicks the Close button.

- With the Events tab active, click When a control on the View raises an event (under the Control Events heading) to add it to the rule definition pane. Click select control and select Close Button. K2 automatically completes the event with Clicked.

- With the Actions tab active, click Get confirmation from user (under the Notifications heading) to add it to the rule definition pane.

- Click specify heading. Enter
Confirm Close
and click OK.
- Click specify message and enter
Are you sure you want to close this form? You will lose any information you entered.
and click OK.
- With the Actions tab active, click Close the browser window (under the Browser Interaction heading) to add it to the rule definition pane. There are no other settings, so click OK to save the rule. Click Finish to save and exit the view.

- To test the confirmation dialog, select the Students Item view and click the Run icon (found in the central pane).

- Click the Close button. Click Cancel on the confirmation dialog. The dialog closes and you are returned to the view. (No other actions execute at this point.) Click the Close button once again. Click OK on the confirmation dialog. The browser window closes.

With the basic configuration, you add the action(s) you want to execute if the form user clicks the OK button on the confirmation dialog. The actions execute immediately after the OK button is clicked. You don't add any actions for the Cancel button. By default, clicking the Cancel button on the dialog closes the dialog and does nothing else.
In this example, you add a rule action that closes the browser window when the form user clicks the OK button on the confirmation dialog. If the form user clicks the Cancel button on the confirmation dialog, a different action displays a message. This step demonstrates how to add the Get confirmation from user action with a conditional statement that executes subsequent actions, depending on which button is clicked.
- Edit the Students Item view and click the Rules tab. Click Add Rule. First, you add an event, or when the rule should run. In this case, the event is when someone clicks the Close button.

- With the Events tab active, click When a control on the View raises an event (under the Control Events heading) to add it to the rule definition pane. Click select control and select Close Button. K2 automatically completes the event with Clicked.

- Condition: add an Advanced Condition and configure the condition so that it is always true (e.g. 1=1)The 'always true' condition is important - it is what makes the OK/Cancel scenario work. Explaining why this happens is beyond the scope of this topic.
- Add the actions that you want to execute if the form user clicks OK
- Action: add the Get confirmation from user action
- Action: add the Close the browser window action
- Condition: add an Else statement that contains the actions that execute if the form user clicks Cancel
- Action: add a Show a message action
The image below shows the structure of the rule to execute different actions depending whether the form user clicks OK or Cancel.

- With the Conditions tab active, click an advanced condition is true (under the Custom Conditions heading) to add it to the rule definition pane. Click the an advanced condition link.

- Next, you set up the condition so that it always returns a true result. On the Rule Designer screen, click Add under the Conditions heading. In the Left text box, enter the number
1
and in the Right text box, enter the number
1
so that your condition reads 1 is equal to 1. This condition always returns a true result. Click OK.
- Now add the actions you want to execute immediately after the true condition result. With the Actions tab active, click Get confirmation from user (under the Notifications heading) to add it to the rule definition pane. Click specify heading.

- Click specify heading. Enter
Confirm Close
and click OK.
- Click specify message and enter
Are you sure you want to close this form? You will lose any information you entered.
and click OK.
- Add the action(s) to want to execute if the form user clicks the OK button on the confirmation dialog.
With the Actions tab active, click Close the browser window (under the Browser Interaction heading) to add it to the rule definition pane. This completes the block of actions for the OK response.
- Next, you add the action(s) for the Cancel response. Begin by adding an else statement to the conditional statement. With the Conditions tab active, click Else (under the Logical Conditions heading) to add it to the rule definition pane.

- With the Actions tab active, click Show a message (under the Notifications heading) to add it to the rule definition pane. Click (configure).

- You are on the Show a Message to the User (configuration) screen. For the Title, enter
Cancel Clicked
and for the message Body, enter
This message appears when you click the Cancel button on the confirmation dialog.
and click OK to save your settings.
- Your rule should look like the image below. Click OK to save the rule. Click Finish to save and exit the view.

- To test the confirmation dialog, select the Students Item view and click the Run icon (found in the central pane).

- Click the Close button. Click OK on the confirmation dialog. The browser window closes.

- Open the Students Item view once again using the Run icon. Click the Close button on the view. Click the Cancel button on the confirmation dialog. You see the message pop-up.

To set up this rule so that it runs differently depending on the user's answer in the dialog window, add and configure the following: