Workflow Start Options
There are two mechanisms through which workflows can be started: :
- When a SmartForm is submitted
- When a SharePoint event occurs
Starting a K2 workflow when a SmartForm is submitted
Select the When a SmartForm is submitted option if you want the workflow to start when a user submits a SmartForm in your Application. . You can select the SmartForm you want to use as the Workflow Start Form from the drop-down menu, and K2 will automatically add the required Rules and Actions into the Form to start the workflow when the user submits the Form. Alternatively select the Other (e.g. as a sub-workflow or manually) option in the start event wizard’s first screen. This option is useful when the workflow is a sub-workflow of a parent workflow and do not require a form, or when you manually design a workflow without a form. It provides the ability to create a workflow without integrating a form first. The form can be added at a later stage if required. When integrating a form at a later stage, you have to configure the rules of the start event manually in the form.
Starting a K2 workflow when a SharePoint Event occurs
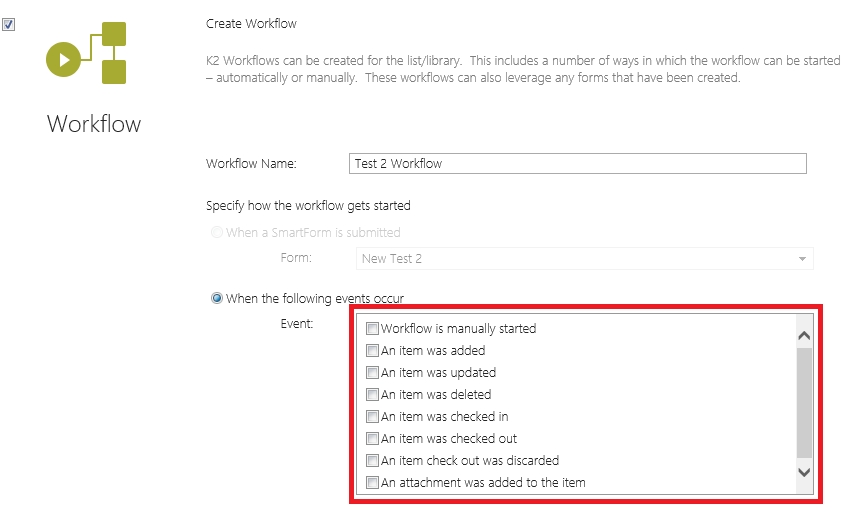
Select the When the following events occur option if you want the workflow to start based on some event in SharePoint, such as a document checked-in, a list item is added or when the user manually starts a workflow on the list item or document. You can select multiple events if you want the same workflow to be started from different events. Note that the workflow always starts when the selected events occur, regardless of whether another workflow was already started for the list item or document.
The image below shows the available SharePoint Events that can be used as the Start Option for your workflow:
Manually starting a workflow
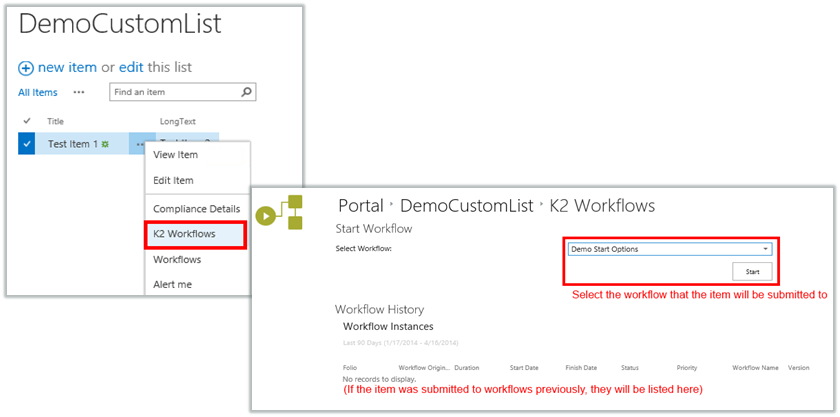
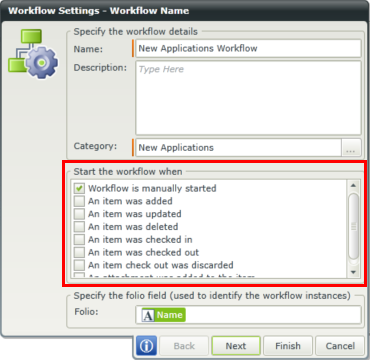
If you select the Workflow is manually started option, users can use the K2 Workflows context menu item for items and documents in SharePoint and then select which workflow they want to submit the Item to. This is useful in scenarios like Document Review & Document Approval if you want users to collaborate on a document in library, and then when the document is ready, submit the document for review or approval using a K2 workflow.
Changing the Start Option
Start Options can only be changed when a SharePoint event was selected as the Start Option. If a Form was selected to start the workflow, the specific form can be changed but not the Start Option. The Start Option can be changed from the K2 Workflow Designer using the Workflow Settings wizard. Follow these steps to change the option:
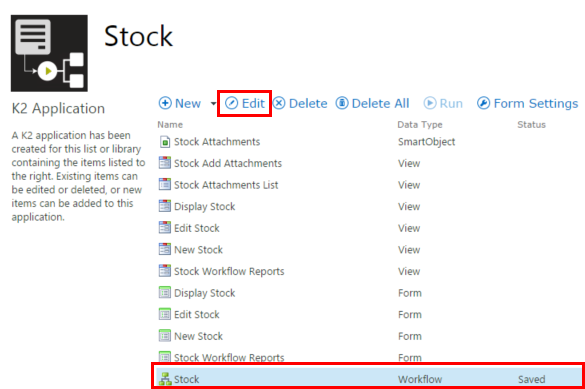
- Open the workflow by selecting the workflow from your Application and clicking the Edit button.
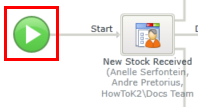
- Click the Start button to open the Workflow Settings wizard.
- Select the new Start Option using the Start the workflow when section.
- Click Finish.
- Deploy the workflow.
Setting up a Start Rule Condition
Start Rule conditions allow for Workflows that are integrated with SharePoint Lists and Document Libraries to start based on a specific condition that has been set within the Start Rule of the workflow. This condition is in addition to the event used to start the workflow.
The Start Rule condition can be set from the K2 Workflow Designer in the Workflow Setting Wizard. Follow these steps to set a Start Rule condition:
-
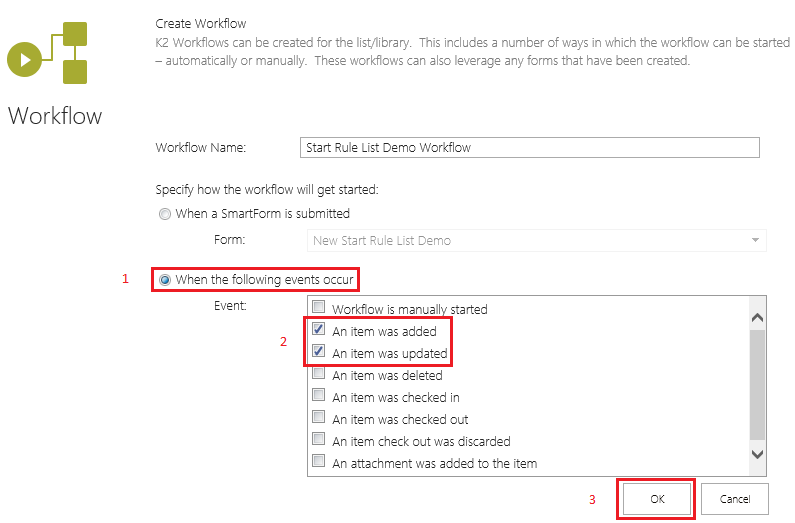
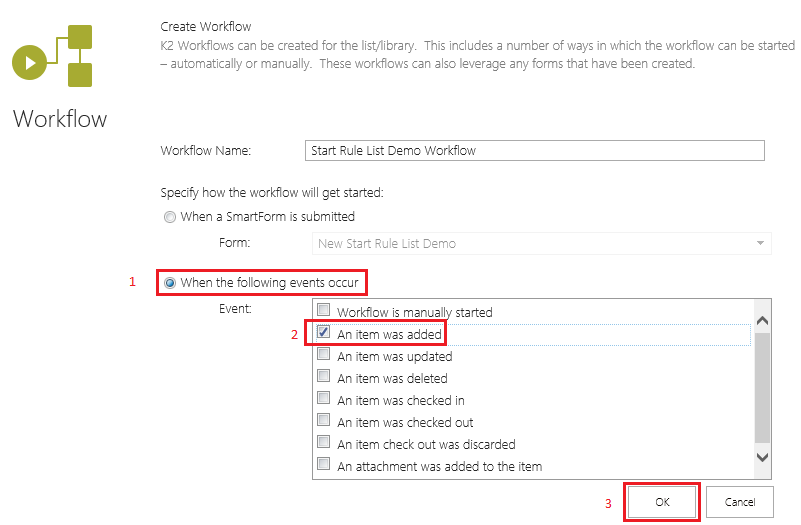
When integrating the K2 Five App to a List or Document Library, navigate to the Create Workflow section. Next select the When the following event occurs button, and check the An item is added and An item was updated check boxes. Take note that any event option can be used to set a Start Rule condition. Then click OK as shown below:
-
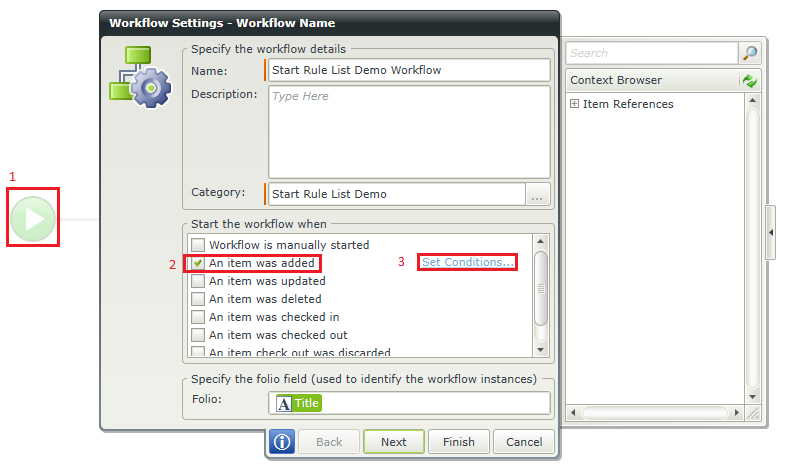
The K2 Five Designer opens. Next click on the Start button on the Designer canvas. The Workflow Settings screen opens. The An Item was added and An item was updated check boxes are selected. Take note that any of the Start the workflow when options can be used to define a Start Rule condition. Next click the Set Conditions... links as shown below:

-
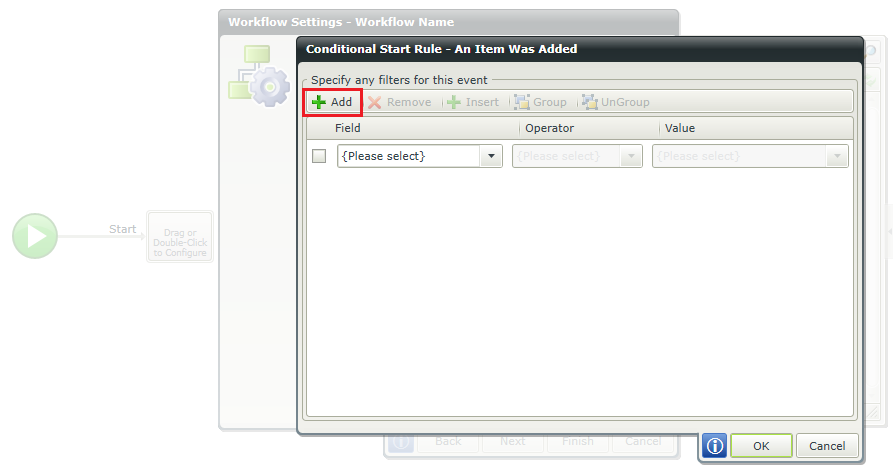
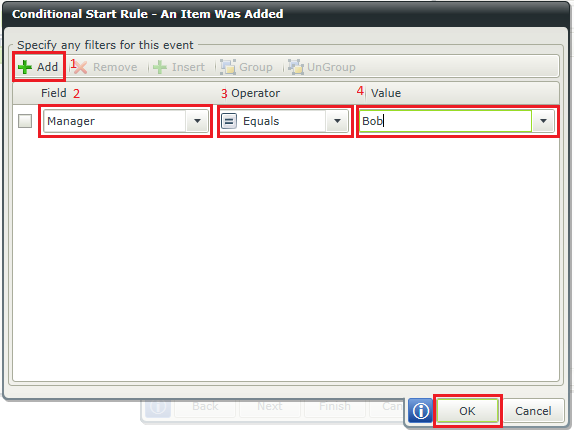
The Conditional Start Rule window opens. Click the Add button to add a new condition to the Start Rule. Three options are provided to configure the condition Field, Operator and Value :
Below are tables that outline all the available Fields ,Operators, and Values that can be used to create a Start Rule condition. The available fields are populated by the context of the List or Document Library.
If a Custom Field has been added to a Document Library a prior value field is available in the condition options. This enables the Changed operator option. This is only available when SharePoint provides a before value and when the An item was updated condition is used.
List Start Rule Condition Field options
Field Description Example Title This the Title value of a list item. This is defined by the Title column in the List. This is the Title value of list item or document within the list. For Example: Title= Expense Report Content Type A content type is a reusable collection of metadata (columns), workflow, behavior, and other settings for a category of items in a Microsoft SharePoint list library. Content Type = List item Content Type Id Content type IDs uniquely identify the content type. Content Type Id example:
0x010100D5C2F139516B419D801AC6C18942554D
Custom Text This property is determined by any custom column (user added field) that has been added to the Custom List Library. This value is any custom column value that has been added to the List or Library. For example:
Custom Text=Manager
Document Library Start Rule Field options
Field Description Example Content Type A content type is a reusable collection of metadata (columns), workflow, behavior, and other settings for a category or documents in a Microsoft SharePoint document library. Content Type = Document Content Type Id Content type IDs uniquely identify the content type and are designed to be recursive. Content Type Id example:
0x010100D5C2F139516B419D801AC6C18942554D
https://msdn.microsoft.com/en-us/library/office/aa543822(v=office.14).aspx
Custom Text This property is determined by any custom column that has been added to the document library. Custom Text = Manager Document Document Created By This property determines the name of the user who created a document. Document Created By = Bob Document Modified By This property determines the name of the user who modified a document. Document Modified By = Bob
The name returned is in claims name format:
i:0#.w|DomainName\Username
Name Title This is the Title value of a Document. This is defined by the Title column in the Document Library. Title = North America List Start Rule Condition Operator options:
Operator Description Example Equals A field which is equal to a specific value Title = North America Not Equal To A field which does not equal a specific value Title <> North America Contains A field which contains a specific value Title Contains North America Starts With A field that starts with specific value Title Starts With North America Ends With A field that ends with a specific value Title Ends With North America Is Empty A field that doesn’t contain a value Title Is Empty Is Not Empty A field that contains any value Title Is Not Empty Document Library Start Rule Condition Operator options:
Operator Description Example Equals A field which is equal to a specific value Title = North America Not Equal To A field which does not equal a specific value Title <> North America Contains A field which contains a specific value Title Contains North America Changed A Custom field that has changed
Take Note:
If a Custom Field has been added to a Document Library a prior value field is available in the condition options. This enables the Changed operator option. This is only available when SharePoint provides a before value and when the An item was updated condition is used.
Title(prior value) Changed Starts With field that starts with specific value Title Starts With North America Ends With A field that ends with a specific value Title Ends With North America Is Empty A field that doesn’t contain a value Title Is Empty Is Not Empty A field that contains any value Title Is Not Empty List Start Rule Condition Value options:
Value Description Example Title This the Title value of a List item. This is defined by the Title column in the Custom List Library. This is the Title value of a specific List Item within the Custom List. For Example: Title= Expense Report Content Type A content type is a reusable collection of metadata (columns), workflow, behavior, and other settings for a category of items or documents in a Microsoft SharePoint list or document library Content Type = Document Content Type Id Content type IDs uniquely identify the content type and are designed to be recursive. Content Type Id example:
0x010100D5C2F139516B419D801AC6C18942554D
https://msdn.microsoft.com/en-us/library/office/aa543822(v=office.14).aspx
Custom Text This property is determined by any custom column that has been added to the Custom List Library View. This value is any custom column value that has been added to the Custom List Library. For example:
Custom Text=Manager
Document Library Start Rule Condition Value options:
Value Description Example Content Type A content type is a reusable collection of metadata (columns), workflow, behavior, and other settings for a category of items or documents in a Microsoft SharePoint list or document library. Content Type = Document Content Type Id Content type IDs uniquely identify the content type and are designed to be recursive. Content Type Id example:
0x010100D5C2F139516B419D801AC6C18942554D
https://msdn.microsoft.com/en-us/library/office/aa543822(v=office.14).aspx
Custom Text This property is determined by any custom column that has been added to the Document Library. Custom Text = Manager Document This property identifies the Document name Document = North America Document Created By This property determines the name of the user who created a document. Document Created By = Bob Document Modified By This property determines the name of the user who modified a document. Document Modified By = Bob Name This property identifies the Name of the uploaded Document Name = North America Title This the Title value of a Document. This is defined by the Title column in the Document Library. Title = North America - Click OK.
Note that you cannot to set the Title when using the An item was added condition on a Document library. However this can be set if the An item was updated condition is used.
Start Rule Condition Example
The following steps provide an example of the Start Rule feature.
-
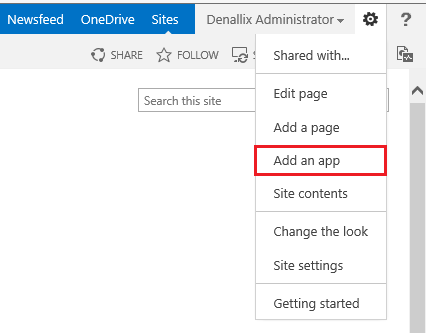
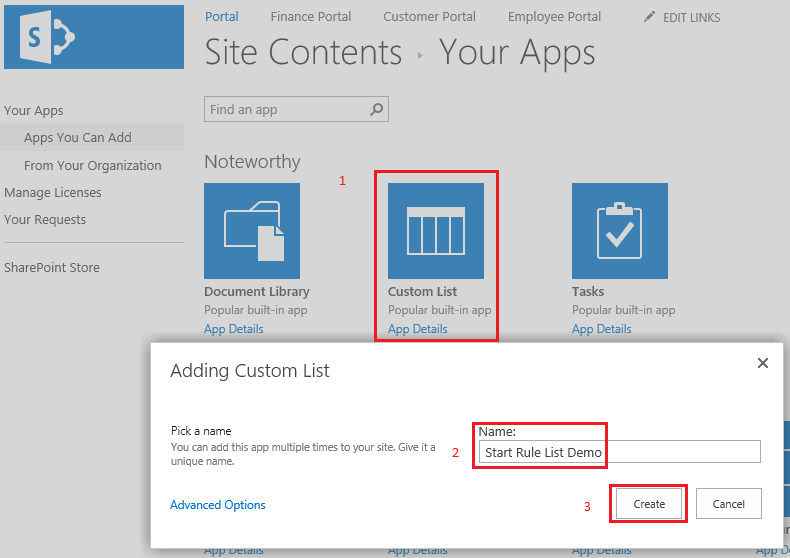
Add new Custom List to the SharePoint site by clicking the Add an app option as shown below:
-
Click the Custom List app option and name it Start Rule List Demo then click the Create button.
-
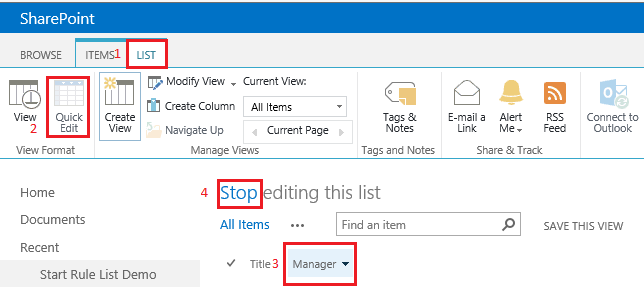
Next click on the List tab, then the Quick Edit button and add column called Manager. Click Stop to finish editing the list. This is your custom column that is referenced in the Start Rule condition.
-
Click the List tab once more and click the K2 Application tab.

-
Select the following options in Create Workflow section as shown below:
-
Click the Start button, the select the An item was added check box. Next click on the Set Conditions link as shown below:
-
On the Conditional Start Rule screen, add a new start rule as shown below, the value field in this example is Bob, (this can be any valid user that is present within your environment). Click OK:
-
Click Finish
-
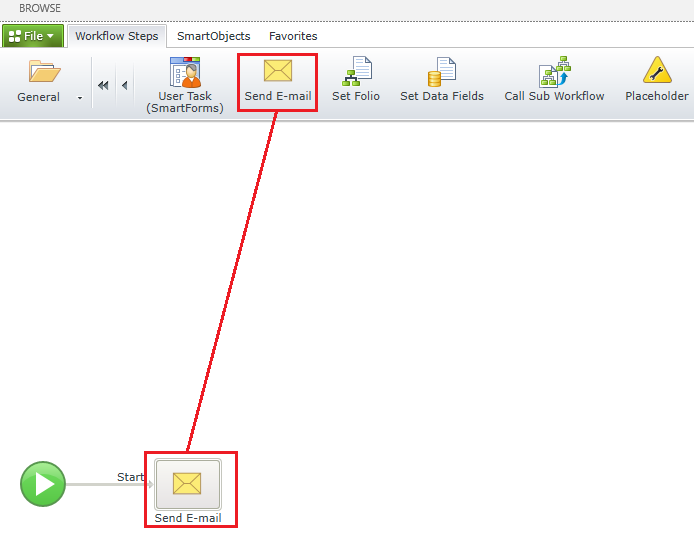
Next, add a Send E-mail event to the workflow:
-
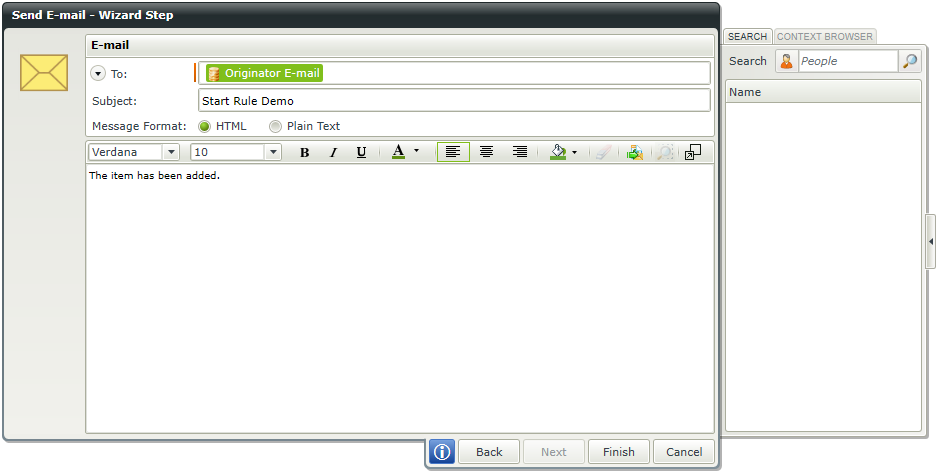
onfigure the E-mail event as shown below with an appropriate recipient:
- Click Finish, then Save and Deploy the workflow.
- >Go to the list and click on new item.
- Add a Title and Manager values. Ensure that the Manager value is set to Bob (as specified in the Start Rule condition) and click Save.
- The workflow starts because Manager equals Bob as, matching the Start Rule condition.
- Check to see if an e-mail is received successfully.
- If the workflow did not start as expected, look at the Windows event viewer (Start > Administrative Tools > Event Viewer).