Reminders tab
Use the Reminders tab to configure what happens when tasks remain uncompleted. You can configure the following actions:
- Send an email reminder
- Redirect the task to someone else
When you configure the task reminder to send an email or redirect to someone else, Working Hours are not taken into consideration. If your company's working hours are, for example, Monday through Friday, 8 am - 5 pm, and the task reminder is due outside of those hours, the reminder is sent at that time and does not wait until the next working hour.
Example of a configured Reminders tab

- With the task step selected, click the Reminders tab.
 The following table explains the options available on this tab:
 - On Date: A specific date and time. Use the date time picker to set a date or use a function such as Tomorrow.
- After: After a task is assigned or completed. This is the default option and allows you to set days, hours, minutes, and seconds.
- Before Deadline: Some time before the task is due. This option is only available if a deadline is defined on the Deadline tab of the step.
- Click the Email Reminder link.

- The email reminder displays.

-
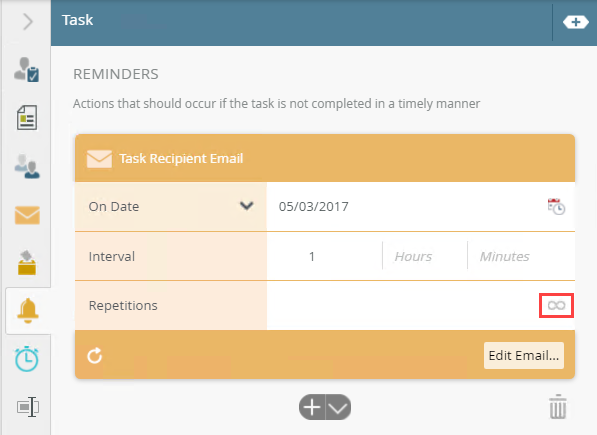
From the drop down, select one of the following options; On Date, After or Before Deadline. In this example the On Date options is selected. Use the calendar picker to select a date or drag a dynamic SmartField into the field. When you select the After or Before Deadline option, you can enter values into the field. Enter values in days, hours, minutes, and seconds. You can use a single field or multiple fields, such as two days, or one hour and 30 minutes.

- Click repeat reminder circle arrow to configure the repetitions.
Click the infinity symbol to set an infinite repetition.

- Use the infinity symbol to toggle between edit and infinite mode.

- Type values or create dynamic values by dragging Functions, Fields, SmartObjects and Workflow-related items from the Context Browser into the fields.

- Click Edit Email... to expand the email panel.

- The Task Recipient Email panel displays.

- Drag and drop inline functions and field properties (from the Context Browser) into the field to create dynamic functions
- Manually type a descriptive subject
- Drag and drop inline functions and field properties (from the Context Browser) into the field to create dynamic functions
- Manually type a descriptive subject
To select a recipient click the To drop down menu. By default, the workflow originator is selected. Other options in this drop down include Originator Manager, Browse, and Type/Construct my own.
 For more information on dynamic recipients, see the Create a Dynamic Recipient topic.
- To add another recipient click the Add link.

- From the drop down menu, select the Browse option.

For more information about the different browse states and errors, see the Browse State topic.
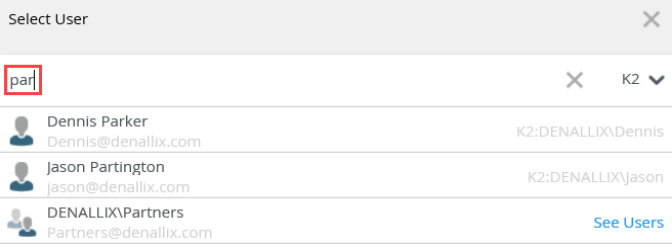
- The Select User page displays. In the Search Items field, type the name of the user. Use the drop down menu to choose which label to search.

Use any of these methods to search for a user, role and group:
For more information on how to send an email to users based on a Get List SmartObject, see the How to: Use the All items as a collection topic.
- Select the user and click OK.

- To remove a recipient, select one and click the Trash bin icon.

- Use the send email type drop down menu to include Cc or Bcc recipients to the email.

- Cc and Bcc recipients added.

- Click the Subject field and type a value or use inline functions or dynamic fields by clicking the expand or collapse toggle to expand the Context Browser. Within the Context Browser, select inline functions from the Functions, Fields, SmartObjects or the Workflow categories to define your function. Click and drag the function on to the field.

- Type content into the Body field to customize the body of the email. Type values or create dynamic values by dragging Functions, Fields, SmartObjects and Workflow-related items from the Context Browser into the fields.

- To clear the formatting from the body of the mail click the Clear link. Click the Insert Field link to expand the Context Browser.

- To link attachments to the email notification, click the Add Attachment link.

-
You can use a reference, a function, and a SmartObject that returns a file in the Attachment field.

For more information on how to use SmartFields, see the Smartfield Composer topic.
- Click the Add button to add additional reminders.

- Click the Trash bin to delete reminders.

- Click the toggle button to add a Redirect reminder.

Your changes are automatically saved.
| Option | Explanation | How to Use |
|---|---|---|
| Email Reminder | Allows you to send task reminder emails on, before, or after a specific period of time or on a specific date. The reminder options are: You can create multiple email reminders and set them to repeat. Type values or create dynamic values by dragging Functions, Fields, SmartObjects and Workflow-related items from the Context Browser into the fields. | Click the Email Reminder link. Select from the Starting Date / Time drop down menu. Enter values in the Days, Hours, Minutes or Seconds fields. Enter values individually or in a combination. You can use a single field or multiple fields, such as two days or one hour and 30 minutes. (missing or bad snippet) Double click the reminder title to edit it. Click the repeat reminder button to display the Interval and Repetitions option. Specify reminder intervals and repetitions. Click the Edit Email button to customize the email reminder. Click the Add button to add more reminders. Click the toggle button to toggle between the email reminders and redirect tasks view. Click the Trash bin to delete redirect tasks. |
For more information on how to use SmartFields in the Smartfield Composer, see the Smartfield Composertopic.
The following table explains the available options:
| Option | Explanation | How to Use |
|---|---|---|
| Send email to task participants | Use this to send the reminder email to the task recipients. The reminder email is sent to all recipients configured on the Recipients tab. To send the reminder email to different recipients, uncheck the check box and add alternative recipients. By default, this option is selected. | Check the check box to enable this option. |
| Send email to workflow originator | Use this to send the reminder email to the workflow originator. | Check the check box to enable this option. |
| To | Allows you to specify which user or group is to receive the email. | Select a user or group from the drop down menu. Click the Edit button to type / construct your own user. Click the Add link to add additional recipients. |
| Subject | Allows you to specify a subject. You can use a combination of inline functions, data fields, SmartObjects, and workflow context data from the Context Browser to create a unique subject line. | The following applies to the Subject field: |
| Email Send Types drop down | Use the drop down to include CC and BCC recipients. You can select to add on or all email send types. You can add additional recipient to the BCC and CC send types. | Click the drop down menu and check the relevant check box. To remove an email send type, uncheck the check box. Select a user or group from the drop down menu. Click the Edit button to type / construct your own user. Click the Add link to add additional recipients. The following applies to the added email send type fields: |
| Body | Allows you to create the body of the email. You can select a standard template or create a custom message. As with the subject, you can create dynamic content using items from the Context Browser. | Drag and drop inline functions and field properties (from the Context Browser) into the field to create dynamic functions. Manually type the email message. Click the Open Text Editor link to open the rich text panel to edit font type, size and alignment. Click the Insert Field link to expend the Context Browser. Click the Clear link to clear all text, inline functions, and field properties from the body. |
| Attachment | Allows you to add attachments to the email. You can use a reference, a function, or a SmartObject that returns a file in the Attachment field. | Click the Add button to add attachments fields. Drag and drop the reference, function, or SmartObject method to add the attachment to the email. |
- With the Task step selected, click the Reminders tab.
 The following table explains the options available on this tab:
 - On Date: A specific date and time. Use the date time picker to set a date or use a function such as Tomorrow.
- After: After a task is assigned or completed. This is the default option and allows you to set days, hours, minutes, and seconds.
- Before Deadline: Some time before the task is due. This option is only available if a deadline is defined on the Deadline tab of the step.
- Click the Redirect link.

- The Redirect to Others reminder displays.

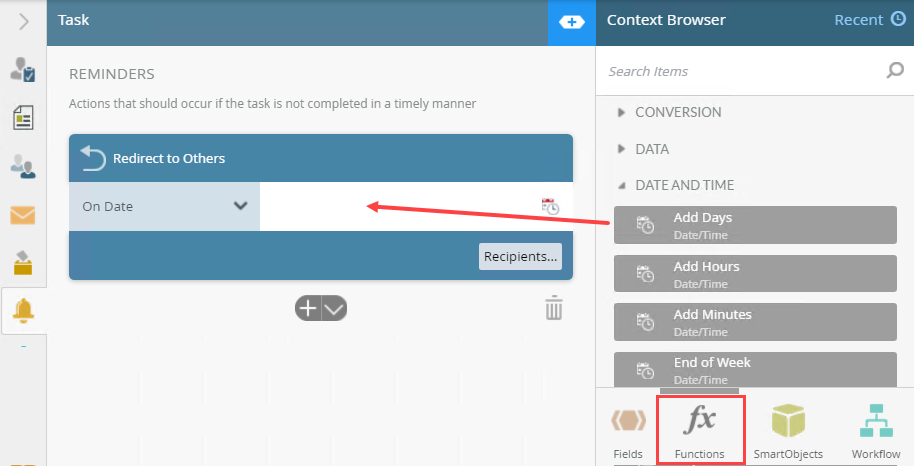
- From the drop down, select a date or time option. Enter values in days, hours, minutes, and seconds. You can use a single field or multiple fields, such as two days, or one hour and 30 minutes.

- On Date example:
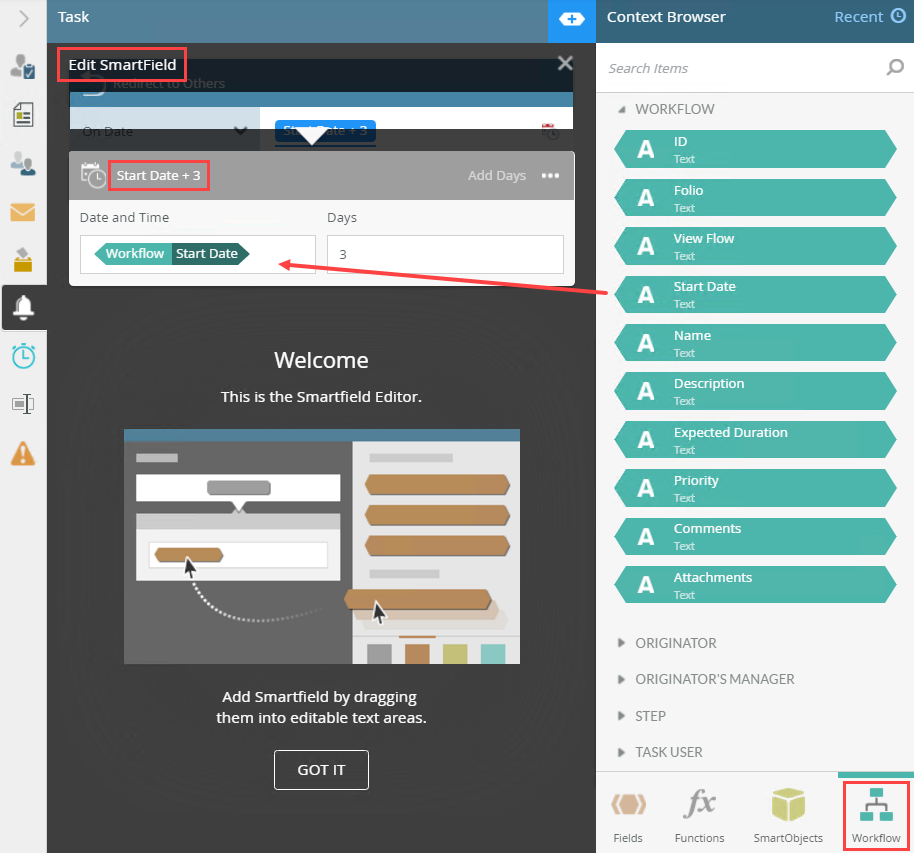
Type values or create dynamic values by dragging Functions, Fields, SmartObjects and Workflow-related items from the Context Browser into the fields. In this example, drag the Add Days function into the field.

- The Smartfield Composer shows. From the Workflow section, drag Start Date into the Date and time field. In the Days field, type the value as 3.
Change the Add Days function name to Start Date + 3.

- Click X to close the Smartfield Composer. The configuration on the Reminders tab shows as follows:

- Click Recipients... to expand the Redirect to Others panel.

- Browse and select the users to receive the redirected task. Click the Add button to add more recipients. Click the Trash bin to delete added recipients.

For more information about the different browse states and errors, see the Browse State topic.
- Click the Add button to add additional redirect reminder.

- Click the Trash bin to delete reminders.

- Click the toggle button to add a redirect reminder.

Your changes are automatically saved.
| Option | Explanation | How to Use |
|---|---|---|
| Redirect | Use this option to redirect the task to someone else on, before, or after a specific period of time or on a specific date. The reminder options are: You can create multiple redirect reminders. Type values or create dynamic values by dragging Functions, Fields, SmartObjects and Workflow-related items from the Context Browser into the fields. | Click the Redirect link. Select from the Starting Date / Time drop down menu. Enter values in the Days, Hours, Minutes or Seconds fields. Enter values individually or in a combination. You can use a single field or multiple fields, such as two days or one hour and 30 minutes. (missing or bad snippet) Click the redirect task title to edit it. Click the Recipients button to select recipients. Click the Add button to add additional reminders. Click the toggle button to toggle between the email reminders and redirect tasks view. Click the Trash bin to delete redirect tasks. |
For more information on how to use the Smartfield Composer, see the Smartfield Composer topic.
For more information on dynamic recipients, see the Create a Dynamic Recipient topic.


