Workflows
The Workflows tab allows you to centrally view and manage workflows in the K2 environment. From the Workflow Projects view, you can Manage Workflow Instances, Manage Workflow Rights and Manage Roles.
The Instances window is used to administer active instances of the workflow, and to start new instances of the workflow manually:
- On the Workflow Projects page, select a workflow and clickInstances.

- The Manage Workflow Instances page opens.

To manage a workflow instance, select the instance from the list and click a button in the toolbar to perform that action on the instance. Use the table below for reference (note that not all the listed buttons may be visible or enabled):Option Description Notes Restart Resume an instance that is in the “Stopped” state. To resume an instance that was previously stopped, click on the stopped instance from the view and click the Start button. The status of the instance will change from Stopped to Active and the workflow instance will continue from the workflow step where it was previously stopped. You can only Start a process that is in the “Stopped” state
The Start/Stop functions are normally used to suspend execution for processes temporarily, for example to hold off execution until a problem has been resolved. Note that if any events like Escalations occur while the process is stopped, K2 will not execute those actions while the process is stooped, but will execute them immediately when the process is started if the escalation time was reached while the workflow was stopped. Stopped instances will not appear in users’ worklists.
Stop Stop (suspend) the selected instances if the workflow is in “Active” or “Running” status. To stop a running instance, click on the instance from the view and click the Stop button. Click OK on the confirmation message. The status of the instance will change from Active to Stopped.
You can only Stop process instances that are in the “Active” or “Running” state. “Active” means that the process is “alive” but waiting for something to happen. Usually this means that there is a client event that must be completed before the process can continue. “Running” means that K2 is busy executing code against the process. Processes should never be in “running” status for more than a few seconds (a few minutes is exceptional cases). If a process is constantly in the “running” status, it usually means that the workflow is in an endless loop and is negatively affecting the performance of the K2 server.
Delete Delete the process instance. To delete an instance, click on the instance or select a group of instances from the view, and then click the Delete button. On the Delete Instances page, check the Delete Reporting Data (Logs) checkbox to delete the logging information of the process instances. Then click OK.
The instance is removed from the view and the task from the worklist, and no further steps can be completed on this workflow instance. If the Delete Reporting Data (Logs) checkbox is selected, data about the instances are removed from the database and the instances no longer appear in reports. This can be useful when you need to delete test instances.Deleted instances cannot be recovered.
Go To Activity Force an active process to go to a specific activity in the workflow. To go to a specific step in an active workflow, select the instance from the view and click the GoTo Activity button. Select the Activity Name you want to go to and click OK. Click OK on the confirmation message and OK again on the information message. The workflow instance will now continue with the activity that has been selected.
This function is normally use to “skip” steps in the workflow or force the process to go back to a previous step. You can only redirect the process back to an activity in the same version of the process: if a newer version of the workflow has additional activities, they will not appear in this list. Note that K2 will execute all rules for the activity (e.g. destination rules, escalations etc.) again if the activity is restarted.
View Flow Opens the View Flow report for the selected instance. To view the real time execution of a workflow instance, select the instance from the view and click View Flow. For more information on how the View Flow can be used and what information is available, see the View Flow topic. Start New Start a new instance of the workflow manually, optionally specifying the folio and entering values for any process-level datafields. Normally used to start "test" instances of a workflow manually, to start workflows that do not have an associated interface for starting the workflow, or to start a process that performs some type of “polling” action.
You can provide a Folio for the new instance, specify whether the instance should start Synchronously or Asynchronously, and provide values for the process-level data fields and XML datafields defined in the workflow.
Refresh Reload the list of workflow instances. To reload the list of workflow instances in the view, click the Refresh button. Any instance started since accessing this page or a previous refresh, will now be added to the workflow instances listed in the view. Retry Retry an instance that is in Error status. Use this option to retry a instance that is in Error state. See the topic Retrying workflow errors for more information on using the Retry command. Selected Filter Create a filter. A predefined filter is configured to return the workflow instances in the view. You can however create various filters that are saved for reuse when revisiting this page. Follow these steps to create a reusable filter. Quick Search Search for workflow instances by predefined filters. The Quick Search filter allows you to search for workflow instances by predefined filters. The quick search is however a once off search that is not saved. Follow these steps to learn how to use the Quick Search functionality.
The Process Rights section is used to set rights and security for individual processes, to determine who may administer, start or report on instances of that process.
You normally have to assign security rights for workflows designed in K2 Studio or K2 for Visual Studio the first time the workflow is deployed to a new environment. (K2 Designer for SharePoint and K2 Designer gathers permission settings from the user when the process is designed, but these permissions can be subsequently modified with the Process Rights screen.). Permissions for subsequent deployments of the process do not need to be set, unless you want to modify permissions for each deployment manually. By default, K2 grants the deploying user account Admin rights to the process.
Users do not require any particular permission to complete worklist items assigned to them. The fact that the task is assigned to the user implies that the user has permission to complete the task. Therefore, it is not necessary to give any permission to a user who may receive a task somewhere in the workflow and who does not need to start the workflow or report on the workflow.
K2 Security generally follows a permissive-optimistic approach. This means that the higher level of permission takes precedence, so if a user had both “Admin” and “Start” permission on a process through different groups, the Admin permission takes precedence and the user will be able to administer the workflow as well as start the workflow. Also, workflow permissions are not version-specific: any rights defined for a workflow will apply to all versions of that workflow.
Use the following functionality provided in the toolbar to manage workflow rights for users and groups.
The following steps describe how to add workflow rights:
- On the Workflow Projects page, select a workflow and click Rights.

- The Manage Workflow Rights page opens. Click Add from the toolbar.

- The Process Rights - Add Users and Groups page opens.

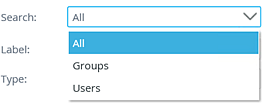
- Click the Search drop-down and select to search for users or groups.

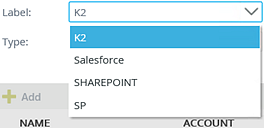
- Click the Label drop-down and select the Security Provider label you want to search on.

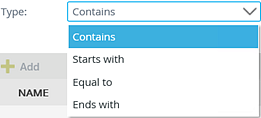
- Click the Type drop-down and select the type of search that will be performed.

- Type a value in the text box provided and click Search.

- The matching users or groups will be returned in the top list. Select a user or group and click Add.

- The added user or group will be added to the bottom list. You can add additional users or groups by doing a new search and clicking Add again, for each of the users and groups you wish to configure rights for..
- Click Next.

- Select the required rights per user or group, using the table below for more information on what the rights allow

- Click Finish.
- The added users or groups will be listed in the Manage Workflow Rights page.

Use the Remove button to remove the assigned rights for a user or group from the workflow. Follow these steps to remove rights:
- Select the user or group you want to remove from the Manage Workflow Rights page. Click Remove.

- The user or group is removed from the list in the Manage Workflow Rights page and will no longer have any rights on the workflow.
The Save button is used to save any rights changes made per user or group. Follow these steps to edit and save rights:
- Double click the user or group you want to make changes to from the Manage Workflow Rights page. Note the check boxes are now available for editing.

- Check or uncheck the check boxes to edit the user or group rights as needed. Click Finishto apply the changes.
Click the Refresh button to refresh the list of users and/or groups.
Roles can be added to workflows to configure the behavior of a Role when that Role used as the destination in workflows. Roles need to be created in the Roles node before you can add the Roles as a destination in a workflow design, and the configuration settings you apply to the role on this screen will only apply when the Role has been set as the Destination for a step in the workflow.
Follow these steps to add a role:
- Open the Workflow Projects page, select a workflow instance and click Roles. The Workflow Roles page opens.

- Click Add from the toolbar. The Add Project Roles page opens.

- Type the name of the role you want to add and click Search. You can enter part of the name and click Search to return all roles containing the entered value.

- Select the role you want to add by clicking on it from the top view.
- Click Add to add the role to Selected Roles view.

- You can now set the role interval which will determine the time interval (in seconds) on which K2 refreshes the role membership. The default is set to 5 seconds. If you configure the interval to 0 seconds, the default value (5 seconds) is applied.
You can also specify the role to refresh with worklist. This will allow a new user added to the role to immediately receive worklist items for that role. The user will receive worklist items at the time of log in, or when the worklist is refreshed. Setting a low interval and then selecting the role to resolve dynamically might have a performance impact.
 - Click OK to finish the selection.
- Click Save to save the role.

- Use the Refresh button to refresh the list of Roles.