SmartWizard Example
Two examples of custom SmartWizards are provided to demonstrate the basics of the SmartWizard framework. These examples do not cover all use cases or potential uses of the controls, data definitions or events available in SmartWizards, but they provide a starting point for understanding how the controls, data definitions, and events work together to create a SmartWizard.
You can download the sample project from K2Documentation.Samples.Extensions.SmartWizard.zip.The sample project is provided for demonstration purposes only. It is not supported by K2 product support and is not intended to be used as-is in production environments. The package contains a K2 Designer for Visual Studio project with the SmartObject sodx file, a K2 Pocess kprx file, and then two SmartWizard folders containg the layout.xml definitions and icon files of the custom SmartWizards.
. The sections in this topic describe the sample project in more detail:
Project Setup
-
Install the custom SmartWizards
- Unzip the demo project to your C:\Users\Administrator\Documents\Visual Studio 2010\Projects folder, and then copy the Create Employee and the Update Employee folders to %PROGRAMFILES%\K2\Bin\DesignTemplates\SmartWizards\Employee (this adds them to the Thick Client designers).
-
Deploy the SmartObject
- Start the K2 Designr for Visual Studio
- Open the K2Employee.k2proj project
- Open the Employee.sodx SmartObject file
- Exclude the K2 Process file (EmployeeProcess.kprx) from the build
- Click on the Deploy button and follow the full deploy sequence
-
Reset the Visual Studio K2 ToolBox in order to load the two new custom SmartWizards
- Select the EmployeeProcess.kprx file and include it in the build
- Open the EmployeeProcess.kprx file (opening this file will open the K2 ToolBox)
- Right click on the ToolBox and select the reset option
The sample project is now ready to be used to demonstrate the two custom SmartWizard definitions.
Create Employee SmartWizard
The function of this custom SmartWizard is to add user data (ID, Name, and Email Address) to the Employee SmartObject.
This sample code demonstrates the use of the Runtime action to run the CreateEmployee event, which is mapped to the Create_Employee SmartObjectMapping data object that performs the Create SmartObject Method for the Employee SmartObject. It also demonstrates the use of the Label and K2Textbox controls, with a Validation event being called by the third K2Textbox object. Finally, a Reference Item is created using the input data so that this information can be easily used by another wizard.
<WizardPages>
<WizardPage Name="MainPage" Unload="">
<Header Text="Specify required values"/>
<Body>
<Label Name="lblId" Text="Employee Id Number:" Top="10" Left="0" Width="200" Height="24" altTop="5" altLeft="0" altWidth="200" altHeight="24"/>
<K2Textbox Name="txtId" WatermarkText="Id Number" Required="True" Validation="ValidateIdNumber" Top="5" Left="205" Width="300" Height="24" altTop="0" altLeft="205" altWidth="300" altHeight="24"/>
<Label Name="lblName" Text="Employee Name:" Top="40" Left="0" Width="200" Height="24" altTop="40" altLeft="0" altWidth="200" altHeight="24"/>
<K2Textbox Name="txtName" WatermarkText="Employee Name" Required="True" Top="35" Left="205" Width="300" Height="24" altTop="35" altLeft="205" altWidth="300" altHeight="24"/>
<Label Name="lblEmail" Text="Employee Email:" Top="70" Left="0" Width="200" Height="24" altTop="65" altLeft="0" altWidth="200" altHeight="24"/>
<K2Textbox Name="txtEmail" WatermarkText="Employee Email Address" Required="True" Validation="ValidateEmail" Top="65" Left="205" Width="300" Height="24" altTop="35" altLeft="205" altWidth="300" altHeight="24"/>
<Label Name="lblReference" Text="Reference Name:" Top="197" Left="0" Width="200" Height="24" altTop="270" altLeft="0" altWidth="200" altHeight="24"/>
<K2Textbox Name="txtReference" WatermarkText="Reference Name" Required="True" Top="192" Left="205" Width="300" Height="24" altTop="270" altLeft="205" altWidth="300" altHeight="24"/>
</Body>
<Footer Text="Specify necessary values to create a new Employee"/>
</WizardPage>
</WizardPages>
<Runtime>
<RuntimeSteps>
<Step Id="1" Event="CreateEmployee"/>
</RuntimeSteps>
</Runtime>
<Events>
<Even tName="CreateEmployee" Type="SmartObjectMapping" Target="Create_Employee"/>
</Events>
<Validations>
<Validation Name="ValidateEmail" ErrorMessage="Email entered not valid." Expression="^[a-zA-Z0-9_.+-]+@[a-zA-Z0-9-]+\.[a-zA-Z0-9-.]"/>
<Validation Name="ValidateIdNumber" ErrorMessage="Enter a valid 13 digit Id Number." Expression="^[0-9]{13}"/>
</Validations>
<SmartObjectMappings>
<SmartObjectMapping Name="Create_Employee" SmartObject="Employee">
<Method Name="Create" Type="create" SaveReference="EmployeeReference">
<Properties>
<Property Name="Id" InputControl="{txtId}"/>
<Property Name="Name" InputControl="{txtName}"/>
<Property Name="Email" InputControl="{txtEmail}"/>
</Properties>
</Method>
</SmartObjectMapping>
</SmartObjectMappings>
<References>
<Reference Name="EmployeeReference" SystemName="{txtReference}">
<DefaultLoad Name="Load" Type="Read"/>
</Reference>
</References>
</SmartWizard>
Update Employee SmartWizard
The function of this SmartWizard is to update the data of the Employee SmartObject.
This custom SmartWizard will demonstrate the use of a K2ReferenceList for a drop down control that calls the data from the Reference created in the first SmartWizard (using the SmartBox ServiceType), the Reference definition to load that data, various Label, K2Textbox, and Checkbox controls, and finally a Runtime event to update the SmartObject data when the workflow step runs.
<SmartWizard>
<WizardPages>
<WizardPage Name="MainPage" Unload="">
<Header Text="Specify relevant values"/>
<Body>
<Label Name="lblrefEmployee" Text="Employee Reference:" Top="10" Left="0" Width="200" Height="24" altTop="5" altLeft="0" altWidth="200" altHeight="24"/>
<K2ReferenceList Name="refEmployee" WatermarkText="Id Number" Required="True" Top="5" Left="205" Width="300" Height="24" altTop="0" altLeft="205" altWidth="300" altHeight="24" ServiceType="SourceCode.SmartObjects.Services.SmartBox.SBService" ServiceObjectType="Default"/>
<Label Name="lblSurname" Text="Employee Surname:" Top="40" Left="0" Width="200" Height="24" altTop="40" altLeft="0" altWidth="200" altHeight="24"/>
<K2Textbox Name="txtSurname" WatermarkText="Employee Surame" Required="True" Top="35" Left="205" Width="300" Height="24" altTop="35" altLeft="205" altWidth="300" altHeight="24"/>
<Label Name="lblStartDate" Text="Employee Start Date:" Top="70" Left="0" Width="200" Height="24" altTop="65" altLeft="0" altWidth="200" altHeight="24"/>
<K2Textbox Name="txtStartDate" WatermarkText="Employee StartDate" Top="65" Left="205" Width="300" Height="24" altTop="35" altLeft="205" altWidth="300" altHeight="24"/>
<CheckBox Name="chbContractor" Text="Contractor" altWidth="150" altHeight="25" altLeft="0" altTop="50" Width="150" Height="24" Top="100" Left="210" Checked="false"/>
<CheckBox Name="chbMarried" Text="Married" altWidth="150" altHeight="25" altLeft="0" altTop="50" Width="150" Height="24" Top="130" Left="210" Checked="false"/>
<Label Name="lblChildren" Text="Number of Children:" Top="160" Left="0" Width="200" Height="24" altTop="270" altLeft="0" altWidth="200" altHeight="24"/>
<K2Textbox Name="txtChildren" WatermarkText="Number of Children" Top="155" Left="205" Width="300" Height="24" altTop="270" altLeft="205" altWidth="300" altHeight="24"/>
</Body>
<Footer Text="Specify necessary values to update an existing Employee"/>
</WizardPage>
</WizardPages>
<Runtime>
<RuntimeSteps>
<Step Id="1" Event="UpdateEmployee"/>
</RuntimeSteps>
</Runtime>
<Events>
<Event Name="UpdateEmployee" Type="SmartObjectMapping" Target="Update_Employee"/>
</Events>
<SmartObjectMappings>
<SmartObjectMapping Name="Update_Employee" SmartObject="Employee">
<Method Name="Save" Type="update" LoadReference="EmployeeReference">
<Properties>
<Property Name="Surname" InputControl="{txtSurname}"/>
<Property Name="Start_Date" InputControl="{txtStartDate}"/>
<Property Name="Is_Contractor" InputControl="{chbContractor}"/>
<Property Name="Married" InputControl="{chbMarried}"/>
<Property Name="Number_of_Children" InputControl="{txtChildren}"/>
</Properties>
</Method>
</SmartObjectMapping>
</SmartObjectMappings>
<References>
<Reference Name="EmployeeReference" SystemName="{refEmployee}">
<DefaultLoad Name="Load" Type="read"/>
</Reference>
</References>
</SmartWizard>
Demo Workflow Project
The Workflow Process file contains a demonstration of the two custom SmartWizards in use. The following screen shots present a view of the process being created:
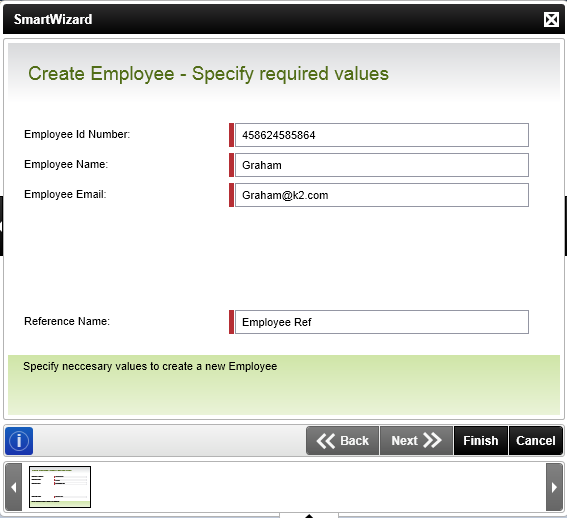
This screen shows the Create Employee WizardPage with the four Label and associated K2Textbox controls. Clicking on the Finish button will created the Reference item that the second SmartWizard will use.
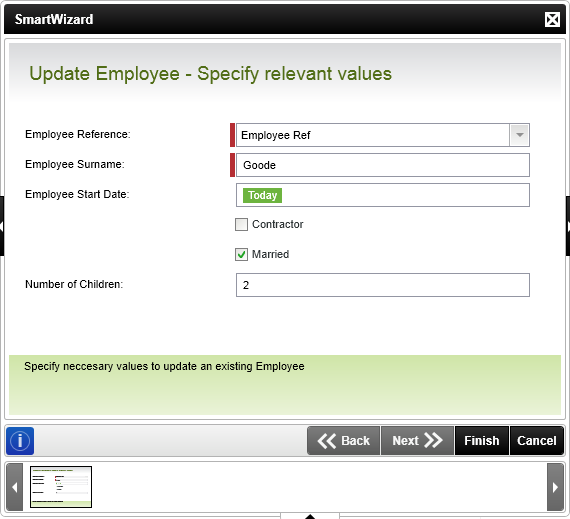
The second screen shows the Update Employee SmartWizard, with the Reference data loaded and the various other controls filled in.