10. Add a Save Method to Update the SmartObject with Manager Changes
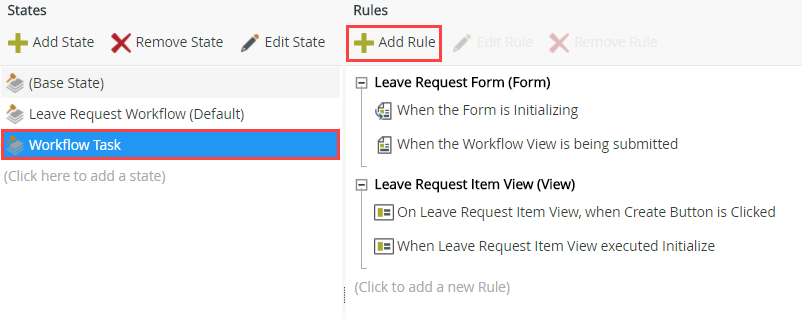
In this step you will add a new rule to the Workflow Task state. (This is the form state for the Manager Approval step.) The new rule fires when the approving manager submits their decision (such as Approved, Denied or Rework). The rule action saves the form fields into the Leave Request SmartObject with any changes the manager made.
-
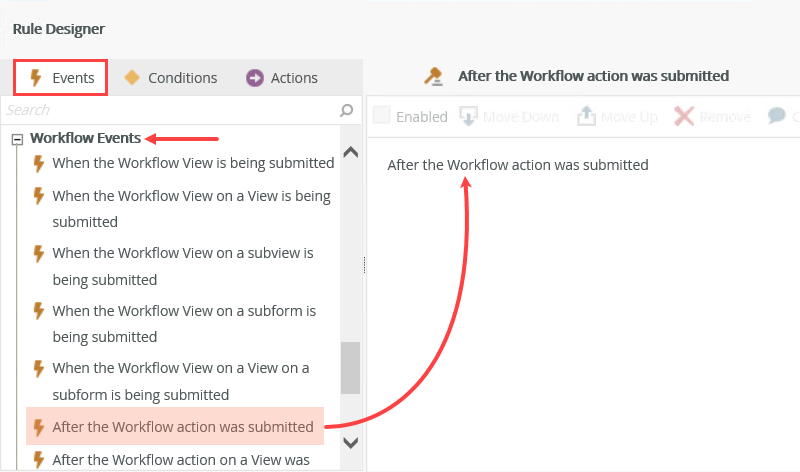
Add a new rule to the Workflow Task state. Add the event After the Workflow action was submitted. The rule fires just after the manager submits their decision.
- On the RULES screen, select the Workflow Task state (if it is not already), then click Add Rule.
- Confirm the Events tab is active. Scroll down until you see the Workflow Events heading. Locate and click the After the Workflow action was submitted event to add it to the rule definition pane.
- On the RULES screen, select the Workflow Task state (if it is not already), then click Add Rule.
- Add an Execute a View method action to call the Save method of the Leave Request Item View.
You may auto-map the input properties, but you MUST delete the auto-mapped ID value and replace it with the Leave Request Item View > Leave Request SmartObject > ID property so that you are referencing the current record. The ID generated by auto-mapping the input properties does not match the ID of the record you want to update. Because of this, an error may be thrown, as it does not know which record to update. You must replace the auto-mapped ID with the ID of the current record.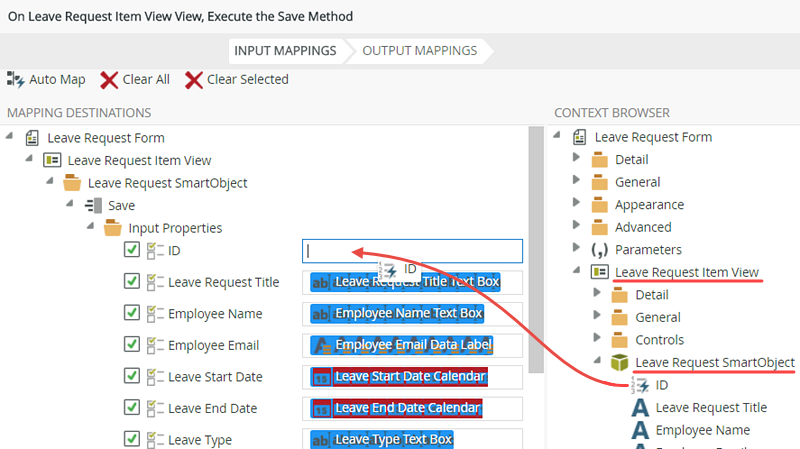
- Now that you have the event set, you will add the action that updates the current leave request record with any changes the manager made.
Click the Actions tab so that it is active. Click to add the Execute a View method action to the rule definition pane. Click the select View link and select Leave Request Item View. Click the select method link and select Save. The save action updates an existing record in the Leave Request SmartObject. In this case, you want to save any changes the approving manager made to the leave request. Next, you will use the auto-map feature, which saves time by mapping the input properties for you.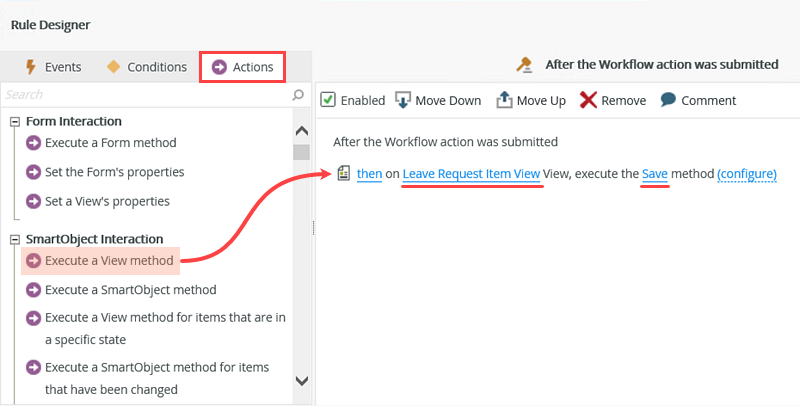
- Click the (configure) link. Click Auto-Map. The input properties (think form fields) are auto-mapped to their corresponding SmartObject properties (Leave Request SmartObject properties). There is one change you must make before continuing and that is to replace the auto-mapped ID with the ID of the current record. Because you are updating a record, the record already exists. You must use the ID of the existing record. The auto-mapped ID creates new record, which is not what you want. So, you will replace the auto-mapped ID with the existing record ID. Do not skip this step or you likely experience errors later on!
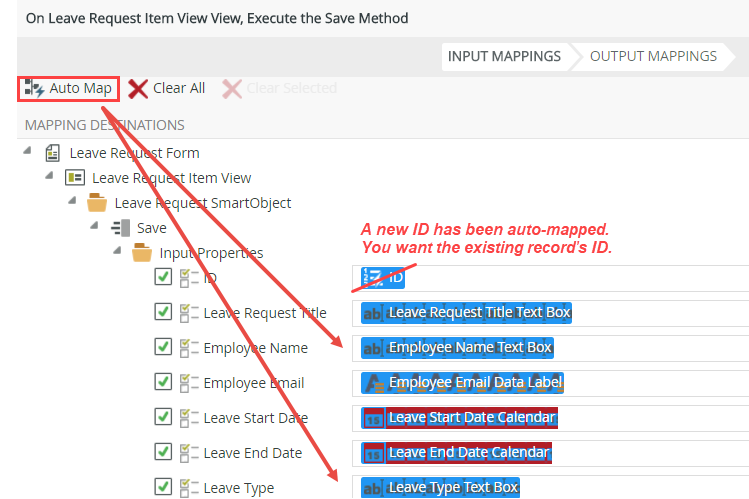
- Click to the right of the auto-mapped ID value and backspace until you have removed it.
- Now, you will add the SmartObject ID for the current record that you want to update. In the CONTEXT BROWSER, expand the Leave Request Item View. Expand the Leave Request SmartObject. Drag the SmartObject ID into the Input Properties > ID field.
DO NOT SKIP THIS STEP! Be sure to complete this step. You want to use the SmartObject ID to update the current record. If you use the auto-mapped ID, the value is not recognized as the current record and will create a new record instead, or possibly throw an error.Click FINISH. Click OK to close the Rule Designer.

- Now that you have the event set, you will add the action that updates the current leave request record with any changes the manager made.
Review
In this step, you added a new rule that saves changes the approving manager made back to the Leave Request SmartObject. You used the auto-mapping feature that saves time, especially if you have a large number of input properties to map. To make sure the current existing record is updated, you mapped the Leave Request SmartObject > ID to the ID input property. In the next step, you will add a clear method that clears the form fields after the leave request submits the form. This gives a visual indication that the form submitted successfully.