11. Add a Clear Method to Clear Form Fields After Submit
In this step, you will add an action that clears the form fields after you submit the form. By default, there is no visual indication that the form submitted. So, by clearing the form fields, you have a visual indication the form submitted. You also have a clean form if you want to submit another leave request. You will add an action to pre-populate the logged-in user's name and email when the form loads. This personalizes the user experience using system values. Last, you will add an action that updates the Leave Request List View with the new record just entered.
-
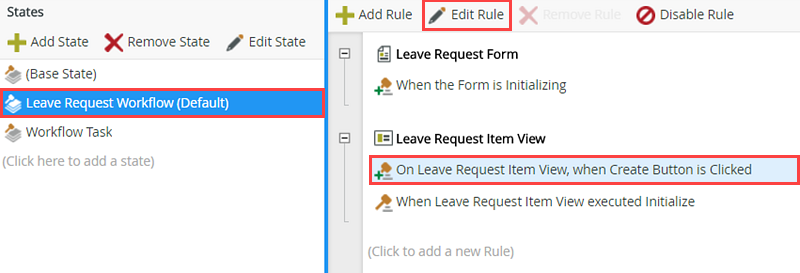
Edit the Create Button is Clicked rule for the Leave Request Workflow (Default) state. Add a view method action to Clear the Leave Request Item View. This step gives you a visual indication the form submitted successfully. Other options include adding a message box to indicate the form submitted or redirecting you to another location, a website for example.
- First, you will configure an action to clear the form entries after the form submits. This gives you a visual indication that the form submitted successfully. Still on the RULES screen, highlight the Leave Request Workflow (Default) state, then the ...Create Button is Clicked rule. The Leave Request Workflow (Default) state is the form configuration and behavior the requester sees when they first submit a leave request. Click Edit Rule.
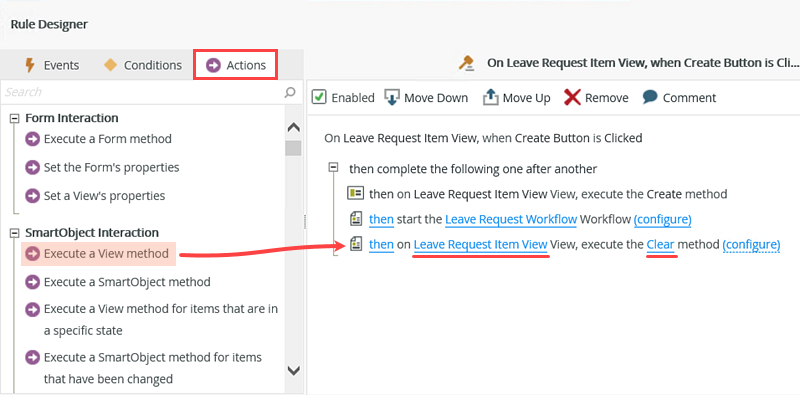
- Confirm the Actions tab is highlighted, then click the Execute a View method action to add it to the rule definition pane. Click the select View link and select Leave Request Item View. Click the select method link and select Clear. You don't need to configure anything else. The action will clear out all the form fields, leaving you still on the form. Now, the form is ready for another leave request entry if needed.
- First, you will configure an action to clear the form entries after the form submits. This gives you a visual indication that the form submitted successfully. Still on the RULES screen, highlight the Leave Request Workflow (Default) state, then the ...Create Button is Clicked rule. The Leave Request Workflow (Default) state is the form configuration and behavior the requester sees when they first submit a leave request. Click Edit Rule.
-
Add another view method action to populate the Leave Request List View (Get List), using the System Value > Current User > Email for the input property. In this step, you are "refreshing" the list view so that it displays the leave request just submitted.
- Next, you will update the Leave Request List View so that it displays the new record you just submitted. If you didn't add this action, the list view would not display the new record until you manually refreshed the page to reload the view. This action is forcing the view to reload behind-the-scenes.
Click Execute a View method once again to add another instance to the rule definition pane. Click the select View link and select Leave Request List View. Click the select method link and select Get List. Click the (configure) link.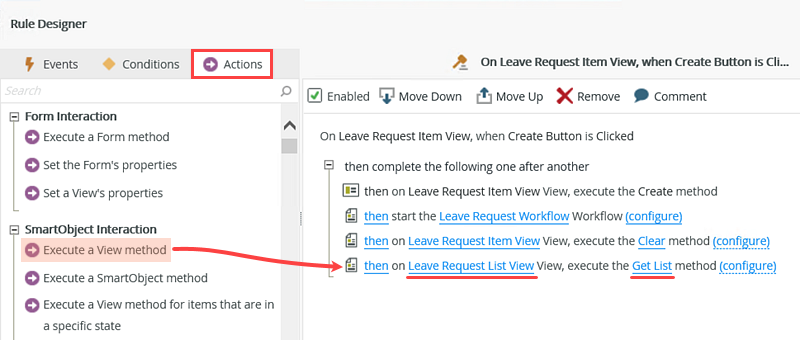
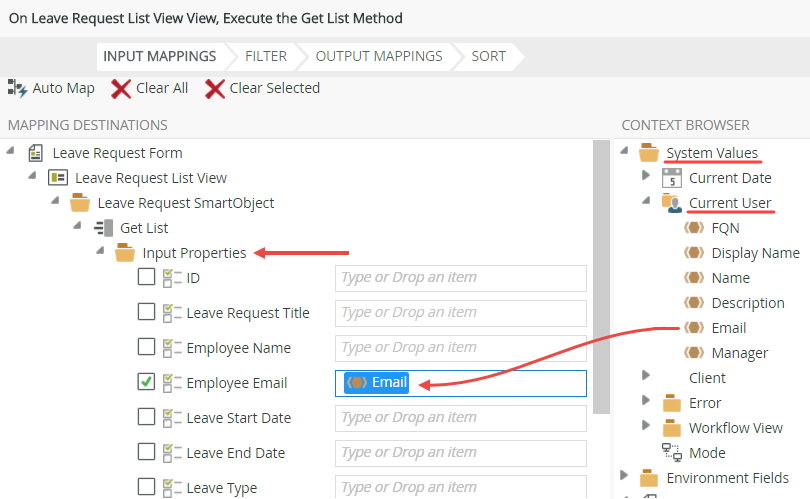
- Now you will map the current user's email as the input property. This step searches the Leave Request SmartObject records for those that have the same email value as the current user. In the CONTEXT BROWSER, expand System Values, then Current User and drag the Email property into the Employee Email input property. Click FINISH.

- Next, you will update the Leave Request List View so that it displays the new record you just submitted. If you didn't add this action, the list view would not display the new record until you manually refreshed the page to reload the view. This action is forcing the view to reload behind-the-scenes.
- Because you just cleared all form fields after you submitted the form, the name and email fields will no longer display the current user. (In the basic tutorial, you configured the name and email fields to pre-populate with the current user's details.) In this step, you will pre-populate the name and email fields once again with system values. Add a transfer data action and map the System Values > Current User > Display Name and Email to their respective item view controls. Finish the form.
Last, check in the views and forms in your application.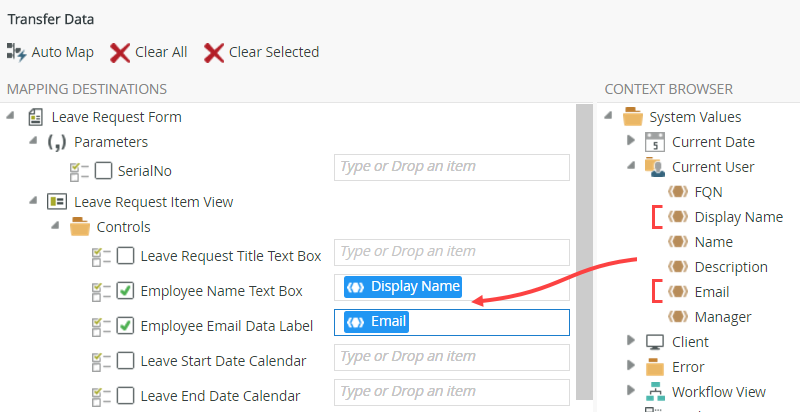
- There is one more step before you can save and exit the form. In the basic version of this tutorial, you configured an action that populates the current user's name and email fields when the form loads. The clear method configured in the previous steps clears the name and email values. You will add a transfer data action to repopulate the name and email fields when the form reloads.
With the Actions tab still active, search for
transfer
then click Transfer data to add it to the rule definition pane. Click the (configure) link.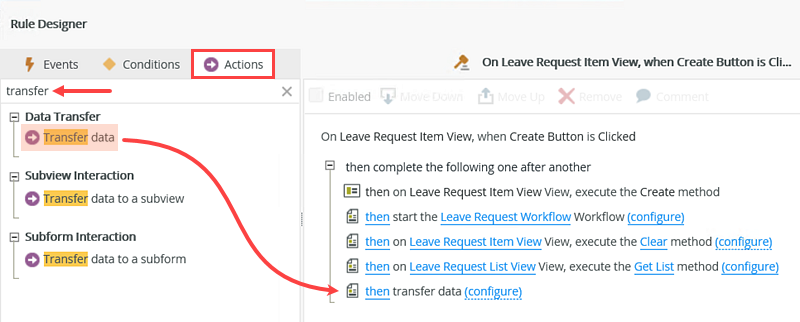
- In the CONTEXT BROWSER, expand the System Values node, then Current User. Drag the Display Name into the Employee Name Text Box and the Email into the Employee Email Data Label. Click OK, then click OK once again. Click FINISH to save and exit the form. (The form finish button is near the upper right corner of the screen.)

- Right-click the Leave Request Form and select Check In. If you see a warning about associated views, CHECK the box to include the views, then click OK. Finishing the form "publishes" it to the server. The changes you made in the last few steps are now ready for use!

- There is one more step before you can save and exit the form. In the basic version of this tutorial, you configured an action that populates the current user's name and email fields when the form loads. The clear method configured in the previous steps clears the name and email values. You will add a transfer data action to repopulate the name and email fields when the form reloads.
Review
In this step, you edited the rule that fires when you click the create button. You added a clear method that will remove the form field values after you click the button. This lets you know that your form submitted successfully and also provides a clean form if you want to submit another leave request. Because the clear method removed all field values, you added a transfer data action to replace the user's name and email. Finally, you added a get list method to update the Leave Request List View with the new leave request record.