28. Create the Expense Claim Report Composite SmartObject
You've completed the testing of your application and now have data you can report on! In this step, you will build a custom reporting dashboard that displays reporting data about expense claims. The form contains reporting controls as charts that show the number of expense claims and average duration of the workflow instances. You will also create a new composite SmartObject that joins two different data sources into one list which provides an overview of the workflow activity, originators, and status.
You begin by building a composite SmartObject. The composite SmartObject joins two data sources into a single output, or list. This is very much like a JOIN statement you might create in SQL. The composite SmartObject joins data generated by Nintex K2 for workflow instances, along with data from your Expense Claim Header SmartObject, using the Workflow ID property as the common value between both data sets.
-
Begin your report construction by creating a new composite SmartObject. In K2 Designer, add a new SmartObject to the Expense Claim > SmartObjects category called Expense Claim Reporting.
- In K2 Designer, right-click the Expense Claim > SmartObjects category and select New SmartObject. Name the SmartObject
Expense Claim Reporting
then click the Advanced SmartObject option and then click CREATE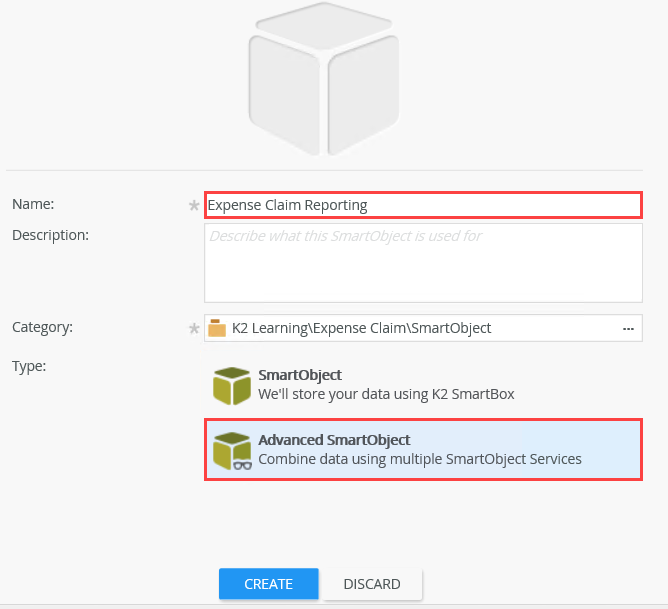
- In K2 Designer, right-click the Expense Claim > SmartObjects category and select New SmartObject. Name the SmartObject
-
Bind the Workflow Reporting Service > Process Instance SmartObject to the Expense Claim Header SmartObject using the Process ID > Workflow ID as the common properties. Use the table below for the specific settings. If a setting is not specified, assume the default
value. If you need help, expand the "Show me how..." section.
Setting Value Notes PROPERTIES & METHODS
Select the first data source from the list of ServiceObjectsAdd the first of two methods. From the Methods tab, add the Workflow Reporting Service > Process Instance > Process Instance > List Process Instances method. This is the first of two methods you will add. This method returns a list of process instances that Nintex K2 stores automatically. This list includes data such as start and end times, workflow status, and Folio. DETAILS Keep the default values (name and type). INPUTS & OUTPUTS Create All Use the Create All button to automatically create and map properties in the new SmartObject to the Process Instance SmartObject. SERVICEOBJECT METHODS Add the second data source method: SmartBox Service > Expense Claim Header > Get List Here, you are adding the second data source method from the Expense Claim Header SmartObject. This method returns a list that includes data such as Employee Name, Request Status, and Total Amount. Add ServiceObject method bindings: Employee Name, Total Amount, and Request Status CREATE new properties for each of the following: Employee Name, Total Amount, and Request Status. You are creating new properties in the new SmartObject and binding them to the Expense Claim Header SmartObject. The new SmartObject now has properties from the workflow reporting SmartObject and the header SmartObject. 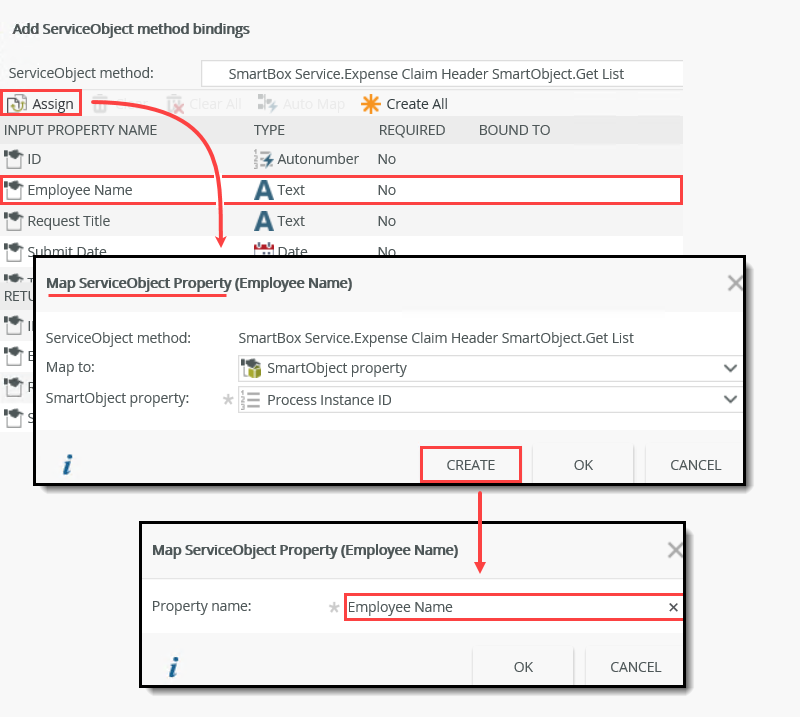
SERVICE METHOD LINKS Bind the Process Instance ID property to the Workflow ID property. And now, you are joining the two data sources together via common properties: Process Instance ID > Workflow ID. This is the last step in creating a composite SmartObject. 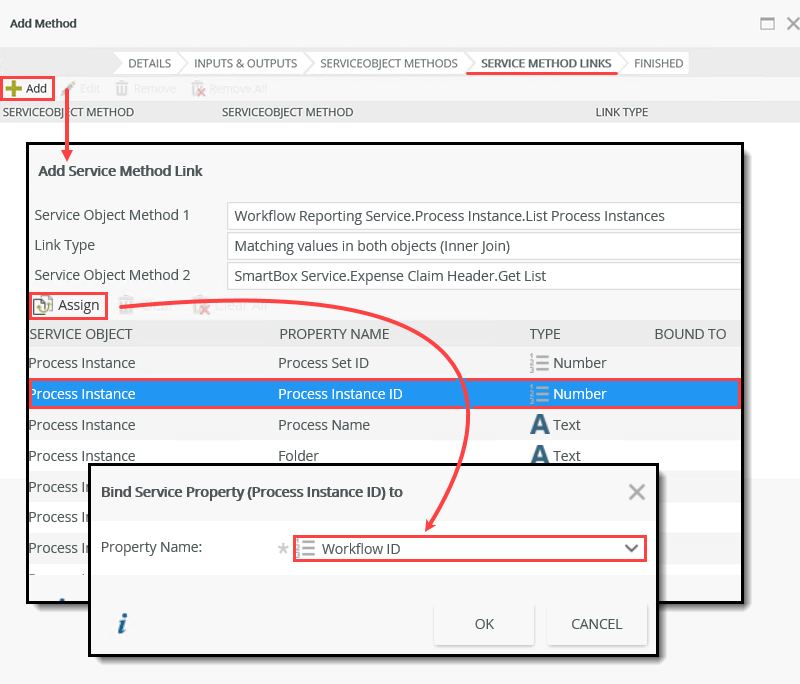
- Next, you will select the first data source. You want to select a method from the data source that returns a list of records. Switch to the Methods tab. The first data source contains information about workflow instances such as start time, end time, duration, and so forth.
From the ServiceObject Explorer on the left side of your screen, expand the Workflow Reporting Service - service instance. Expand the Process Instance > Process Instance node. Drag the List Process Instances method onto the Methods canvas.
- Keep the default values on the DETAILS screen, then click NEXT.

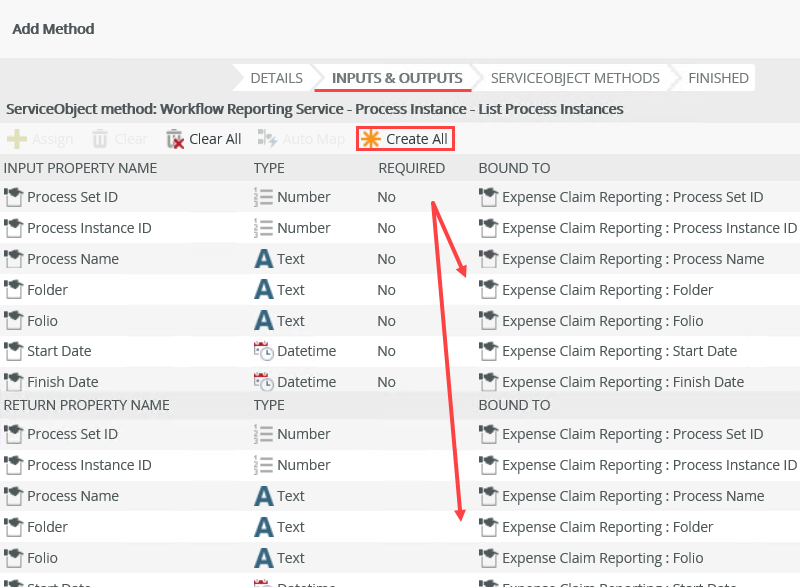
- On the INPUTS & OUTPUTS screen, click Create All. All the input and return properties are created in the new SmartObject. You can select specific properties, then create them individually in the new SmartObject as well. Using the create-all option just saves you time. Click NEXT.
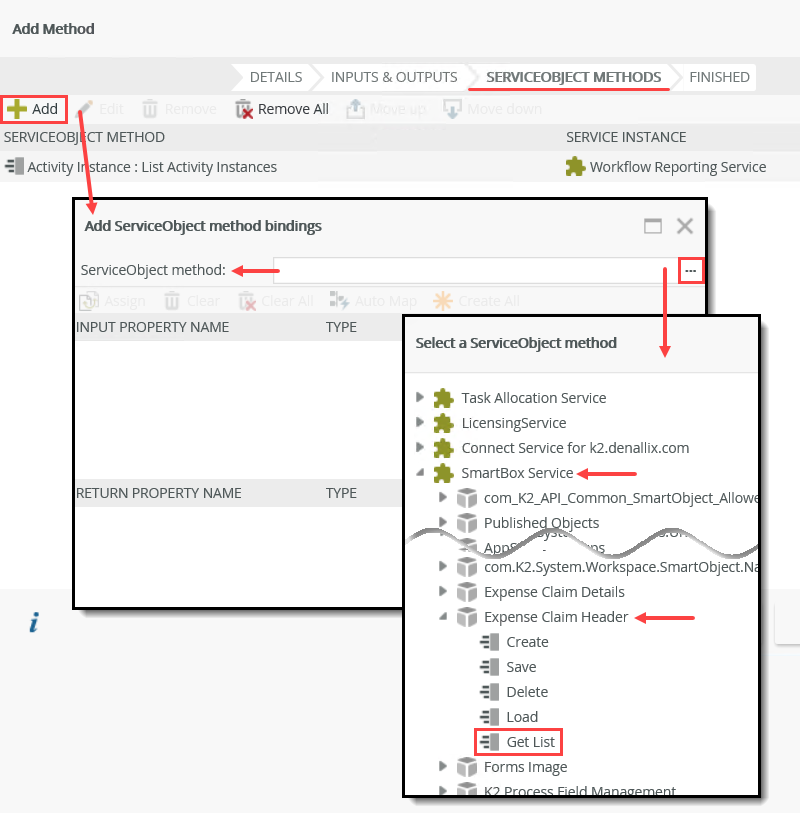
- You are now on the SERVICEOBJECT METHODS screen. Here, you add the list method from the second data source. The second data source is your Expense Claim Header SmartObject. Click the Add button. On the Add ServiceObject method bindings screen, click the ellipses for the ServiceObject method property. Expand the SmartBox Service node. (Recall that the header and details SmartObjects are SmartBox SmartObjects.) Locate and expand the Expense Claim Header SmartObject. Select the Get List method, then click OK.
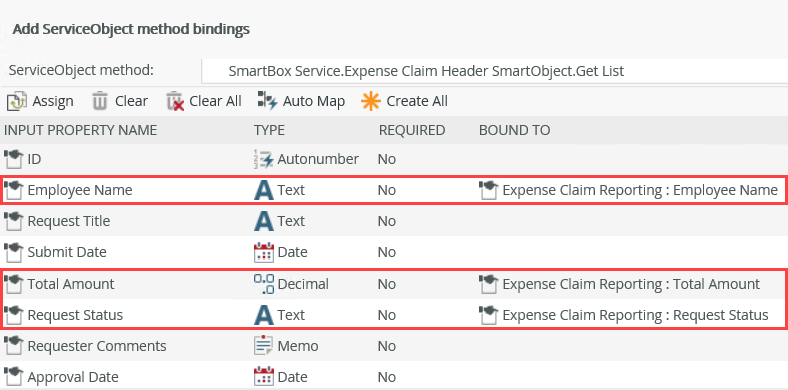
- Back on the Add ServiceObject method bindings screen, notice that the SmartBox properties for the header SmartObject now appear in the input and return property panes. Now you want to create properties in the new SmartObject and map them to the SmartBox properties. (Recall that you clicked the Create All button to map the properties from the first data source. In this case, you will create new properties individually, which demonstrates how you can pick and choose which properties you want in the new SmartObject.)
In the INPUT PROPERTIES pane, select Employee Name, then click Assign. On the Map ServiceObject Property screen, click CREATE. You want to create a new property in the new SmartObject. Accept the default Property name and click OK twice.
- Repeat this step and create new properties for the Total Amount and Request Status properties. Click OK to continue.
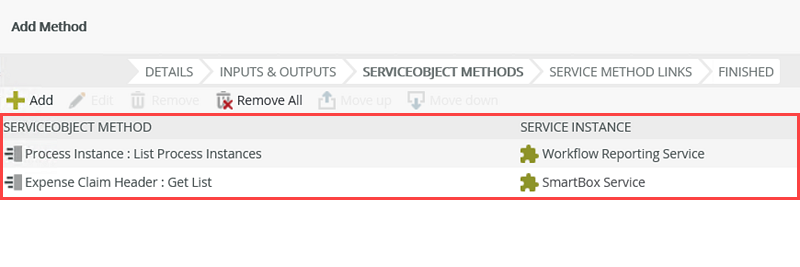
- Notice that you now have two list methods, one for the Process Instance SmartObject and one for the SmartBox SmartObject. Next, you bind the two together via a common property. Click NEXT.
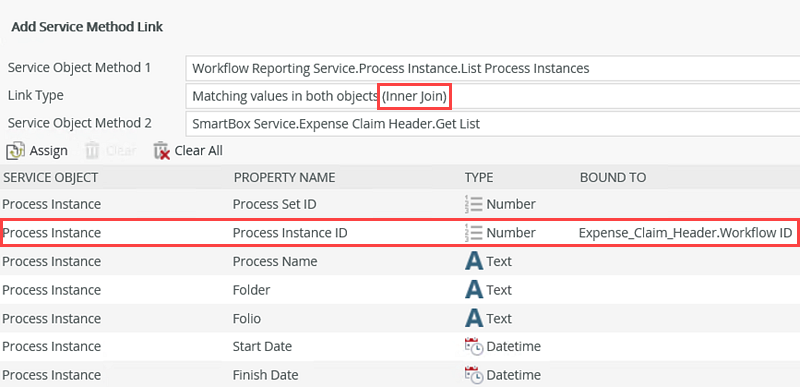
- On the SERVICE METHOD LINKS screen, click Add. You will join the Process Instance ID to the header SmartObject Workflow ID. Select the Process Instance ID, then click Assign. From the Property Name drop-down list, select Workflow ID. Click OK.

- You now have an inner join between the two data sources. Click OK. Click FINISH.
- On the SmartObject PROPERTIES & METHODS screen, you see the completed method bindings. Click FINISH to save and exit this SmartObject.
Notice now, the Employee Name from the SmartBox SmartObject is mapped to the Employee Name in the new SmartObject.

Now, you are ready to link, or join, the two data sources together. You will use the Workflow ID property from the header SmartObject. Recall building the workflow. In the first SmartObject Method step you set the status to submitted. In this step, you also mapped the system Workflow ID to the Workflow ID property in the header SmartObject. Now, you are putting this value to use!
- Next, you will select the first data source. You want to select a method from the data source that returns a list of records. Switch to the Methods tab. The first data source contains information about workflow instances such as start time, end time, duration, and so forth.
-
Before continuing, you will test the new composite SmartObject and review the results. In a later step, you will select a few of the properties to use on a list view for your reporting form. From the Management site, execute the List Process Instance method of the Expense Claim Reporting SmartObject. You do not need to apply any filters, just return all the records. (Remember, the SmartObject is located in the Expense Claim > SmartObjects category.)
- In the next few topics, you will build the list view for the reporting form. You will select several properties from the new composite SmartObject for the list view. Before you start building the list view, you should test the new composite SmartObject and review the results returned. Launch the Management site if it is not already open.If you are unsure of how to launch the Management site, see Accessing K2 Sites.
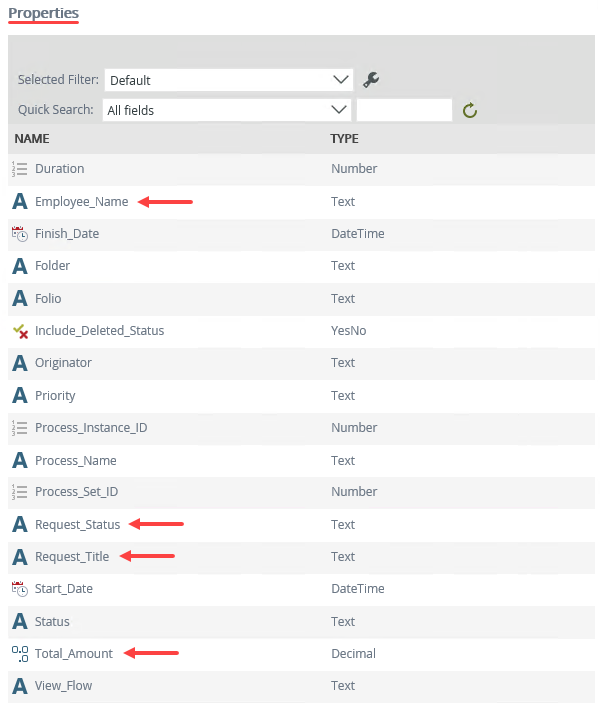
- Navigate to the Categories > K2 Learning > Expense Claim > SmartObjects folder. Click the Expense Claim Reporting SmartObject. The SmartObject's details appear in the central pane. Review the properties. (You may have to scroll through the pages to view all the properties.) Notice the properties reflect both the Process Instance SmartObject and the Expense Claim Header SmartObject. (In the image below, the header properties have an arrow.)
- Scroll down the central pane until you see the Methods sections. There is one method, List Process Instances. Select the method, then click Execute.

- On the Execute SmartObject Method screen, click Execute once again. You do not need to apply filters for this test.
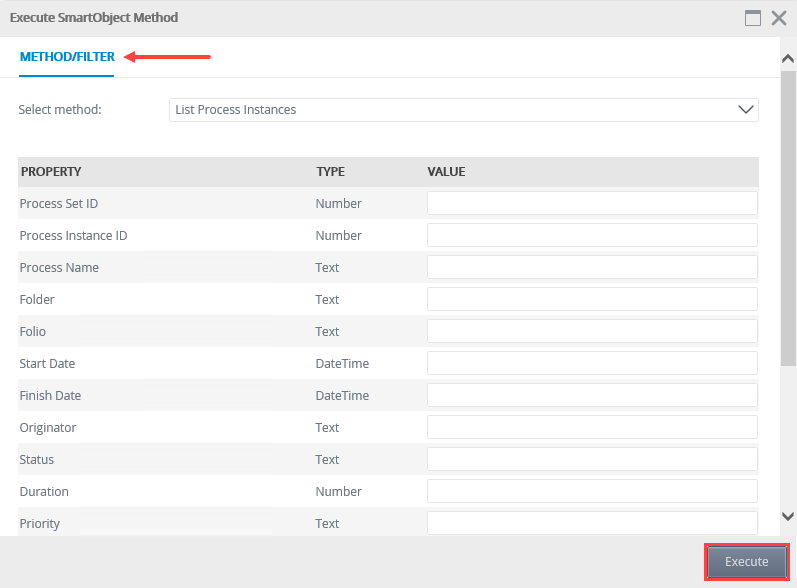
- On the RESULTS screen, you should see the two workflow instances you started for the Expense Claim Workflow. Use the scroll bar to scroll to the right, then review all the results that are returned. Some results reflect the Process Instance SmartObject, while others reflect the Expense Claim Header SmartObject. Click Done to exit the results screen.

- In the next few topics, you will build the list view for the reporting form. You will select several properties from the new composite SmartObject for the list view. Before you start building the list view, you should test the new composite SmartObject and review the results returned. Launch the Management site if it is not already open.
Review
In this step, you built a composite SmartObject that you will use as a data source for expense claim reporting. Composite SmartObjects bind two or more data sources much like a JOIN statement in SQL. For expense claim reporting, you are using data from a system-generated SmartObject that provides details on process instances (or workflow instances), along with data from the Expense Claim Header SmartObject. In a later step, you will select specific properties from the composite SmartObject to display as a list on your reporting dashboard.