Salesforce
K2 integrates with Salesforce using SmartObjects. To enable integration between K2 and Salesforce, you must activate the Salesforce feature which registers an instance of it. You then need to create SmartObjects using this Service Instance.
- A Salesforce.com login with permissions for all the data needed in K2
- A Salesforce Connected App enabled with OAuth with the following scopes
- Full access
- Perform requests on your behalf at any time
- OAuth Client ID
- OAuth Client Secret
See Creating the Salesforce Connected App for information on where to find these values.
Follow these steps to configure your Salesforce Connected App
- Log into Salesforce.com
- In the Salesforce setup platform tools menu click Apps > App Manager

- Click New Connected App

- Specify values for the required fields.

- Check the box to enable API (enable OAuth Settings) and specify the OAuth Redirect URL as the Callback URLYou create your connected app in Salesforce first, but the value of the Callback URL for your K2 system comes from the Salesforce Add Feature Instance page, so open a K2 Salesforce Add Feature Instance page during this step to get the OAuth Redirect URL. In this example it is https://sa-k2-current.denallix.com/identity/token/oauth/2
- Add the following OAuth Scopes:
- Full access
- Perform requests on your behalf at any time

- Save the new connected app (you may get a message about needing to wait a few minutes for your changes to take effect).
- Click Continue
- You now see the Connect App summary screen. If you see an error message from Salesforce wait a few minutes and refresh the page.
- Copy the Consumer Key (needed for the OAuth Client ID)
- Click the Consumer Secret link and copy it (needed for the OAuth Client Secret)

Follow these steps to create a new Salesforce instance.
- Select the Salesforce feature and click New Instance

- Enter the name and description for your new Salesforce instance.
- Enter the OAuth Client ID and OAuth Client Secret (see OAuth Keys)

- Enter the Login URL (See Login Domains)
- Click OK
-
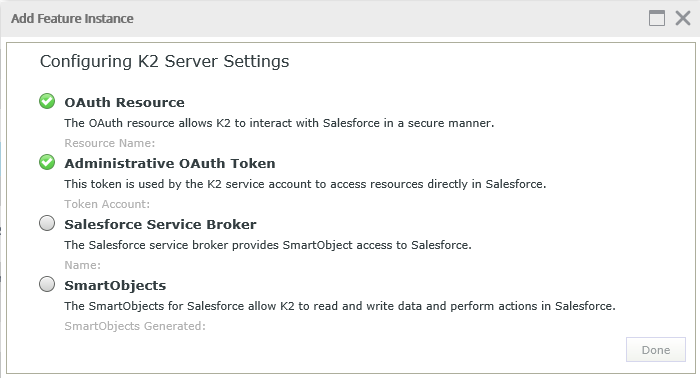
The Add Feature Instance page authenticates with the Salesforce Connected App. You may need to provide your credentials during this process.

A Salesforce Service Instance is created.
Generate your SmartObjects
Salesforce feature activation does not auto-generate SmartObjects due to the time it takes to go through all available objects and describe them. Follow these steps to generate your Salesforce SmartObjects:
- In K2 Management, go to Management -> Integration -> Service Instances
- Select your Salesforce service instance
- Click Generate SmartObjects to start the data objects selection

- Select the Salesforce objects needed in your K2 environment
- Click OK to continue
- Creating the SmartObjects may take a while depending on the number being generated
- Once the process is complete, you can use your Salesforce SmartObjects in views, forms, and workflows
Salesforce provides several options for you to log in to environments. There are default login addresses for each type of Salesforce environment as well as the ability to create a custom URL or even redirect to Salesforce from any domain. Each of these options is supported in the Salesforce Feature Activation by changing the Login URL field.
Default Logins
Salesforce includes standard login URLs for either Production or Sandbox environments, and they areare mutually exclusive in that you cannot use the URL for Production to log into a Sandbox and vice-versa. These URLs are:
- Production: https://login.salesforce.com
- Sandbox: https://test.salesforce.com
The Salesforce Feature Activation page defaults to the Production URL.
Custom URLs
In addition to the default URLs provided by Salesforce, you have the option to configure Custom URLs within your Salesforce environment. Custom URLs use a hostname (provided by a Salesforce administrator) and look something like the following URL: https://customurl.my.salesforce.com.
Note that when using a Custom URL for either a Production or Sandbox environment, your administrator may choose to deny log ins from the default URL for that environment.
Custom Domains
Salesforce also allows you to redirect any DNS record to provide a log in to Salesforce. For example, https://salesforce.acme.com could be redirected by your administrator to provide a way for you to log in from a URL associated with your corporate or intranet environment.
For more information on using custom login domains, Salesforce Custom URL documentation:
- You can only use the OAuth Client ID and OAuth Client Secret of a Salesforce app for a single Salesforce instance. You must configure separate Client IDs and Secrets for Sandbox and Production service instances.
- You cannot migrate between your Sandbox service instance and your Production service instance if you have both on a single K2 Server. You must modify your SmartForms and workflows to use the SmartObjects corresponding to the correct environment.
-
After creating the Salesforce instance by activating the feature, you must create the SmartObjects for the Salesforce objects needed in your K2 environment. See Salesforce Service Type for more information.