How to: Use the All items as a collection option
Use the All items as a collection option to perform an operation on all items in a list of records. For example, you may have a SmartObject that contains a list of email addresses. As part of your workflow, you want to send an email with all the email addresses on the email's To: line. You can use the Join operation in conjunction with the All Items as a collection setting to combine all of the returned email addresses into one line.
The All items as a collection option is located in the Smartfield Composer. When you drag a SmartObject Get List method from the Context Browser into a workflow step, the Smartfield Composer allows you to select the All items as a collection option from the drop down menu.
Design time example of the All items as a collection option
Scenario
Your company uses a workflow to send average sales figures to a list of department heads. You want to send an email to add department heads in the To: line of the email, and also calculate the average of sales per department to include in the email body.
Steps
In this scenario, you begin by building a SmartObject called Department Sales that stores names and email addresses for each of the department heads, as well as total sales amount per department. Next, create an editable list view to populate the Department Sales SmartObject. Create a workflow and configure the Send Email step to send an email to all department heads. This email also contains the average sales figure across all departments. Finally, you deploy the workflow and test the solution.
Prior to working through this how-to, you should know how to work with the category system and add elements such as SmartObjects and views. If you do not know how to build the basic application elements, see: Getting Started (with K2 Designer).
Setup Steps
The following steps set up the scenario from start to finish. If you want to skip the setup steps and view the topic step, go to Configure the All items as a collection option in the Join function.
-
Create a SmartObject called Department Sales with the following properties: Department Name (Text), Department Head (Text), Email (Text), Total Sales (Decimal), and Month (Text). The Department Sales SmartObject store department and total sales data. Once you create the SmartObject, populate it with some data.
- Using K2 Designer, create the Department Sales SmartObject with the properties as shown below.

If you are not familiar with creating a SmartBox SmartObject, see How To: Create A SmartBox SmartObject. - From K2 Designer, right click the Department Sales SmartObject and generate an editable list view. Run the list view to populate the SmartObject with data, as in the example below. (You may want to use different email addresses that will work in your environment.)

If you are not familiar with creating views, see How To: Create an Item View and a List View.
- Using K2 Designer, create the Department Sales SmartObject with the properties as shown below.
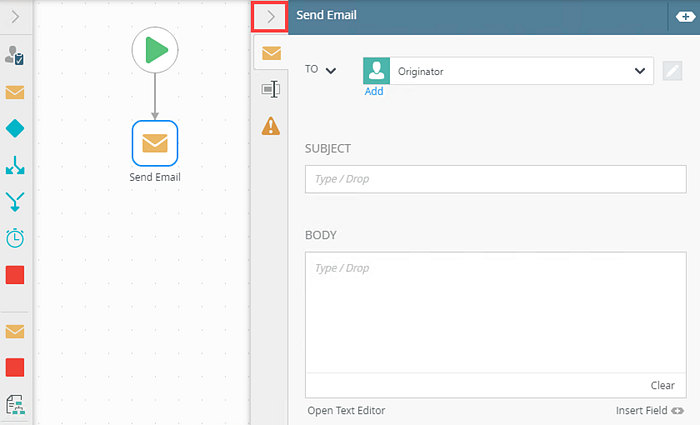
- Create a workflow called Sales and add a Send Email step.
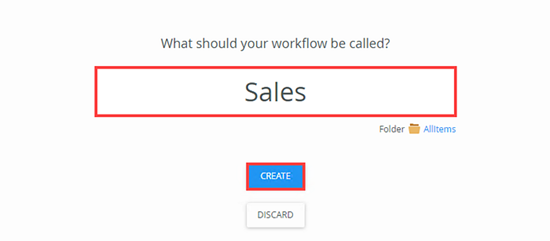
- From the K2 Designer, locate the category where you added the SmartObject and from the menu select New Workflow. Name this workflow Sales and click Create.

- From the Toolbox, click the Basic category, and drag the Send Email step onto the canvas.

- From the K2 Designer, locate the category where you added the SmartObject and from the menu select New Workflow. Name this workflow Sales and click Create.
Configure the Join function
In this scenario, the Department Sales SmartObject contains a list of email addresses and you need to send an email to every address in the list. To do this, you use the Join function to configure the To field on the Send Email step. The Join function concatenates a list of text values or fields, delimiting each with a separator. In the function you use the Email property from your SmartObject, and select the All items as a collection option. We will combine the email addresses with a semicolon, and put the result into the To: property of the email.
-
Add and configure the Join function. Locate the Join function from Context Browser > Text section and use the Email property (from the Department Sales SmartObject) to configure the function.
- From the K2 Workflow Designer, select the Send Email step and expand the Configuration Panel.

- To select a recipient click the To menu. By default, the workflow originator is selected. Other options in this menu include Originator's Manager, Browse, and Type/Construct my own. In this example, click the Add link and then select the Type/Construct my own option from the drop down menu.

- Configure the To field, click the Functions tab and drag the Join function (found in the Text section) from the Context Browser into this field.

For more information on how to use the Smartfield Composer, see theSmartfield Composer topic. - The Smartfield Composer shows. From the SmartObjects section, enter Department Sales in the search area to locate your SmartObject.

- Select the Department Sales SmartObject and then select the Get List operation.

- Drag the Email property into the Values field. Change the name of the Join function to Department Email. Enter a semi-colon (; into the Separator field. In this example, the Join function concatenates all email addresses with a semi-colon, and the resulting value is used to send the email.

- In the Get List Email SmartObject configuration block, select the All items as a collection option from the drop down menu.

- Click X to close the Smartfield Composer. The configuration on the To field should look as follows:

- From the K2 Workflow Designer, select the Send Email step and expand the Configuration Panel.
-
Next, add and configure the Average function. Locate the Average function from Context Browser > Mathematical section and use the function to show the average sales across all departments in the body of the email. This function calculates the average of a collection of values. In the function you use the Total Sales property from the Department Sales SmartObject, and select the All items as a collection option.
- Drag the Average function (found in the Mathematical section) from the Context Browser into this field.

- The Smartfield Composer shows. From the SmartObjects section, locate and click the Department Sales SmartObject. Select the Get List option. Drag the Total Sales property into the Values field. Change the name of the Average function to Average Sales. In this example, the Average function calculates the average total sales across all departments.

- In the Get List Total Sales SmartObject configuration block, select the All items as a collection option from the drop down menu.

- Click X to close the Smartfield Composer. The configuration in the email body is as follows:

- Drag the Average function (found in the Mathematical section) from the Context Browser into this field.
- Deploy the workflow.
- The final thing to do is to deploy your workflow. From the File menu select Deploy.
Before you can use the workflow, you must deploy it. Deploying the workflow publishes it and makes it available for use. If you make any changes to the workflow, you must deploy it again so that the changes are updated on the server.
For more information on deploying the workflow, see the Deploy a workflow topic.
- The final thing to do is to deploy your workflow. From the File menu select Deploy.
-
Test the solution by running an instance of the workflow.
- From K2 Management, manually start an instance of the Sales workflow.

For more information on how to start a workflow manually, see Start a Workflow Manually in K2 Management.
- At runtime, the workflow calls the SmartObject, collects and calculates data, and then sends an email to every address. In this example, the body of the email contains the average sales figure across departments which is 11833.33, and you should also see all the email addresses returned by the SmartObject in the email To: line.

- From K2 Management, manually start an instance of the Sales workflow.
Review
You learned how to use the All items as a collection option to perform an action on all items contained in a selected SmartObject. In this scenario you used a SmartObject to send an email to a list of email addresses. You also used a list of sales figures to work out an average sales amount and added this to the body of the email.