The View Flow Report
In the Reporting in K2 Workspace exercise, we worked with the Process Overview report and observed how you can drill down into the Activity Instance details in a linear fashion. In this tutorial, we will see how this same information can be displayed in a flowchart format by using the View Flow Report. First, we'll take a tour of the View Flow Report, then we will action the Active Leave Request Workflow Process and observe the View Flow chart as it updates in almost real-time.
In this step, we will compare the View Flow results with the Completed Leave Request Workflow Process we observed in Step 3 of Part 1.
Step 5 Tasks
- Open the View Flow Report for the same completed Leave Request Workflow Process Instance that you used for the Process Overview Report steps in Part 1.
- Observe how the workflow is visually presented, and that you can see the paths/decisions that the workflow followed.
- Open the Process Summary details (double-click the Start button) and observe how the same information found in the Process Overview Report is presented in the View Flow Process Summary.
- Open the Manager Approval Activity Summary details and again, observe how the Process Overview Report details are presented in the View Flow format.
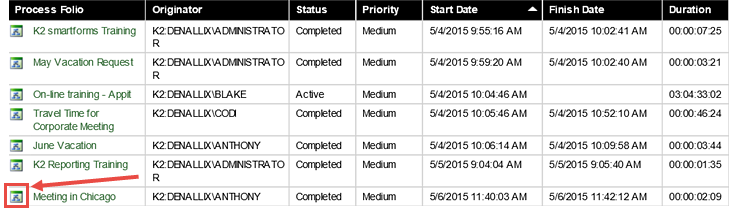
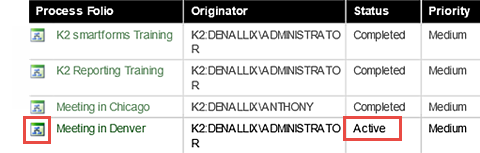
- Click on the Process Overview Report to open it. Click on the Leave Request Workflow Process to expose the Process Instances. Each Process Instance has a View Flow icon to the left of the Process Folio title. Each Process Instance can be viewed in View Flow format. Click the View Flow icon that is associated with the Completed Process Instance that you worked with in Part 1.
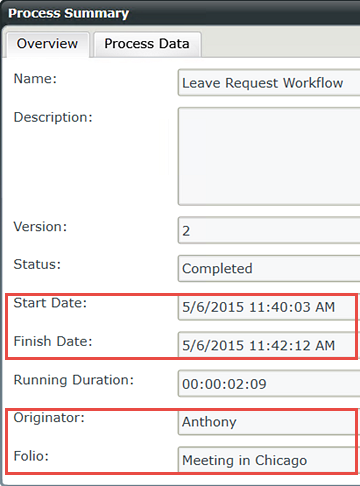
- Double-click the Start button to open the Process Summary. (A above) Here we find basic details regarding this Process Instance. We can see the Start and Finish Dates and the Duration. We also can see that Anthony was the form originator and we see the Folio name.
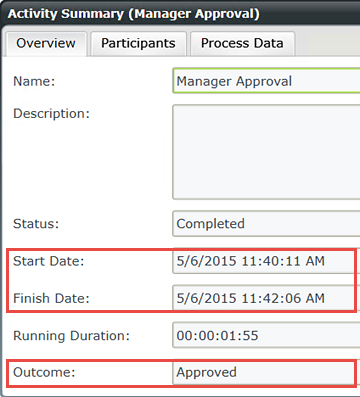
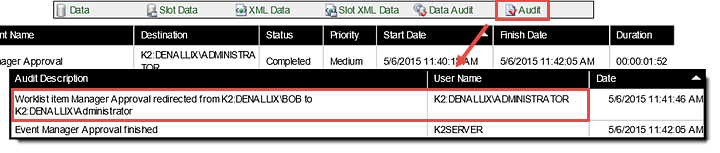
- Double-click the Manager Approval task to open its details. On the Overview screen, we have details including the task Start and Finish Dates, as well as the Outcome (Approved).
- Click the Participants tab. Now we can see that administrator (this is the same as Denallix Administrator) approved the request.
- Exit the Activity Summary screen.
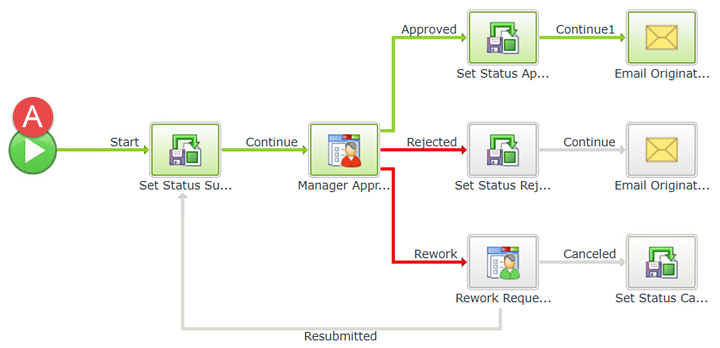
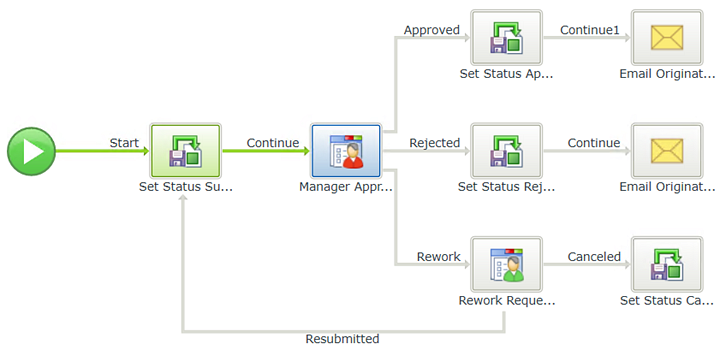
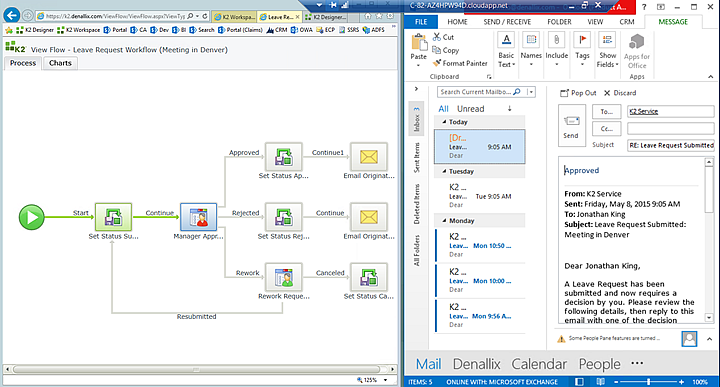
The View Flow Report opens. One difference between the Process Overview report and the View Flow report is that we can see at a glance what 'paths' the workflow took by following the green lines. We see that the outcome for the Manager Approval task was Approved and that after updating the Status and sending an email to the originator, the workflow was complete. (The red lines indicate the workflow outcomes that were not followed.) What we don't see, is who made the Approved decision, and we'll explore that next.
Compare the View Flow details with the Process Overview Report.

Exit the Process Summary screen to continue.

Compare this information with the details found in the Process Overview Report.

Recall that we observed the Audit trail in the Process Overview Report. In View Flow, Audit details are not available.
STEP 5 REVIEW
The View Flow Report provides the same details as the Process Overview Report with some minor exceptions (for example, the Audit trail). While the details are largely the same, the presentation and navigation is what sets these two reports apart. The View Flow offers a clear vision of the entire Process Instance (start to finish) on one screen. With very few clicks, you have the same Process and Activity Instance details as you do with the Process Overview Report. In the next step, we will see the fundamental difference between the two reports, as we observe the View Flow report update in almost real-time.
In this step, we will observe a workflow in progress and how the View Flow Report updates in almost real time. This feature can be very useful for troubleshooting as you are able to view the path the workflow is taking and events as they are occurring. For this step, we will first action a Process Instance that has an Active Status. We will then return to the View Flow chart and confirm the outcome path corresponds with the action taken.
Step 6 Tasks
- Open a View Flow Report for a Process Instance that has an Active Status. Observe how the chart has a green line up to the Manager Approval step.
- Open Outlook for the destination user assigned to the Manager Approval task.
- Position Outlook and the View Flow screen so that they are side-by-side. Using SmartActions, action the Leave Request from the manager's Outlook. (SmartActions simply require you to Reply to the task notification email, entering one of the outcome actions in the email message body. K2 will 'read' the action and continue the workflow accordingly.)
- Observe the View Flow chart and how it updates automatically with the action outcome entered.
- Open the Process Overview Reports, then the Leave Request Workflow Process. Click the View Flow icon for a Process Instance that has an Active Status. (If you do not have any Process Instances that are active, you will need to submit a new Leave Request Form to create a new, active Process Instance.)
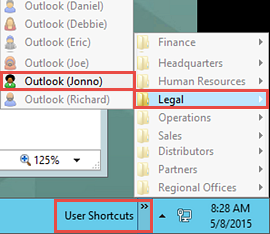
- Since the Leave Request Workflows were submitted by us (Denallix Administrator), we need to open Administrator's manager's Outlook (who is Jonno). Click the User Shortcuts link in the lower right corner of your screen. Expand the Legal folder, then click on Outlook (Jonno). (Jonno's Outlook will launch. This may take a minute or two. If you get a dialog about CRM syncing, let it complete, then click OK. If you get a dialog about licensing, click Close to continue.)
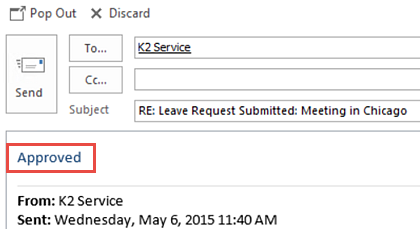
- Reply to the email with either Approved or Rejected as the message body. Click Send, then observe the View Flow Report update. (The timing for the update will vary, depending on your environment.)
Your View Flow Report should look similar to the image below. Notice the green line flows through the system task (Set Status), then stops at the Manager Approval task. This is telling you that the workflow is currently waiting for the Manager Approval task to be actioned. In the next step, we are going to action this request, then observe the View Flow Report update itself.
Before you action the request, adjust your View Flow Report screen and Outlook screen so that they are side-by-side. The View Flow Report can update very quickly (depending on your environment) after we action the request in Outlook. With the screens side-by-side, you will be able to see the View Flow update.
We are going to action the Leave Request using a technology called SmartActions. SmartActions allow the user to action a task by simply replying to the email, then entering one of the action options as the message body. K2 will 'read' the action and move the workflow along accordingly.
The View Flow Report after it has updated.

STEP 6 REVIEW
In this step, we observed in real-time how the View Flow Report updates after a task has been processed. In our example, we actioned a Leave Request using SmartActions. This report can be useful for troubleshooting as you can observe the system and user tasks as they are processed, giving you immediate feedback as to your workflow's efficiency.
This concludes the View Flow Reports tutorial.