Deploying a K2 Package
Once the package (.kspx file) has been created, you can use the Deploy Package function to deploy the package to the target K2 environment.
Prior to deploying a package to your target environment, be sure to review the Package and Deployment Considerations.
A K2 package can be deployed from the K2 Application page associated with the SharePoint list or library.
When using the Package and Deploy tool to create or deploy a package in K2 for SharePoint, do not click the Back button in the browser to navigate back. Doing so may result in increased memory usage on the K2 server due to session management. The correct way to cancel out of the Deploy Package screens is to click the Cancel button at the bottom of the screen.
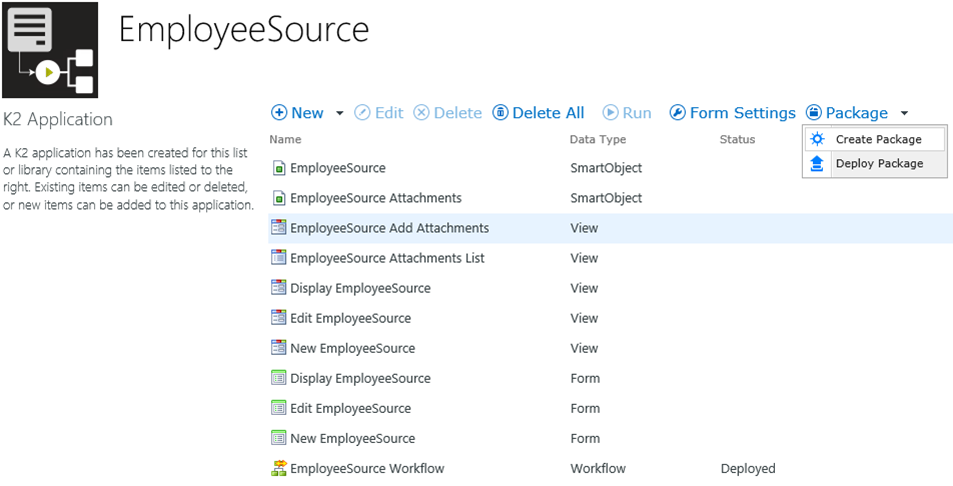
Step 1: Deploy Package
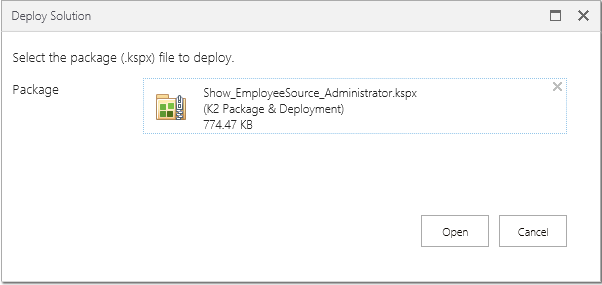
Click on the Deploy Package option from the Package drop-down list. The Deploy Solution window opens. Browse to the location of the saved K2 package, then select the file. Click Open to continue.
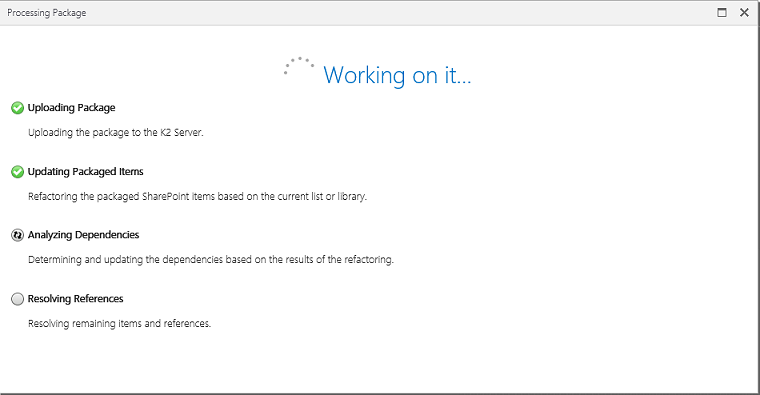
Step 2: Artifacts
The K2 package will now load, and the artifacts within the package will be analyzed.
Step 3: Columns
Once the package is loaded, the Columns configuration screen is displayed. If the list or library columns of the destination environment match the source environment, then the screen will automatically navigate to the Additional References.
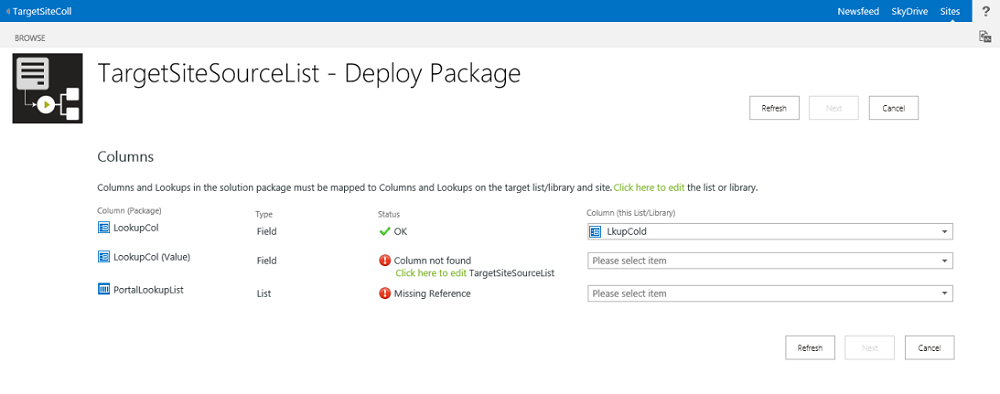
Use the Column (this List/Library) drop-down to select the matching column in the target environment, or use the Click here to edit link to open the list or library settings screen so that you can add the required column. Use the Refresh button after changing settings so that the new properties are available.
If you select a column object that does not match the original list or library, a warning will display informing you of what columns are missing from the target.
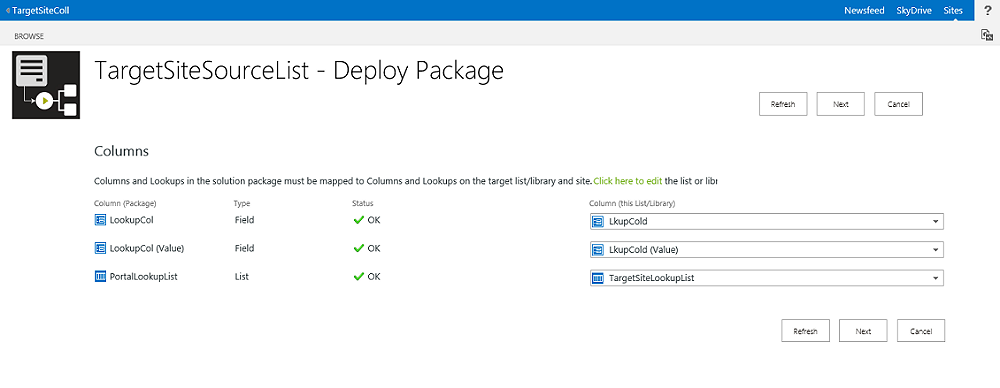
Click Next when all of the columns indicate OK for the status.
Step 4: Additional References
Once the Columns configuration is finalized, the Additional References configuration screen is displayed.
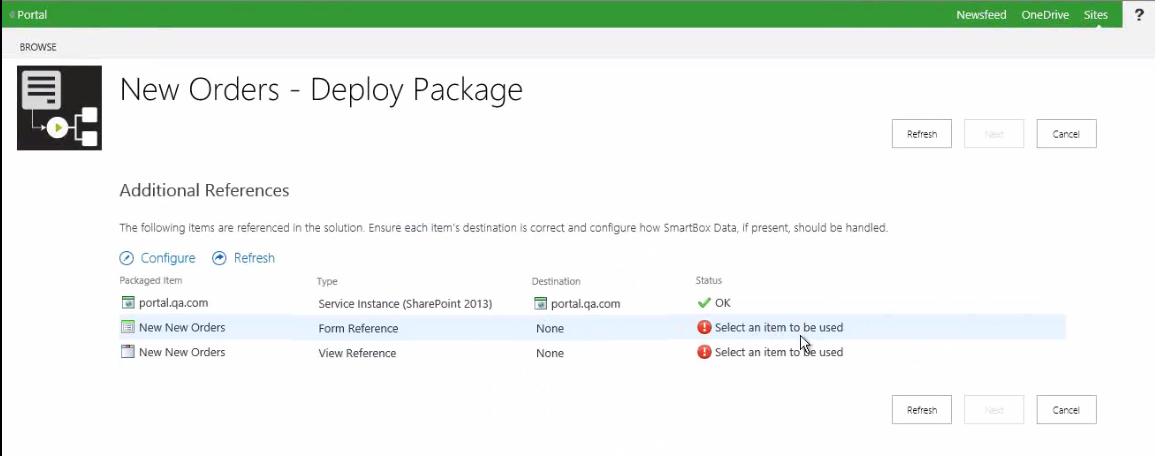
Artifacts that are external to the context of the SharePoint 2013 list or library application must be manually remapped during the deployment. These include:
- SmartBox SmartObjects
- Managed Metadata SmartObjects
- SmartObjects for lists and libraries that are referenced throughout the application
- SmartObjects referenced in site columns
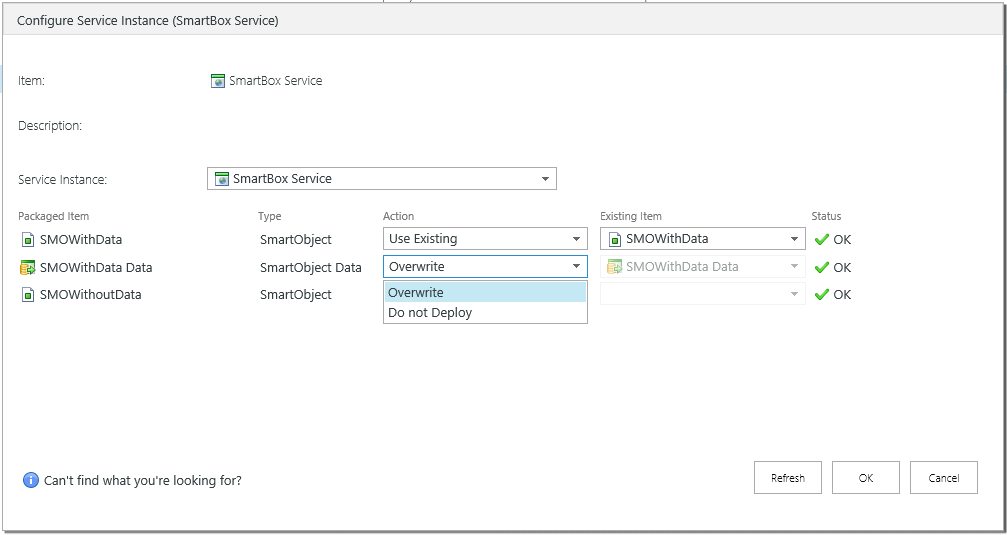
For these artifacts, the only action option is Use Existing. These lists and libraries must exist on the target environment and must have been K2 appified in order for the SmartObjects to exist. If the SmartObjects do not exist you can run the create K2 app on the lists and libraries and return to this screen.
Use the Configure button to make any changes that are needed for this local environment. If SmartBox data was included in the package and you configure the parent SmartObject to use a SmartObject already deployed to the target environment (Use Existing), configure the SmartObject data artifact to Do not Deploy to keep the data of the target environment, or Overwrite to write the packaged data to the target environment (overwriting the data already there). When deploying SmartObject data artifacts with a new SmartObject (Create New) you have the option to Deploy or Do not Deploy the data.
If an artifact was packaged as a reference and not a full object and that artifact does not exist on the target environment, you will need to deploy a package with that artifact onto the target environment before attempting to re-deploy the artifact packaged as a reference. If the referenced object exists on the target environment and the deployment validation tool was unsuccessful in locating it, use the Configure button or double click on the artifact in order to select the correct object in your environment.
If you have changed the configuration, click the Refresh button to re-analyze the artifacts in the package.
Some service instances are package specific and are not configurable. The drop down for those service instances will be grayed out.
When all of the additional references and service instances are correctly configured, click Next to continue.
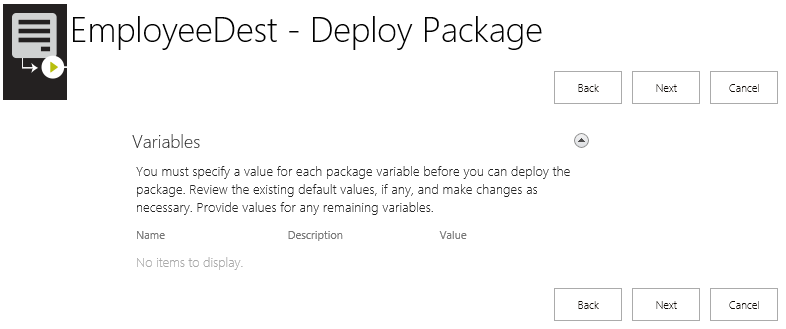
Step 5: Variables
If there are Variables configured within the K2 package, use this screen to edit the value of the variable to match the environment. Click Next to continue.
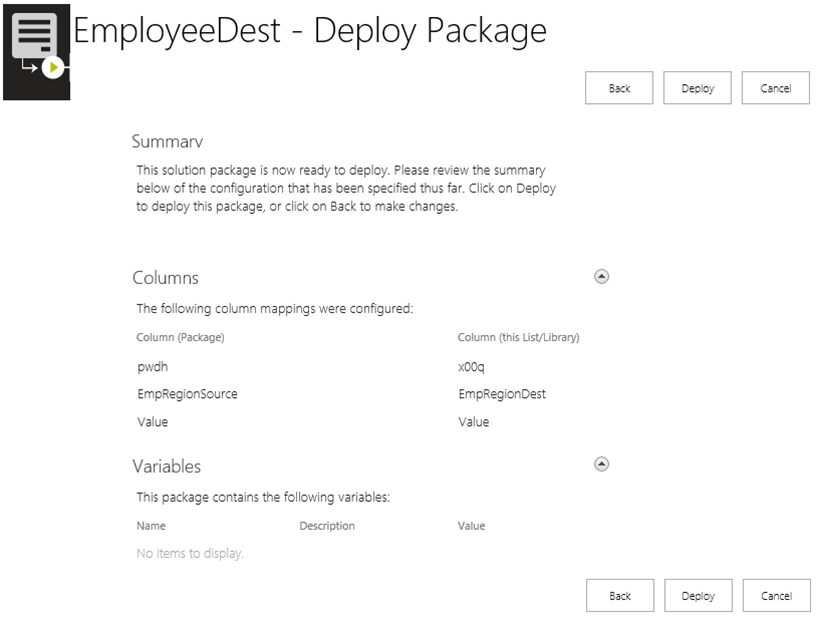
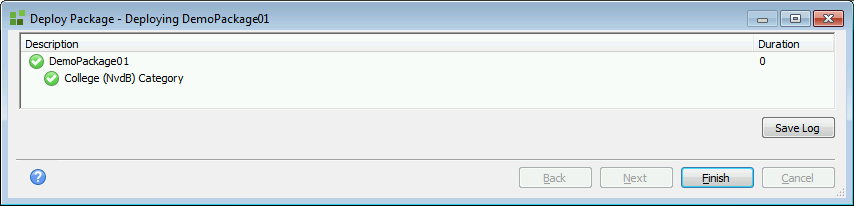
Step 6: Summary
A summary of the deployment will now display. If there are any issues, use the Back button to navigate back to the screen where that item can be configured. If everything is correct, click the Deploy button to start the package deployment.
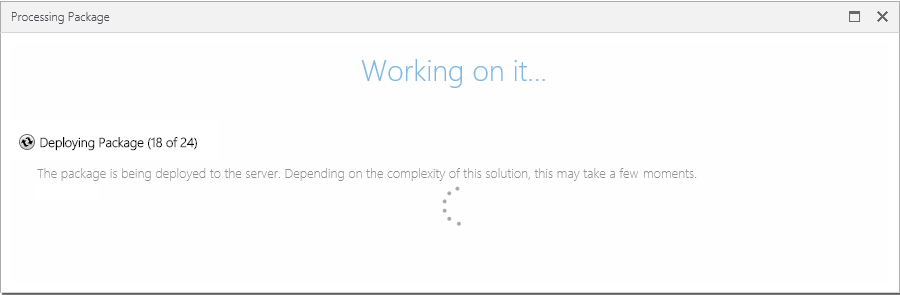
Step 7: Working
While the package is being deployed, the Working on it... screen will be displayed.
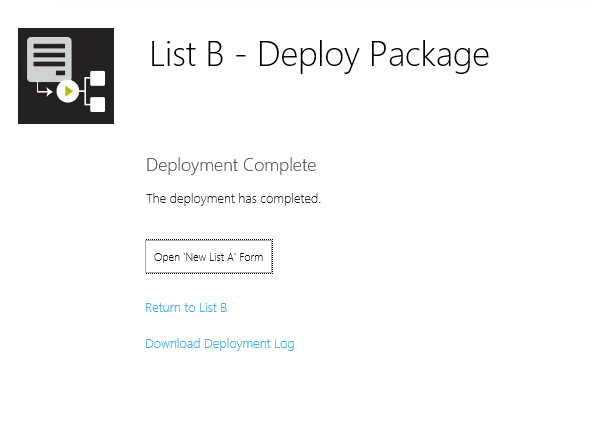
Step 8: Report
Once the package has been deployed, a summary report will be displayed. If any errors occurred, they will be reported here. Use the Download Log File link to save a local copy of the deployment log (the log file can be used to troubleshoot an issue). Click the Open form button to go to the deployed solution, or click the Return to link to conclude the deployment process.
If any artifacts failed to deploy, use the log file to investigate the issue or issues. Once the problem is resolved (i.e. the mail server is back online), click the Retry link to re-deploy the package.
Step 1: Environment
Requirement: On the target environment, install K2 for SharePoint and deploy the K2 Application to the App Catalog using the AppDeployment.exe available in [Install Directory]:\Program Files (x86)\K2 blackpearl\K2 for SharePoint 2013 Setup. Create the exact same list or library (column names, fields and content types must match) in the target environment. You do not have to integrate into the list or library, just add the K2 app and run the configuration on the target environment. This will create a required service instance for you to rebind the service object to. If the target SharePoint environment’s site is not set up to mirror the source SharePoint environment at deployment, missing references will be encountered and will need to be resolved before the package can be deployed.
Step 2: K2 Package and Deployment
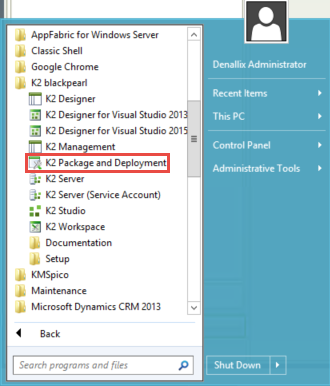
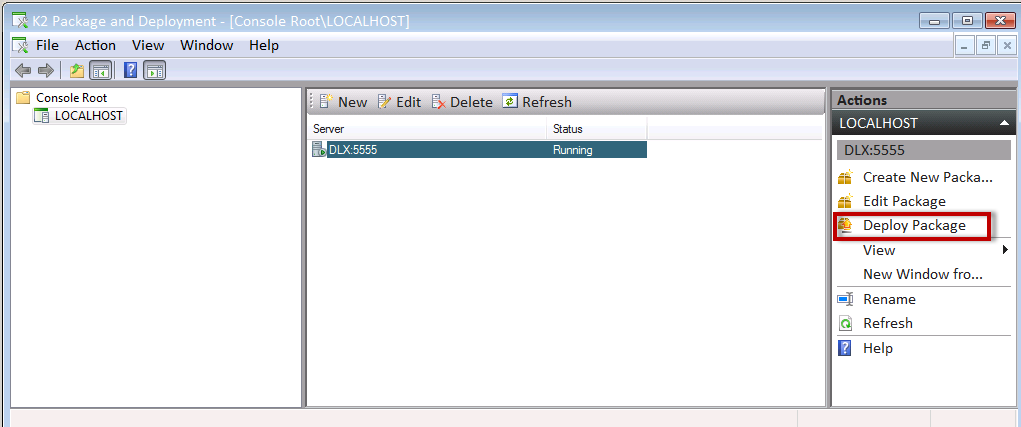
Open the K2 Package and Deployment tool from the Start menu.
Select Deploy Package from the Actions pane on the right.
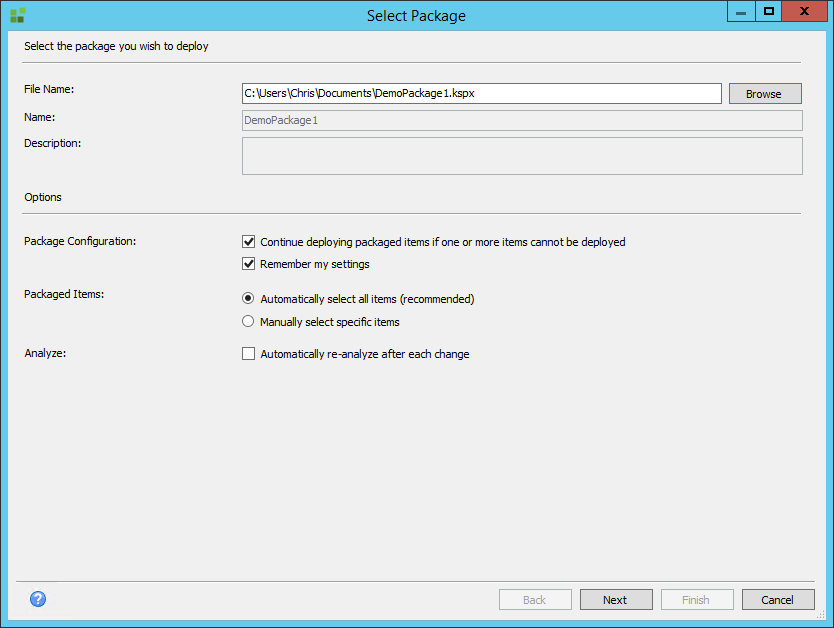
Use the Browse button to locate and load the K2 deployment package into the Select Package dialog screen.
- Packaged Items radio buttons:
- Select the Automatically select all items option if all items in the current deployment package should be deployed. When Next is clicked in the Select Package window, all items within the deployment package will be selected by default.
- Select the Manually select specific items option if only some items within the current package should be deployed. After clicking Next, individually select the artifacts to be packaged.
- Analyze check box:
- The analysis function compares the artifacts on the server (if they exist) with the artifacts in the K2 package. If any items to be deployed contain content which differs from existing items, the analysis function offers the option to replace the existing artifacts and dependencies with current versions.
- Enable the Automatically re-analyze after each change option if needed. For larger packages, K2 recommends that you keep this option disabled.
- Package Configuration check boxes:
- The Continue deploying packaged items if one or more items cannot be deployed check box is checked by default.
- Deselecting the check box will halt the deployment entirely if any artifacts cannot be found, or are incompatible with the current deployment.
- Selecting the check box will halt the deployment of individual artifacts if the relevant artifacts cannot be found or are incompatible with the current deployment. Package and deployment will continue deploying all artifacts which are not in conflict with the target environment.
- The Remember my settings check box is checked by default. This allows K2 Package and Deployment to remember which package-selection options have been specified for the current package, and apply the options to future package deployments. Should different selection options be needed for future package deployments, deselect the check box.
- The Continue deploying packaged items if one or more items cannot be deployed check box is checked by default.
Click Next. The Deploy Package window will open. If variables must be assigned at this point, see the Assigning Variables section in Create a Package for more details.
Analysis
Validation analysis helps prevent deploying a package that is broken. You are warned when artifacts that are dependent on other artifacts may not exist. An example of this is where a property or method has been removed from a SmartObject which is referenced in a view or workflow. Automatically re-analyzing each artifact after a change in the deployment has a performance cost, so this option is de-selected by default. A full analysis of the package is performed before the Deploy Package options page shows. The Analyze option is then used if artifacts need to be mapped to local entities.
K2 is adding error validation of K2 artifacts from within the design environments, so that missing dependencies are highlighted and traceable during design time, making it less likely to have missing dependencies during deployment.
Step 3: Deploy Package
Click Next. The Deploy Package window will open. You will need to assign variables, resolve conflicts, and solve dependency issues at this point. If your site and portal have the same name you will not see any missing references or conflicts.
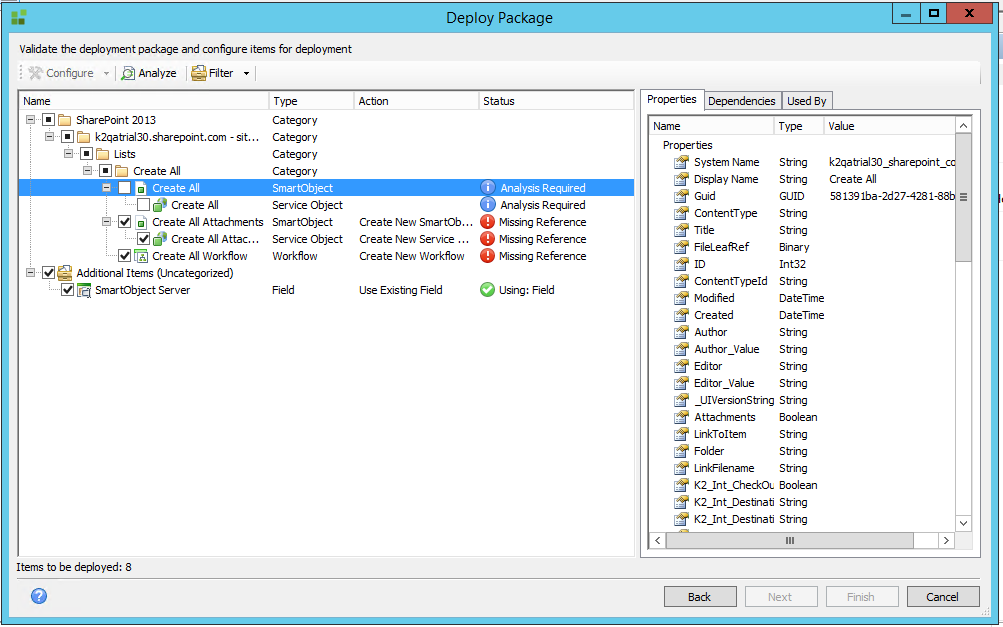
Right-click on the artifact to show the options menu.
| Field | Description | Notes |
|---|---|---|
| Configure | Opens the advanced configuration page for that artifact type. | Each artifact type will present a configuration screen exposing the options for that artifact type. |
| Include | Includes the artifact in the deployment. | This option is only active if the artifact has been excluded. |
| Exclude | Excludes the artifact from the deployment. | This option is only active if the artifact has been included. |
| Overwrite | Enables the option to overwrite the existing artifact with the definition contained in the package. | The description of this option within the menu indicates the artifact type to be overwritten. |
| Use Existing | Uses the existing artifact from the target environment. | The description of this option within the menu indicates the artifact type to be overwritten. |
| Analyze | Re-runs the analysis of this artifact. | Choosing the Analyze option from the top menu will run analysis on all the enabled artifacts. Selecting the line item Analyze option to run the analysis on the individual artifact. |
All conflicts must be resolved before the package can be deployed to the new environment. If a conflict cannot be resolved, the artifact or dependency causing the conflict must be excluded. See Conflict Resolution for more details. Once all conflicts have been resolved, run the Analyze option to update the deployment status check.
The following will show as missing references and will need to be remapped if your site or portal names are different:
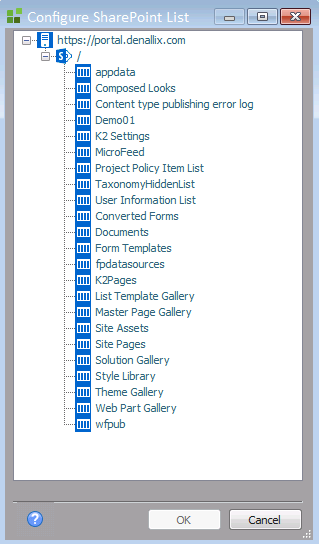
- Service Objects: The SharePoint list or library will show as a missing reference and must be rebound to the matching SharePoint list or library in the target environment. If, for example, the source environment is https://portal.denallix.com and in the target environment you map it to https://sales.denallix.com, the service instance missing reference also needs to be mapped to the same service instance for https://sales.denallix.com. In the Properties column, right-click the missing reference, select Configure, then expand the tree to open the SharePoint environment objects screen to select the object to map that property to in the target environment.
- When selecting the list or library to bind to, all lists and libraries on the site where the K2 app has been deployed to will display.
- When resolving conflicts at deployment time, only the following items (shown as missing references) can be resolved on this page:
- The list itself which will open the tree view
- The service instance
- Fields, although shown as missing references, cannot be remapped. They are only displayed so that you know there are missing fields. If a list with missing fields has been selected, the correct field's missing references will automatically be matched and will disappear. The missing field references will still show as missing references.
System artifacts are linked to SmartObject associations and should already exist in the target environment. If they show as a missing reference, configure them to use the existing artifacts.
- Ensure that all needed artifacts and dependencies have been checked for inclusion in the deployment package. The total number of items to be deployed appears in the lower left corner of the window.
- All conflicts must be resolved before the package can be deployed to the new environment. If a conflict cannot be resolved, the artifact or dependency causing the conflict must be de-selected. Once all conflicts have been resolved, run the Analyze All option to update the tool's internal status check.
Artifacts that are external to the context of the SharePoint 2013 list or library application must be manually remapped during the deployment. These include:
- SmartBox SmartObjects
- Managed Metadata SmartObjects
- SmartObjects for lists and libraries that are referenced through the application
- SmartObjects referenced in site columns
For these artifacts, the only action option is Use Existing. The other lists and libraries must exist on the target environment, and must have been K2 appified in order for the SmartObjects to exist. If the SmartObjects do not exist, you can run the create K2 App on those lists and libraries and return to this screen.
Step 4: Deploying
- Click Next. K2 Package and Deployment will interrogate both the K2 artifact definitions and the target K2 environment.
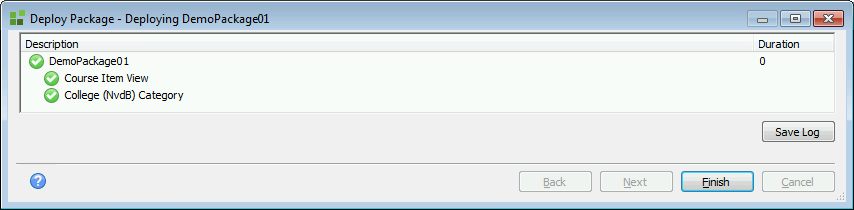
- The Deploy Package – Deploying window will load. This is a list of the packaged items and their readiness status. The time taken to deploy the package’s artifacts and dependencies will be shown in the right-hand column once deployment is complete. Where a status icon to the left side of a deployed item shows a green check mark, the item has been successfully deployed.
Deployment times may vary depending on the size of packages to be deployed. To avoid inconvenience, it is recommended that large packages are deployed only after regular working hours.
- If an artifact fails to deploy due to circumstances beyond K2 Package and Deployment's control, a red exclamation mark will be displayed next to the artifact that fails to deploy.
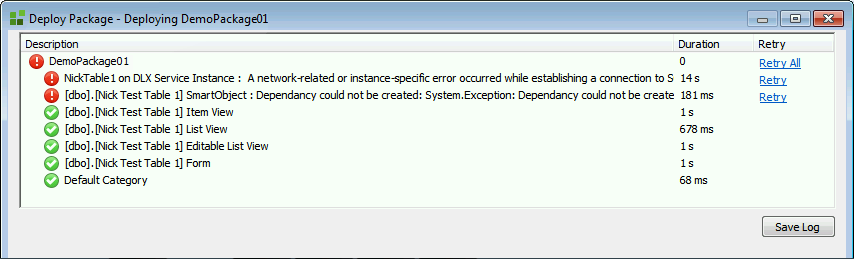
- If such a deployment failure occurs, double-click the artifact responsible to view an explanation for the failure:

- When the deployment failure issue has been resolved, click the Retry or Retry All link next to the relevant artifact or dependency to re-attempt deployment.
If the K2 server has been rebooted since the deployment of the package, using the retry option will not work.
- If a deployment log needs to be created and saved, click the Save Log button. The Save As window will open, allowing you to re-name and save the log file.
- Close the Deploy Package – Deploying window. This will conclude the deployment process.
Deployment of Microsoft SharePoint Event Processes
SharePoint event processes can be packaged and deployed using the K2 Package and Deployment tool. However, the lists and libraries associated with these SharePoint event processes cannot be packaged and deployed using the K2 Package and Deployment tool interface. The lists and libraries must be manually pre-created on the target environment before packaging and deploying the relevant SharePoint event processes to the target environment.
If the user attempts to deploy SharePoint event process lists and libraries using the K2 Package and Deployment tool, deployment of the lists and libraries to the target environment may succeed, but the relevant process will fail when it is run.
Also, if the needed SharePoint lists and libraries are not pre-created and an instance of the relevant SharePoint process is started, an error will be given stating that the list and/or library was not found, and the process will fail.
SharePoint event processes must be deployed using the following procedure:
- Pre-create the needed lists and libraries on the target environment by manually copying the lists and libraries from the source environment to the target environment.
- Package and deploy the associated SharePoint processes from the source environment to the target environment, using K2 Package and Deployment.
Deployment of K2 connect SmartObjects
If K2 connect SmartObjects are to be packaged and deployed, the following prerequisites are needed:
- The K2 connect application must be installed on both the source and target environments.
- The K2 connect installation on the target environment must include a K2 connect service instance (this is typically created during the K2 connect installation).
SmartObjects created using K2 connect can be packaged and deployed using the Package and Deployment interface. However, the K2 connect service objects (in *.SVD file format) associated with these SmartObjects cannot be packaged and deployed using the K2 Package and Deployment interface.
The K2 connect service objects must be manually pre-created on the target environment before the relevant SmartObjects are packaged and deployed to the target environment using K2 Package and Deployment.
K2 connect service objects must be deployed using the following procedure:
- Pre-create the *.SVD-format service objects in the target environment by manually copying the service objects from the source environment (on the local machine) to the target environment.
- Open the K2 connect service objects in a new Visual Studio project. Publish the service objects.
- Package and deploy the K2 connect SmartObjects associated with the service objects from the source environment to the target environment, using K2 Package and Deployment.
Processes Containing Project References
Processes containing project reference(s) (i.e. where the reference type is listed as Project in the Process References window) cannot be deployed to a target environment:
- If the user tries to deploy an existing process containing project references, the system will return a System.Reflection.TargetInvocationException: Value cannot be null. error.
- If the user tries to include a process which contains a project reference in a new deployment package, the user will be prevented from creating that deployment package.
For a process containing project references to be successfully deployed, the project references within a process must be deleted and re-added as assembly references before the package is recreated and the process deployed, as in the procedure below.
Within the source environment:
- Open the project using K2 for Visual Studio.
- Right-click the process Start icon. Select Properties.
- In the Configuration menu, click the Process References icon. The Manage Process References window will appear.
- Locate and make a note of all processes where the Type is listed as Project. Remove the project reference(s) by selecting them, then clicking the Delete button.
- Click the Add button in the Manage Process References window.
- The Add References window will open. Click on the .NET tab.
- Search for the previously deleted references in the Component Name column. Click on the correct references and click the Select button.
- Click OK. The references will be re-added as assembly references (i.e. listed as .NET).
- The references will now be visible in the Manage Process References window. Locate the references, ensuring that the Copy Local check box is checked for each process.
- Prior to recreating the package, a local disk cache must be cleared, or the new assembly references will not be picked up. To delete the cache file, navigate to the HostServer folder on the source server (C:\ProgramData \SourceCode\HostServer). Delete the HostServer folder and its contents.
- Recreate and redeploy the deployment package.
K2 Package and Deployment allows packages to be deployed from a source environment to an unlimited number of target environments.
However, package deployments made to multiple environments can only be made to one environment at a time. Currently, users cannot deploy a package to all target environments at the same time.
For packages to be deployed to more than one target environment, the server containing each target environment must be added to the user's Package and Deployment console using the procedure below.
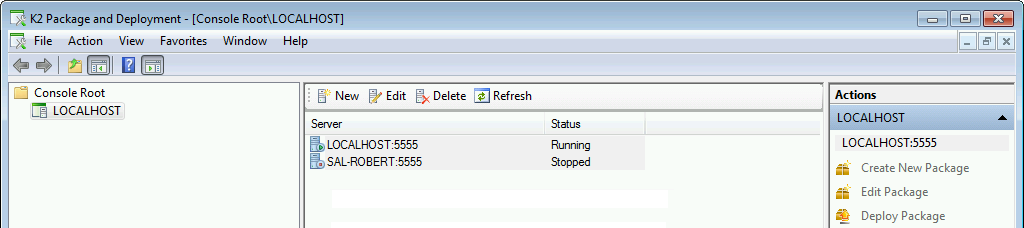
Adding Multiple Servers
If the permissions below are not set correctly, the administrative changes that are applied will not persist.
Users tasked with adding multiple servers must have administrator privileges for the relevant source environment.
- Open the Windows Start menu.
- Navigate to All Programs > K2 blackpearl > K2 Package and Deployment.
- Right click the K2 Package and Deployment link. From the options menu, select the Author option.
- From the top ribbon of the Package and Deployment MMC console, click File > Options.
- The Options window will open. Select Author mode from the Console mode: drop down list.
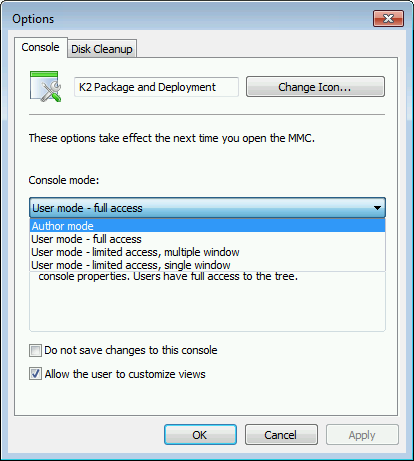
- Click Apply, then click OK.
- Within the Package and Deployment console, you can now add a new target server. Click the New button above the server list column.

- The Add new server window will open. Populate the Server Name and Server Port fields with valid server connection values only.
- Click OK. A Servers Found. Retrieving Connection Information progress update may appear.
- The server which has been added will now be listed under the original server in the server list column.
- If you need to add more than one server, repeat the process. You may add as many servers as necessary.
If multiple servers are added to the K2 Package and Deployment console, ensure that all the servers are running the same version of K2.
- To save the changes, click File > Save from the menu bar of the Package and Deployment console.
- From this time, whenever the user launches Package and Deployment, the new server will be displayed in the server list column.
- When all needed servers have been added to the server list, the MMC console must be set from Author mode to User mode. This will help prevent unauthorized addition or removal of target servers.
- To set the MMC console from Author mode to User mode, open the Windows Start Menu. Click All Programs > K2 blackpearl. Right-click Package and Deployment. Click Author from the pop-up menu.
- From the top ribbon of the Package and Deployment MMC console, click File > Options.
- The Options window will open. Select User mode – Full Access from the Console mode: drop down list.
- Click Apply, then click OK.
- A window will appear, asking Save console settings to Package and Deployment.msc? Click Yes.
Removing Added Servers
- Users tasked with removing servers from the server list must have administrator privileges for the relevant source environment.
- Open the K2 Package and Deployment console.
- Click on the server to be removed. Click the Delete button above the server list column and follow the prompts to remove the server.
- To save the changes, click File > Save from the menu bar of the K2 Package and Deployment console.
K2 Package and Deployment enables the packager to edit properties in the deployment package that is in conflict with the target environment.
Typically, there are three types of conflicts:
- A name conflict exists when a source item (an item to be deployed) has an identifier which is different to the identifier used by a target item (an item to be replaced). This would normally occur when the SmartObject system name is the same, but the unique identifier is different.
- A version conflict exists when an item is present at both the source and target, but will break compatibility with existing items.
- A missing reference conflict exists when artifacts in the package are dependent on objects that cannot be located in the target environment.
Typically, there are three actions that can be taken if an item is in conflict:
- Overwrite, or deploy a new version of the artifact (if the artifact supports versioning).
- Change the system name or display name of the artifact. Note that this option is not available for some artifacts.
- Exclude the artifact from the deployment package.
To Resolve a Package Conflict
- Select the package to be deployed, and deploy the package.
- All items for deployment will be validated and configured. (Note the Missing Reference status of the Application Approved and Denallix College Application items.)
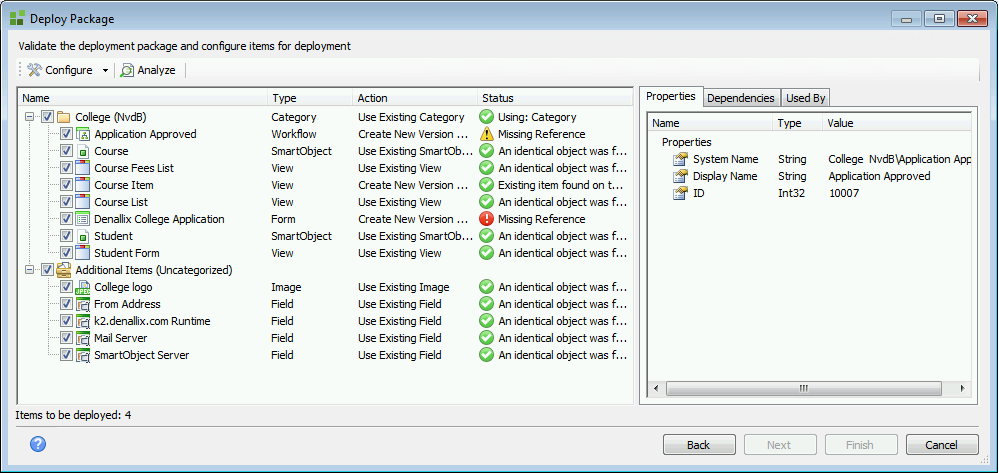
To ensure that the deployment is successful, make sure that all conflicts have been resolved, then check again for warning icons.
Icon Description 
This indicates that the action selected for the deployment of the artifact has no system warnings or conflicts, and the artifact is ready to be deployed. 
This icon has two potential meanings:
- The action selected for the deployment of the artifact has raised a system warning. The action should be reviewed to make sure it will perform the desired end result in the target K2 environment. This warning is typically given if the selected action will overwrite an existing service instance or environment field. An artifact with this status can be deployed.
- A property of a dependent item is in conflict.

This indicates that the action selected is in system conflict with the K2 environment. An artifact with this status cannot be deployed. - To resolve a package conflict by re-configuring a conflicting object, right-click the item which is in conflict. Select an action from the drop down menu, or right-click the affected item on the main deployment window, then select an option from the menu to resolve the issue.

- Depending on whether the item is categorized or uncategorized, the menu options will be as follows:
Menu Option Description Configure This option opens the conflict resolution window. Include Click this option to include an object in the deployment package. Note that if the object is already included, this action will be grayed out. Exclude This action will remove the selected artifact from the deployment package. Note that if the object is already excluded, this action will be grayed out. Create New Version Selecting this action configures the artifact to be deployed as a new object, or new version of the existing object, within the K2 environment. Use Existing Selecting this action configures the artifact deployment not to use the artifact data from the deployment package. The existing local K2 environment artifact will be used instead, and links will be created from the existing artifact to any other new or updated artifacts from the deployment package that will be deployed to the K2 environment. Overwrite Selecting this action configures deployment of the artifact to overwrite the artifact's existing definition/data within the K2 environment. Analyze Re-analyzes the selected object for changes in configuration. If the object's status has changed, the new status will be displayed. To see detailed analysis results for the selected object, click the Properties, Dependencies and Used By tabs in the Deploy Package window. - If the Configure option is selected, the conflict resolution window for the artifact type will load. (Note that in this instance, a form has been selected, and the conflict resolution window has opened as Configure Form.)
- To select a different SmartObject, click on the ellipsis button next the Select field box and select the required SmartObject from the K2 environment.
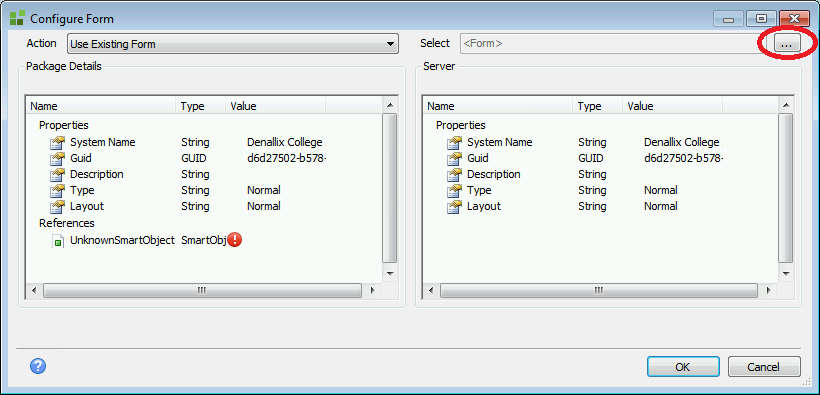
- Once the conflicting properties have been resolved, click OK.
- When all conflicts have been resolved, click the Next button in the Deploy Package window.
- Click the Finish button to deploy the reconfigured package.
- If you need to refresh the analysis of an artifact, right-click on the artifact, and select Analyze from the pop-up menu.