Sales Orders application 4.7 (K2 smartforms and K2 Studio)
This document contains the step-by-step instructions for building a sample Sales Orders application using K2 Studio. This tutorial covers more advanced SmartForms concepts and has an intermediate level of complexity.
In this tutorial, you will create an application that is used to capture a new Sales Order entry and, if the total amount exceeds $10,000, submit the entry for approval. The primary focus for this application is on the data elements (where you will be using several different data sources) and the forms elements (where you will create more advanced SmartForms, including master-detail forms, tabbed forms and more advanced rules).
This tutorial can be completed in any environment that has K2 blackpearl 4.7 (or later) or K2 Appit 1.5 (or later) installed. The screen shots and users in the tutorial reflect the standard K2-provided virtual environment, commonly used for K2 blackpearl training events. You can, however, complete this tutorial in any other environment as long as the necessary K2 components are installed and operational, though your screens and users may be different. You must also have the necessary rights and permissions to create the K2 artifacts in the target environment. Be aware that it may be difficult to follow the steps in this tutorial if you are working in a .
Some tutorials require that you have internet access to be able to connect to an external SQL database used for retrieving data. Those tutorials will contain additional information on internet connection requirements.
Tutorial Overview
The sections in this tutorial are designed to expand on your knowledge of the four components that make up K2 applications: Data, Forms, Workflows and Reports and are structured accordingly.
In Part 1, you will begin with the Data components required for this application by creating six SmartObjects. The first SmartObject will connect to Active Directory to show user information. The second, third and forth SmartObjects will connect to an external SQL Server and are used to look up information from this external database. You will explore the K2 Management site to create the service instance for this external data source connection. The final two data sources will be SmartBox SmartObjects, where you will create the data sources from scratch (as opposed to connecting to existing data sources).
In Part 2, you will focus on the Views component. You will create the Sales Orders Header view, which will contain the Customer and Invoice details. You will customize the view by adding a cascading drop-down list feature and a picker control. To complete the views section, you will create the Sales Orders Items view, which will be the tool for your users to pick the products they want and the quantity.
In Part 3, the Forms component, you will move into more complex forms design by adding a second tabbed form and a sub-view, then configure a number of expressions to perform calculations on form fields. In a later part, you will return to the forms component and edit a form rule that will evaluate the Total Amount field, then either start (or not start) the workflow depending on the total amount value.
In Part 4, Workflows, you will build a simple one-step approval workflow, then test your application. In Part 5, Reports, you return to the K2 Designer canvas to create a dashboard-style report using reporting controls.
Finally, in Part 6 you will learn about debugging SmartForms and in Part 7, you will complete your Sales Orders Application tutorial by learning how to Package and Deploy the solution.
Prior to jumping into building your application, it is important to understand what you want to achieve by designing the necessary pieces of the application. Let's start with the workflow.
Workflow Design
The key to a successful workflow is to completely understand the task at hand. What are the steps necessary to accomplish your goals? One option you might use is to lay out the workflow as a flowchart. There are a number of tools for designing flowcharts (the flowchart below was created in Visio). The objective here is to visually create a representation of the workflow steps and events needed to accomplish the workflow goal. This particular flowchart is laid out in a swim-lane format, where the user tasks and system tasks are separated into separate lanes.
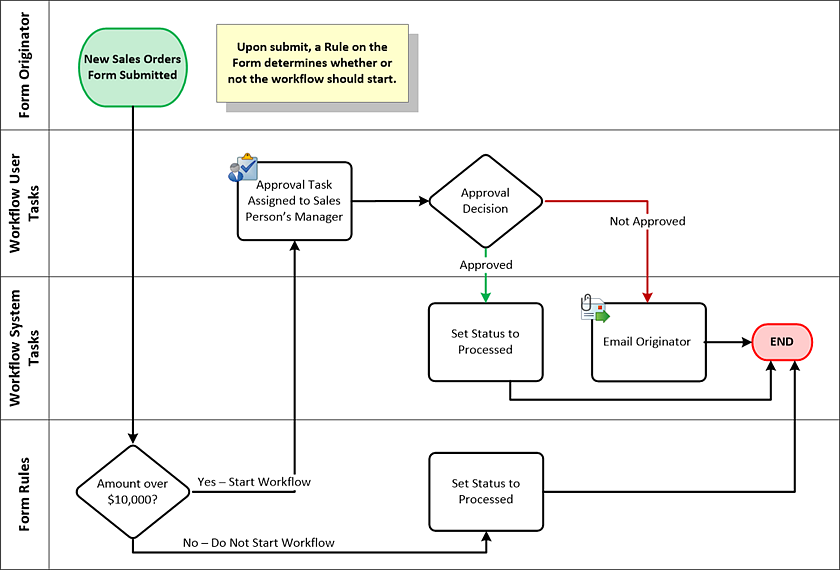
There are two swim-lanes for user tasks. The first is the form originator, or the person submitting the form for the first time. The second swim-lane represents the user tasks, in your case this will be the form originator’s manager who must approve the sales order if the amount is greater than $10,000. The third lane represents system tasks, or tasks that K2 will manage behind-the-scenes. The fourth lane represents form rules which are performed outside of the K2 Studio-generated workflow.
In a vast majority of applications, the workflow is started when the user clicks a submit button. The Sales Orders application will be slightly different in that when the submit button is clicked, the workflow will not immediately start. Instead, a rule on the form will start instead and will evaluate the Total Due field value. If the Total Due value is greater than $10,000, the workflow will start. If not, the form content will be saved to a SmartBox SmartObject and the process will be complete.
By creating the Sales Orders flowchart, you have a good idea of how the workflow will look, what user and system tasks you will need, what forms you will need to support the tasks and finally, the data resources you need to support the form content.
Forms Design
This application will consist of two forms that will be used for the order entry and approval steps. A third form (not part of the workflow process) will display custom reporting controls in a dashboard format.
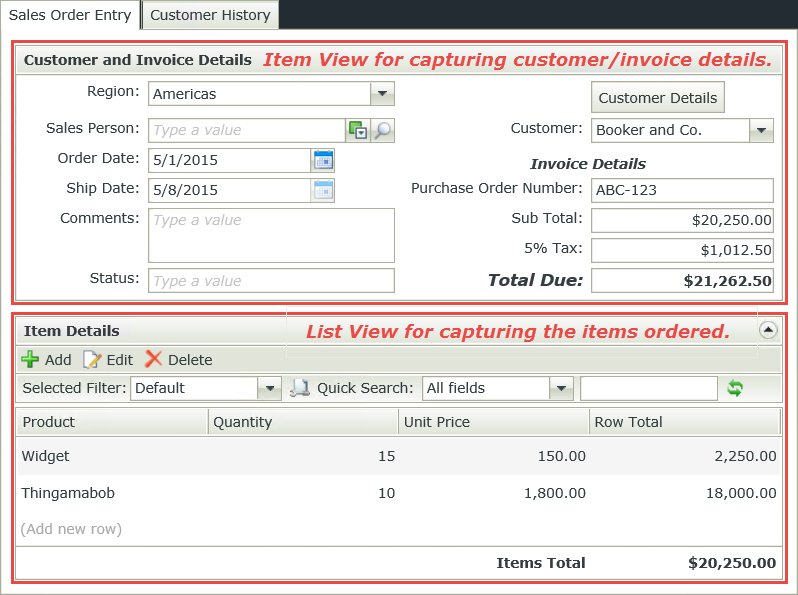
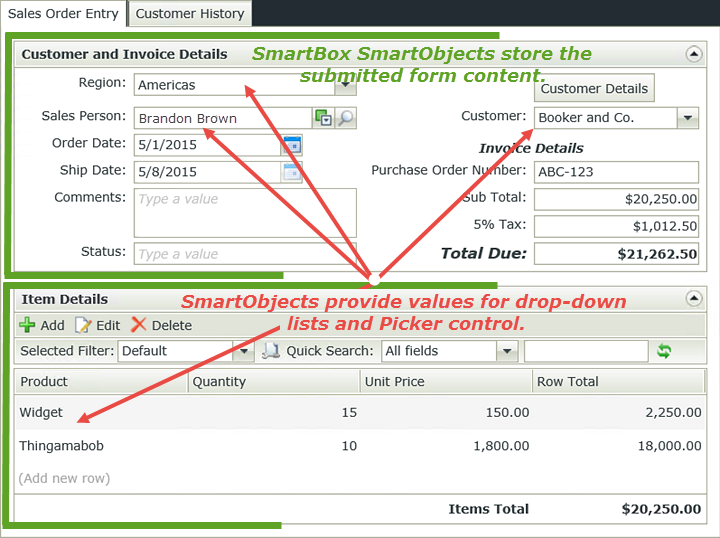
The Sales Orders entry form will contain two views. The first view, an item view, will be used to capture the customer and invoice details. The second view, a list view, will contain editable rows to capture the items that are ordered. The customer drop-down list will be configured so that it only displays customers associated with the region that has been selected. There are a number of expressions and rules that you will apply to perform calculations and populate fields. For example, when a product is selected from the drop-down list, the price will automatically be called to the Unit Price field. As items are added, the Sub-Total, 5% Tax and Total Due fields will be automatically calculated.
This form will also contain a tabbed form displaying the Customer History and a sub-view which will display the details for the customer selected.
The form used to capture the Sales Orders entries
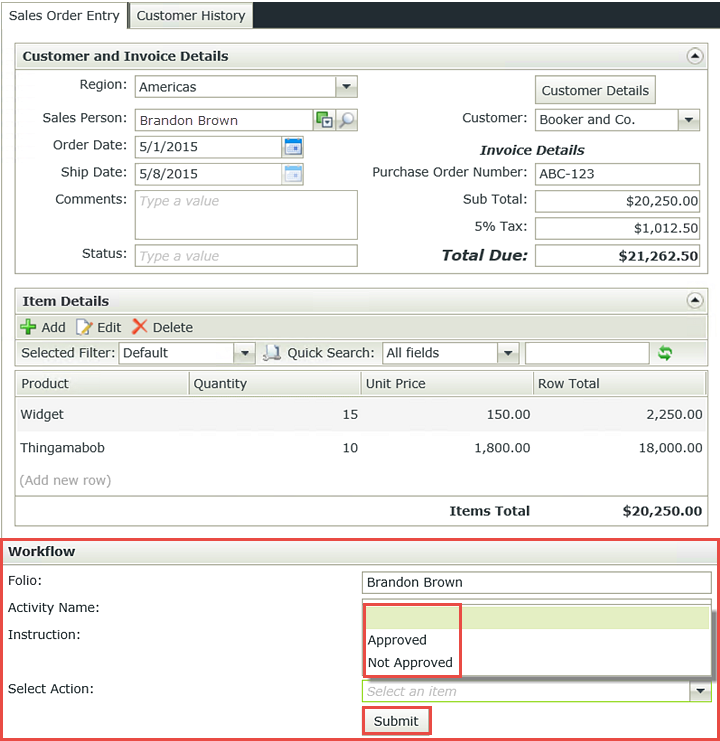
The second form is used by the approving manager if the sales orders requires approval. Along with the original form content, K2 has added a third view (workflow) containing the action options (approved or not approved) along with a submit button. The workflow view is at the bottom of the Sales Orders entry form, which is a configuration you will set during the workflow build.
The Manager's Approval form containing the workflow view.
Data Design
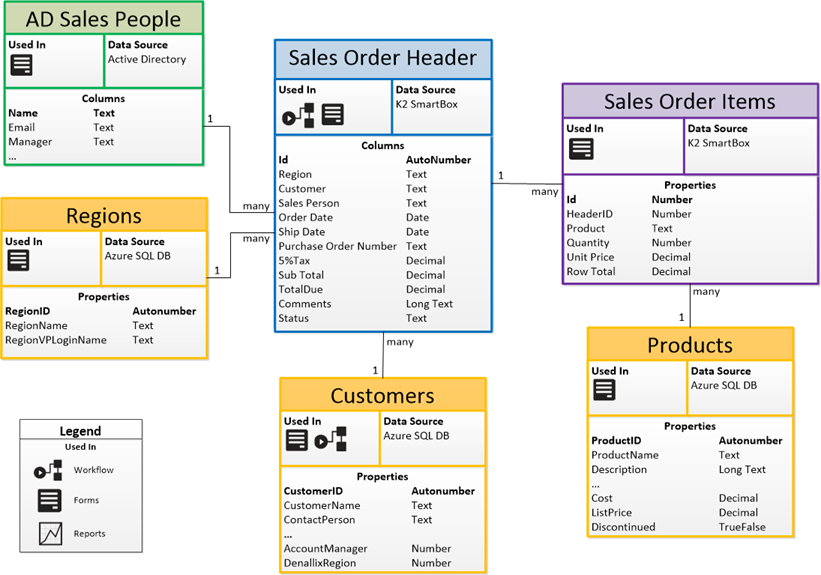
This application requires six SmartObjects for its data components. The first SmartObject (AD Sales People) will be connected to Active Directory and will provide the values for Sales Person picker control. The next three SmartObjects (Regions, Customers and Products) are lookup SmartObjects that will be connected to an external Azure SQL database, and will provide the form field values for the Regions, Customers and Products drop-down lists. The final two SmartObjects (Sales Orders Header and Sales Orders Items) will be SmartBox SmartObjects. The data entered when capturing a new sales order will be saved into these SmartBox SmartObjects; all the other data is essentially "lookup" data that is used to populate controls with values.
The diagram below illustrates the data objects used in this application, their respective data sources and the relationships between the SmartObjects.
The image below illustrates how the SmartObjects will present their data on the Sales Order Entry form.
Reports Design
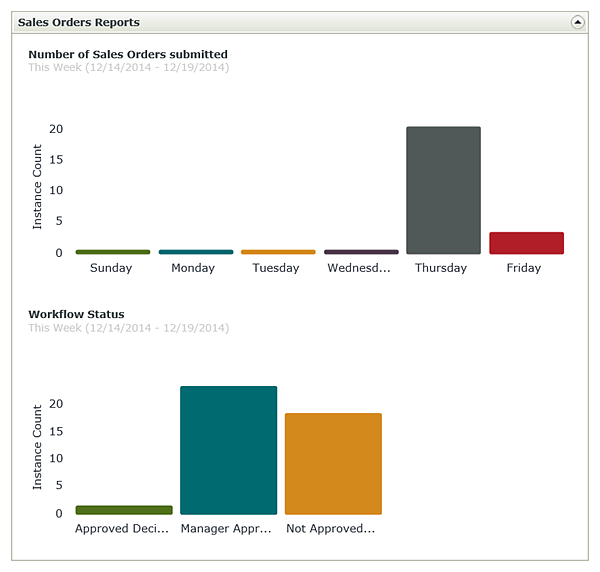
In this application, you will use the reporting controls found in K2 Designer to create a dashboard-style report. You will add two charting controls to a new view and then a new form. The first chart will display the number of sales orders submitted, and the second chart will display the workflow status of submitted workflows.
The image below shows the eventual custom report SmartForm that you will create for the Sales Order application.
Building the application
Now that you have designs for each of the components (Workflow, Data, Forms, Reports), you are ready to begin building the application. You will begin with the data component by connecting to the data sources required.
When you are ready to start building the application, continue on to the Part 1: Data section to get started.