19. Configure the Start Rule on the New Expense Claim Form
Because you did not create the workflow component when you created the application elements from the Expense Claim list, the start rule does not exist (yet). To continue building the workflow, you need the start rule in place for some remaining steps. In this step, you create a new state for the workflow originator, or person who submits the claim that starts the workflow. After creating the state, you add the start workflow action with basic configuration.
- Check out and edit the New Expense Claim form. Add a new default state called Expense Claim Workflow.
- Check out and edit the New Expense Claim form.
- Begin by adding the default state for when the workflow starts.
Click the RULES tab in the navigation bar. Click Add State. Name the new state
Expense Claim Workflow
then CHECK the option to make this the default state. Click OK.A state represents the configuration and behavior of a form for a specific use. States are generally configured for a (user) Task step. For example, a request approver's form may have form fields disabled because as the approver, they do not need to change any form field values. A form used for rework will have the same fields enabled, because the workflow originator needs to update those form field values. Rather than creating two separate forms, you can use different States for each step, then use rules to control how the same form should behave in each of those two states.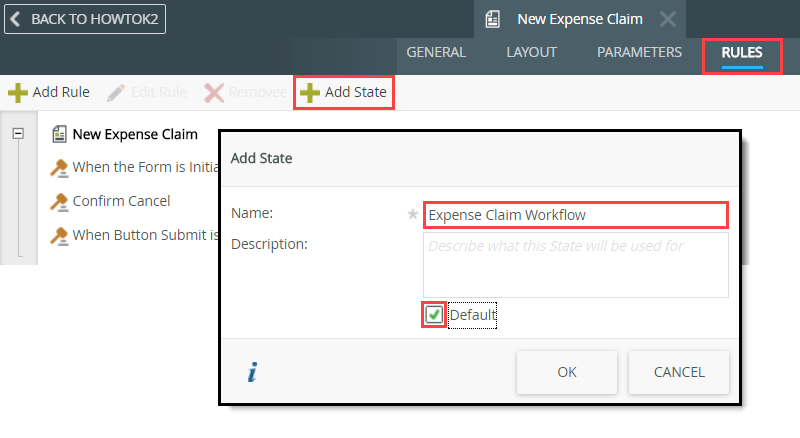
- Edit the Expense Claim Workflow (Default) state > When Button Submit is Clicked rule. Add a Start a Workflow action. Move it to just above the show a message action. Click the select Workflow link, then select the Expense Claim Workflow.
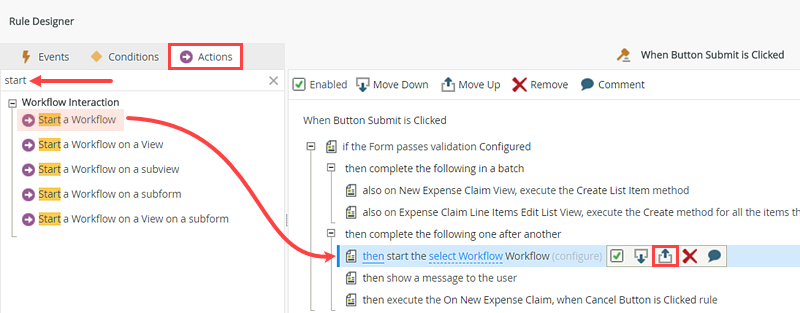
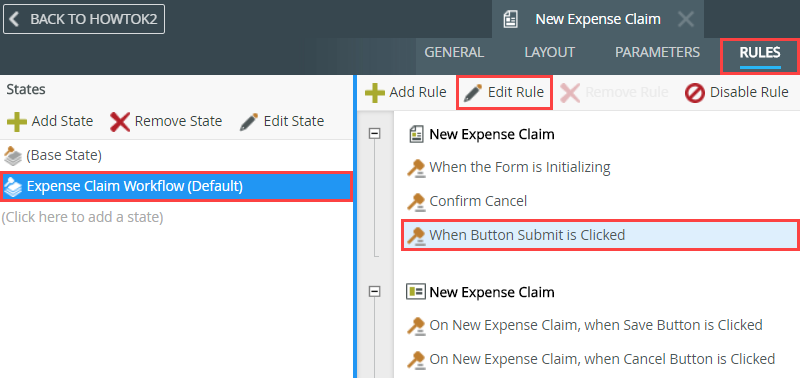
- Click the Expense Claim Workflow (Default) state, then click the When Button Submit is Clicked rule. Edit the rule.
- With the Actions tab active, add the Start a Workflow action. Use the up arrow to move the workflow action so that it is just above the show message... action. (This comes in handy later on. When you submit the form, you see the message. Because the workflow action is before the message, you know the workflow started.)
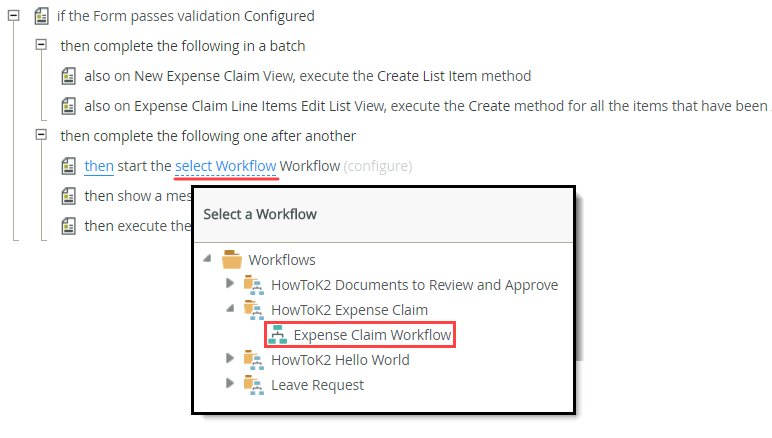
- Click the select Workflow link, then navigate to and select the Expense Claim Workflow. Click OK. (Your naming structure may be different than the image below.)
- Click the Expense Claim Workflow (Default) state, then click the When Button Submit is Clicked rule. Edit the rule.
- Next, configure the item references for the workflow. K2 needs to know the data sources of the records to update. Depending on your version of K2, the references may already be mapped. If they are, you can skip to the next step to map the folio.
Input Mappings: Map the Expense Claim SmartObject and the Expense Claim Line Items Edit List SmartObject to their respective Item References. You do not need to map the remaining SmartObjects.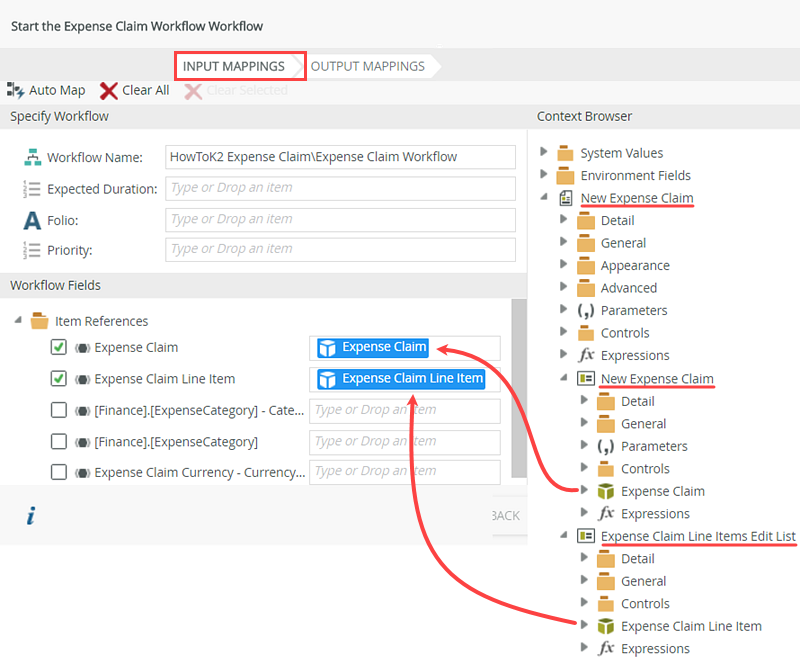
- Next, you configure the item references for the workflow. K2 needs to know the data sources of the records to update. Depending on your version of K2, the references may already be mapped. If they are, you can skip to the next step to map the folio.A reference is essentially an association between a workflow instance and record(s) in some data store. For example, an item added to a SharePoint list starts a workflow. K2 creates a reference between the workflow instance and the item that was created in the SharePoint List. This allows you to easily work with the list item that started the workflow.Click (configure). On the Input Mappings screen, notice the Item References in the Workflow Fields pane. If they are not mapped, map the header and details SmartObjects. From the Context Browser, drag the Expense Claim SmartObject into the Expense Claim > Workflow Fields > Item References. Drag the Expense Claim Line Item SmartObject into the Workflow Fields > Item References > Expense Claim Line Item text box. You do not need to map the other item references manually.If K2 has mapped the Item References for you, you can skip to the next step. In some cases, you may see all references mapped.
- Next, you configure the item references for the workflow. K2 needs to know the data sources of the records to update. Depending on your version of K2, the references may already be mapped. If they are, you can skip to the next step to map the folio.
- Map the New Expense Claim > Controls > Title Text Box to the Folio.
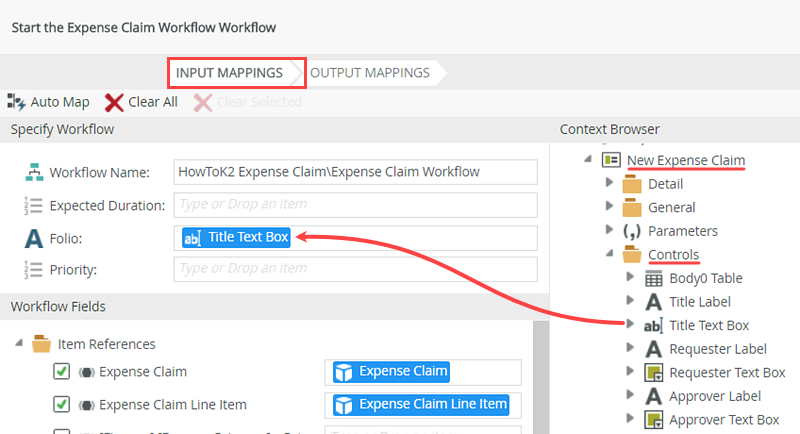
- Next, map the Folio. Expand the New Expense Claim view > Controls. Drag the Title Text Box into the Folio text box.A common use for the folio is to distinguish one workflow instance from another. The folio is often a unique value, but it does not have to be unique, nor is it required. The folio can use properties from the Context Browser as its value, or it can be set by hand, and it can be changed over the course of a workflow if you want to.
- Next, map the Folio. Expand the New Expense Claim view > Controls. Drag the Title Text Box into the Folio text box.
- Output Mappings: Map the Expense Claim and Expense Claim Line Item references back to their respective SmartObjects. Finish the rules and form. Check-in the form.
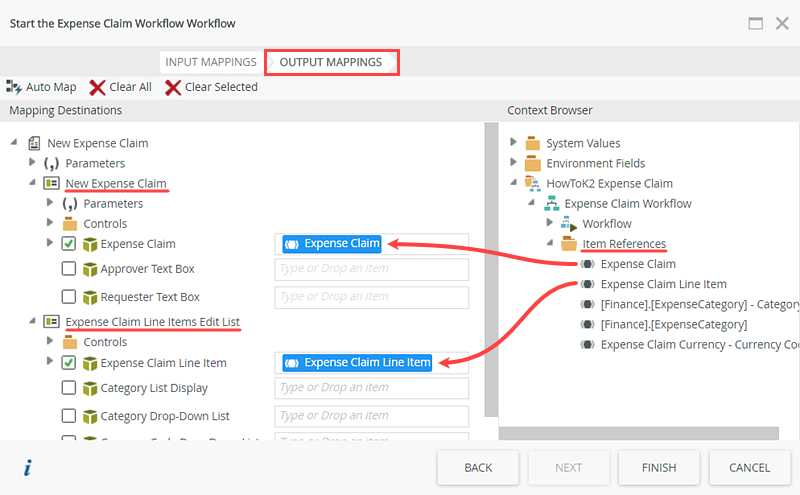
- Click Output Mappings. In the Context Browser, expand Item References. Drag the Expense Claim reference into the New Expense Claim form > New Expense Claim view > Expense Claim SmartObject text box. Drag the Expense Claim Line Item reference to the Expense Claim Line Items Edit List view > Expense Claim Line Item text box. Click FINISH to complete the action.z
- Click OK to close the rule designer, then click FINISH to save and exit the New Expense Claim form.
- Check-in any views and forms that are checked out.
- Click Output Mappings. In the Context Browser, expand Item References. Drag the Expense Claim reference into the New Expense Claim form > New Expense Claim view > Expense Claim SmartObject text box. Drag the Expense Claim Line Item reference to the Expense Claim Line Items Edit List view > Expense Claim Line Item text box. Click FINISH to complete the action.
Review
In this step, you added a new state to the New Expense Claim form. You added and configured the start workflow action. You also mapped the folio. This step is necessary because you did not create the workflow component when you created the application elements from the Expense Claim list. Therefore, the workflow start action did not exist in the workflow. The start workflow rule must exist before you can continue building the workflow. In the next step, you return to the workflow build by adding the rework steps.