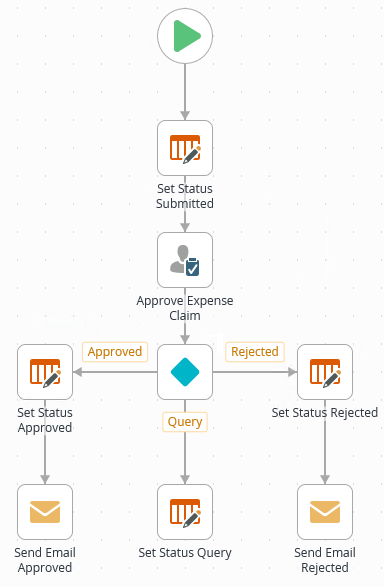
17. Add a Task step to Approve, Reject or Query the Expense Claim
In this step, you add and configure the first task step, used to approve or reject the claim. This step has three action options: Approved, Rejected, and Query. You update the status column for each of the action outcomes, then send an email to the originator for the Approved and Rejected outcomes. Overall, you configure the workflow as follows:
- Task step: Add a Task step and assign it to the Expense Claim Approvers group previously created in SharePoint. The approvers can either approve, reject, or query the claim.
- Decision step: This step generates the outcome lines for the approval step.
- Approved outcome: Add an Update List Item step to set the status column. Add a Send Email step to let the originator know the approved decision.
- Rejected outcome: Add an Update List Item step to set the status column. Add a Send Email step to let the originator know the rejected decision.
- Queried outcome: This step is configured later.
- From the Toolbox > Basic menu, add a Task step to the design canvas below the Set Status Submitted step. Connect the two steps. Configure the task step as follows:
- Instructions: Please review and approve, reject, or query the new expense claim.
- Actions: Approved, Rejected, Query
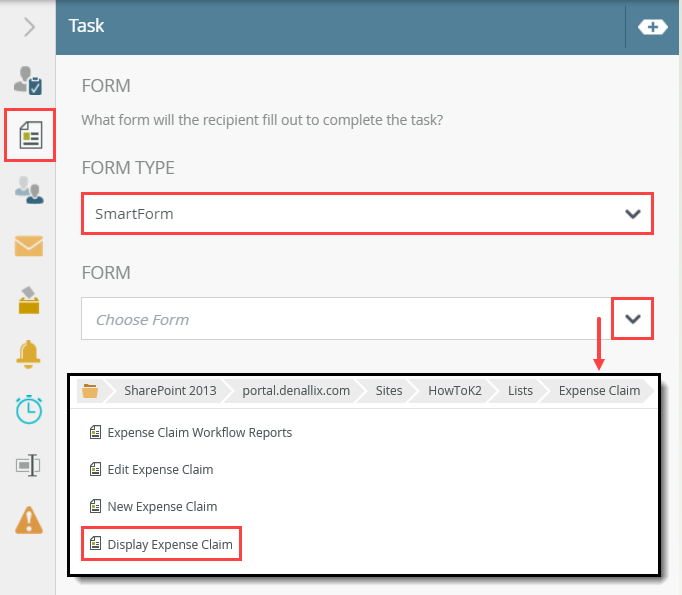
- Form: SmartForm > Display Expense Claim
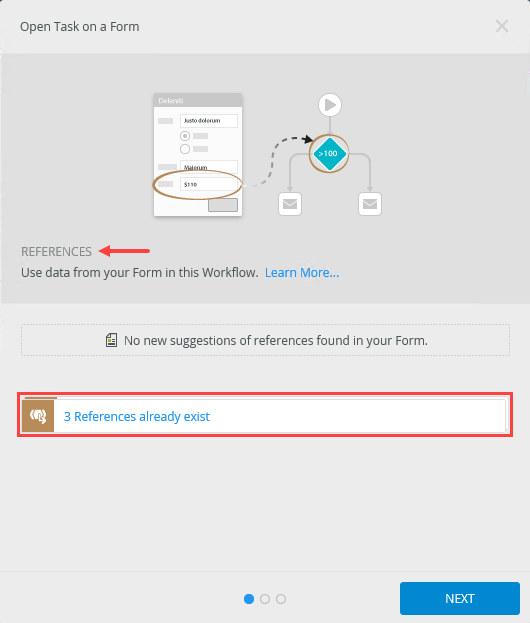
- References: Keep default settings
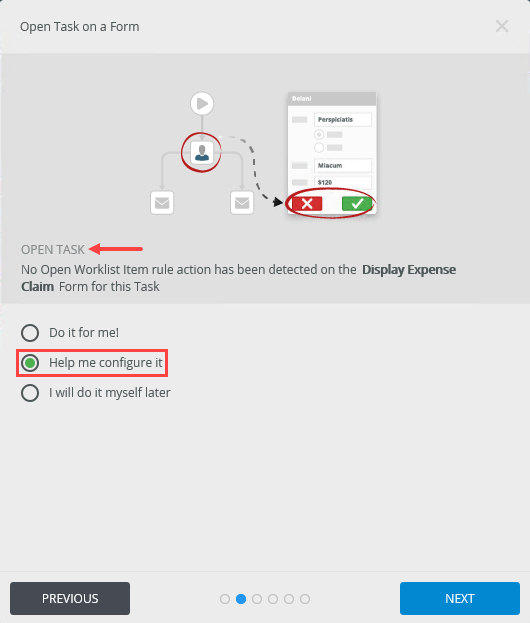
- Open Task: Help me configure it
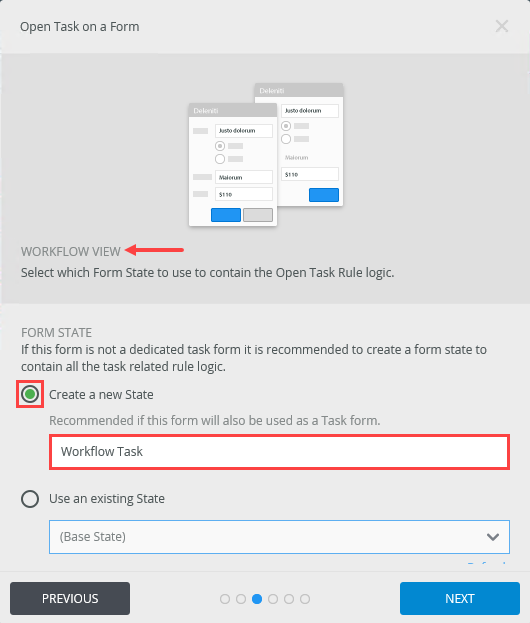
- Workflow View: Create a new State: Workflow Task
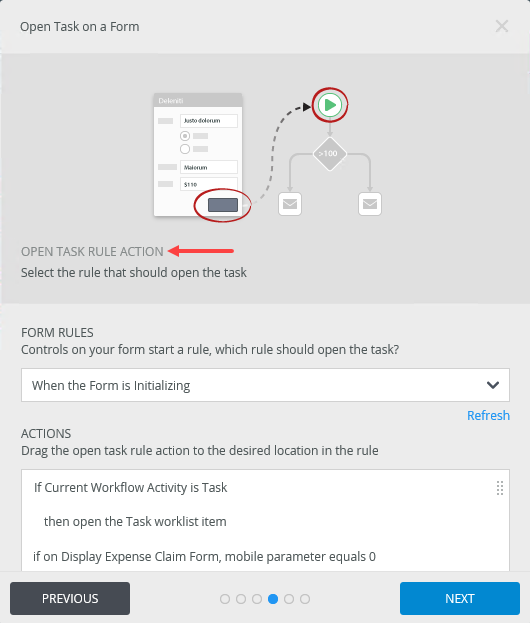
- Open Task Rule Action: Keep default settings
- After submit: Keep default settings
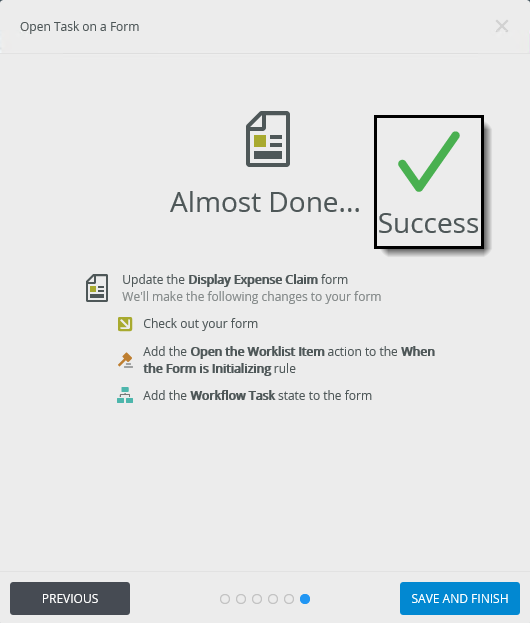
- Summary: Save and Finish
- Recipients: Select Browse, then select the Expense Claim Approvers group.
- Email Alert: Customize the notification to include Context Browser values in the SUBJECT line and BODY.
- Properties: Rename the step: Approve Expense Claim

- Begin by adding a Task step to the design canvas. This is a user task that assigns the approval decision to a person or group. These are the task recipients. The recipients can decide whether to approve, reject, or query (send the workflow back for rework) the claim.
Click the Toolbox icon to return to its main menu.
- Expand the Basic node, then drag a Task step onto the design canvas, below the Set Status Submitted step.
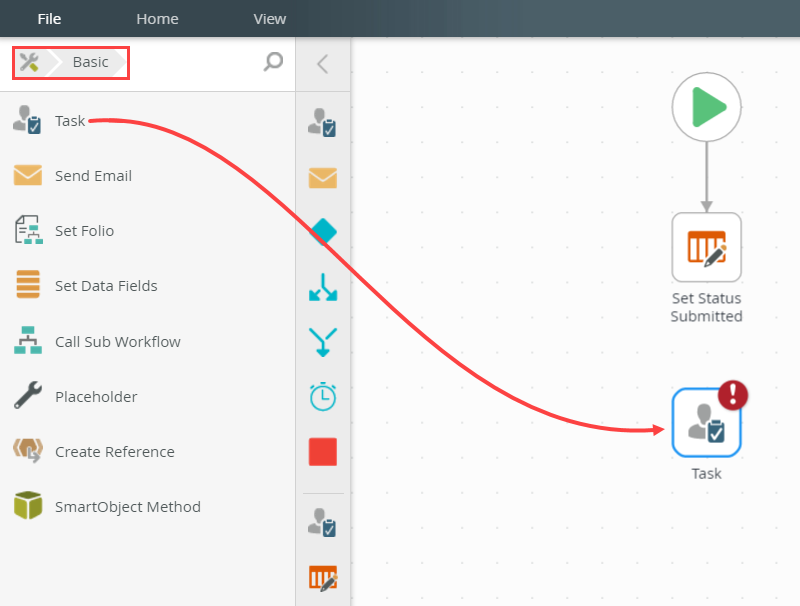
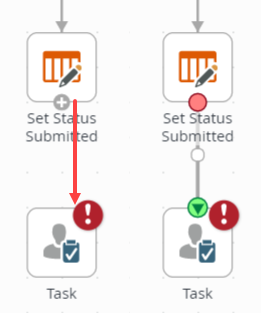
- Connect the two steps. Hover over the bottom border of the Set Status Submitted step to expose an outcome handle. Click and drag the handle from the Set Status Submitted step into the Task step, connecting the two. Click anywhere on the design canvas to set the line.
- Select the Task step, then expand the Configuration Panel. Click the Task tab, if it is not already active.
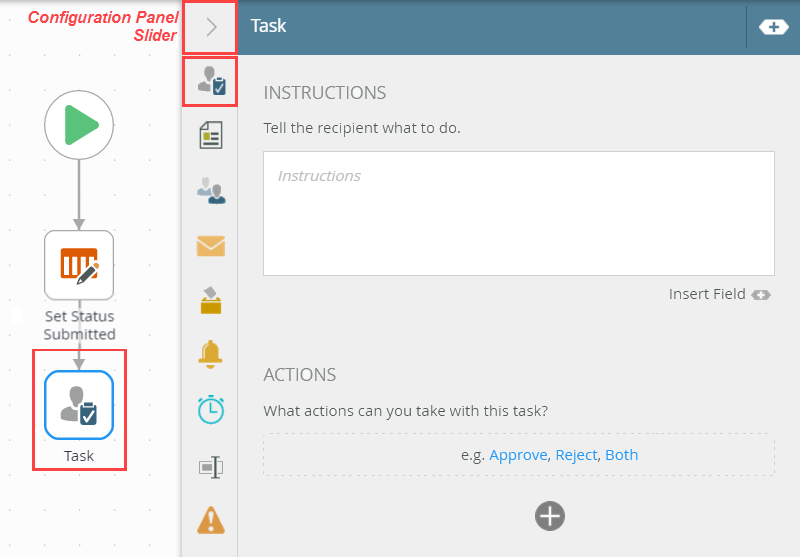
- For the INSTRUCTIONS, enter
Please review and approve, reject, or query the new expense claim. - For the ACTIONS, click the Add (+) icon. For the first action, enter
Approved
then add a second action,
Rejected
then add a third action,
Query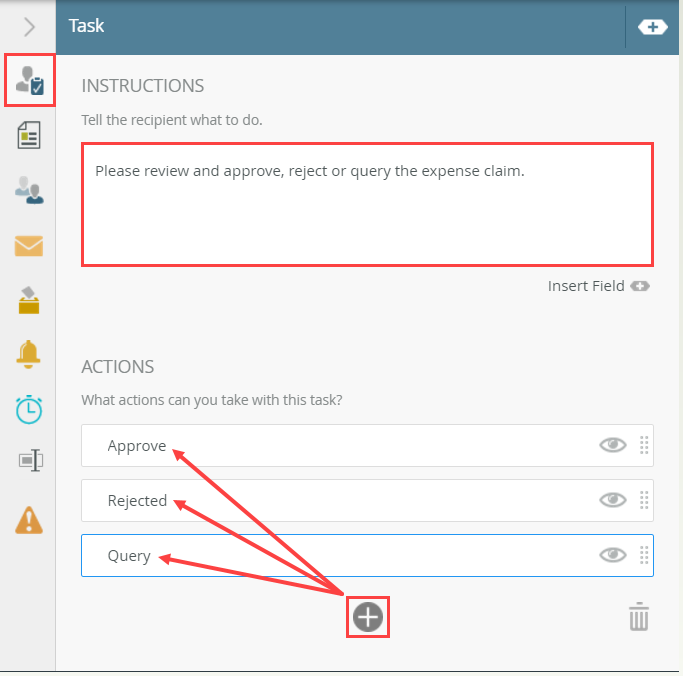
- Click the Form tab. For the FORM TYPE, select SmartForm. For the FORM, browse to and select the Display Expense Claim form. You use the display form because you do not want the recipients to make any changes to the form entries. Click OK to launch the wizard.Your explorer structure may be different than the images in this tutorial, depending on how you configured SharePoint (such as subsite and list name).
- There are no changes to the REFERENCES screen, so click NEXT.
- On the OPEN TASK screen, select Help me configure it, then click NEXT.
- On the WORKFLOW VIEW screen, confirm Create a new State is the default, and the state name is Workflow Task. States represent the form's configuration and behavior for a specific use. You can have many states for one form. This allows you to use the same form, but configure it to look and behave differently depending on the use. In this case, you are creating the state that represents the form's behavior for the approval task step. Click NEXT.
- On the OPEN TASK RULE ACTION screen, keep the default settings and click NEXT.
- There are no changes to the AFTER SUBMIT ACTION screen, click NEXT.
- The final screen is the summary. Review the settings, then click SAVE AND FINISH. When you see the Success check, click OK to exit the wizard.
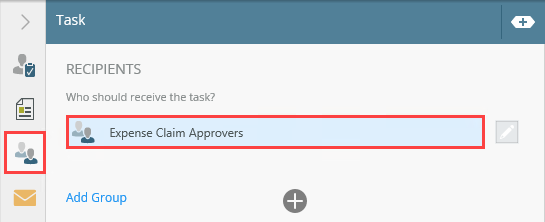
- Next, you configure the recipient, or person who is responsible for completing this task. You are assigning the task to the Expense Claim Approvers group that you previously created in SharePoint.
Click the Recipients tab. By default, the recipient is Originator. You want to change this to the SharePoint group. Click anywhere in the Originator box to expose the drop-down menu, then select Browse.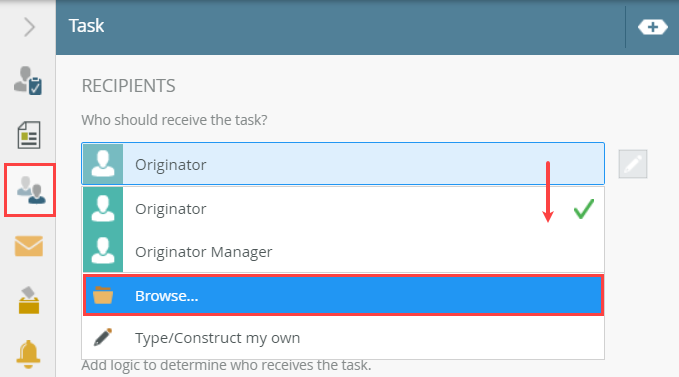
- On the Select User page, enter
approvers
into the search box. K2 resolves search results as you type. Select Expense Claim Approvers when you see it returned. Click OK.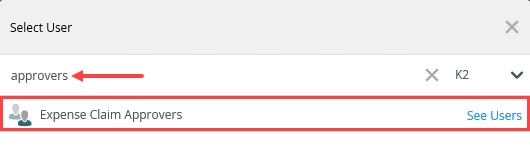
- Click the Email Alert tab. You can personalize the task notification email the recipients receive. Use references from the Context Browser in both the subject line and the message body. At runtime, K2 replaces the references with "live" data, specific to the workflow instance.
CHECK the box to Customize Notification. Notice that the SUBJECT line and BODY containing the default email template are now editable.
- Fields: This section contains references to SharePoint lists, SmartForms, and SmartObjects. You can also create variables to hold and use data within the workflow itself, such as to store record IDs.
- Functions: This section contains tools for transforming data. Some examples include performing calculations, formatting text, and working with date and time values.
- SmartObjects: This section contains system and custom SmartObject references.
- Workflow: This section contains process variables. Examples include the originator's name, email, manager, and folio.
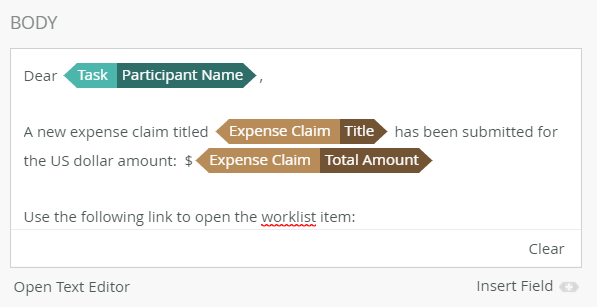
- To personalize the subject line, add a reference from the Context Browser. Begin by entering the following into the Subject line:
New Expense Claim: - Expand the Context Browser. Expand the REFERENCES node. Notice the Expense Claim SmartObjects. Expand the Expense Claim SmartObject , then drag the Title property to the end of the Subject line.
- Include some information about the claim in the message body. This allows the approver to make a decision without having to open the form or the list item if they want to. In the BODY section, add some descriptive text such as:
A new expense claim titled [TITLE] has been submitted for the US dollar amount: [TOTAL AMOUNT].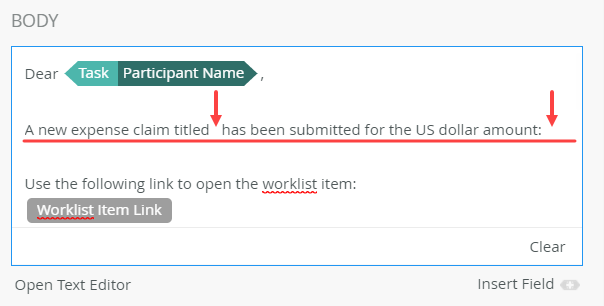
-
From the Context Browser, drag the Title and Total Amount references into the sentence, replacing the bracketed text.
- reply to the email itself with one of the actions as the message body
- open the form and action the task from the form
- access the K2 Worklist web part in SharePoint and choose an action from the context menu
- The final configuration is to rename this step. Click the Properties tab. Rename the step to
Approve Expense Claim
then collapse the Configuration Panel.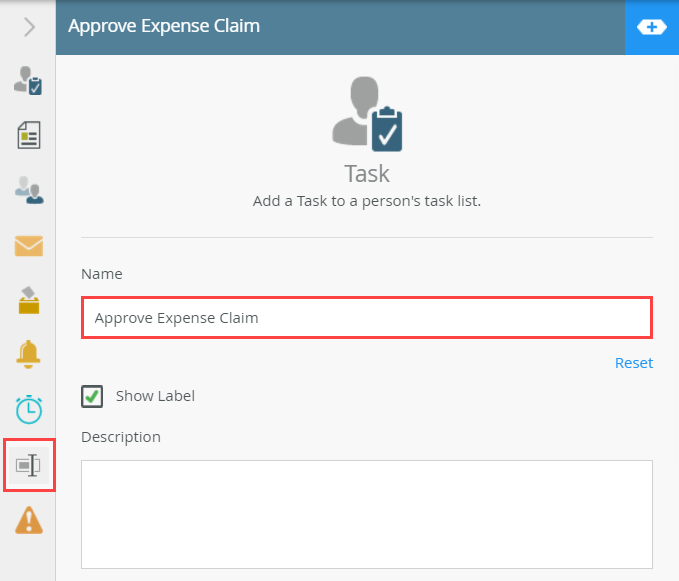
The Open Task on a Form wizard launches.
The Context Browser provides access to data about the current user and process, as well as functions and SmartObject data. You can use variables dragged from the Context Browser throughout the configuration of workflow steps. At runtime, K2 replaces the variables with "live" data. There are four tabs:Recipients can action a task in one of three ways: - Add a Decision step and connect it to the Approve Expense Claim step.
- The Decision step generates the outcomes for the Approve Expense Claim step. You can configure conditional rules for outcomes as well in the Decision step. In this case, you just want to generate the lines.
From the Toolbox > Logic node, drag a Decision step below the Approve Expense Claim step. Connect the two steps. Notice that the actions configured in the task step are now represented as outcomes from the decision step.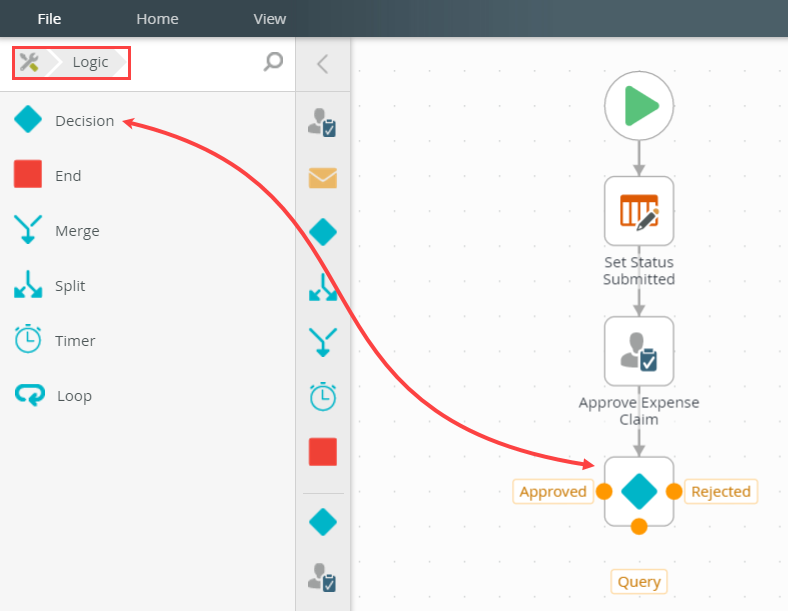
- The Decision step generates the outcomes for the Approve Expense Claim step. You can configure conditional rules for outcomes as well in the Decision step. In this case, you just want to generate the lines.
- Add three Update List Item steps (one for each outcome). Update the status column to reflect the approver decisions. Add the Approval Date to the approved properties. Add the Now() function for the Approval Date value
HINT: You can copy and paste the existing Set Status Submitted step if you like. Change the status values to reflect the outcomes. Add the Approval Date to the approved properties. Add the Now() function for the Approval Date value.
Outcome/Property Status/Value Approved Date Approved Approved Approval Date (as part of the Approve outcome properties) Now() Use the Now() Date and Time Inline Function to set the approval date to the current date. Rejected Rejected (not applicable) Query Query (not applicable) - Now that the Approve Expense Claim step is complete, add steps for each of the outcomes. First, update the status for each outcome, then send email notices for the approved and rejected outcomes. To speed things up, copy and paste the existing Set Status Submitted step, then reconfigure it with the status and date. (Reusing steps saves time and helps maintain consistency.)
Select the Set Status Submitted step, then click Home > Copy.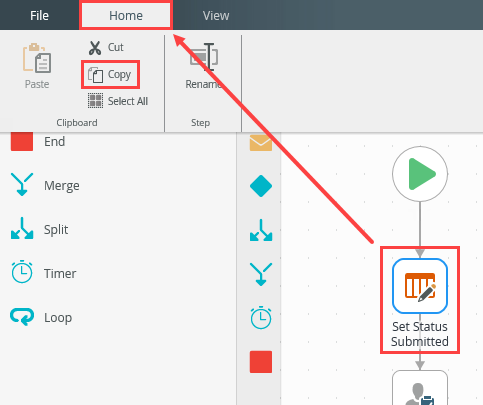
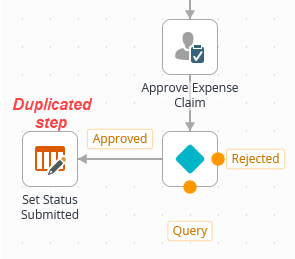
- Click Home > Paste. K2 duplicates the step. Drag the duplicated step to the left of the Approved outcome, then connect the outcome to the step.
- Select the duplicated Set Status Submitted step, then expand the Configuration Panel.
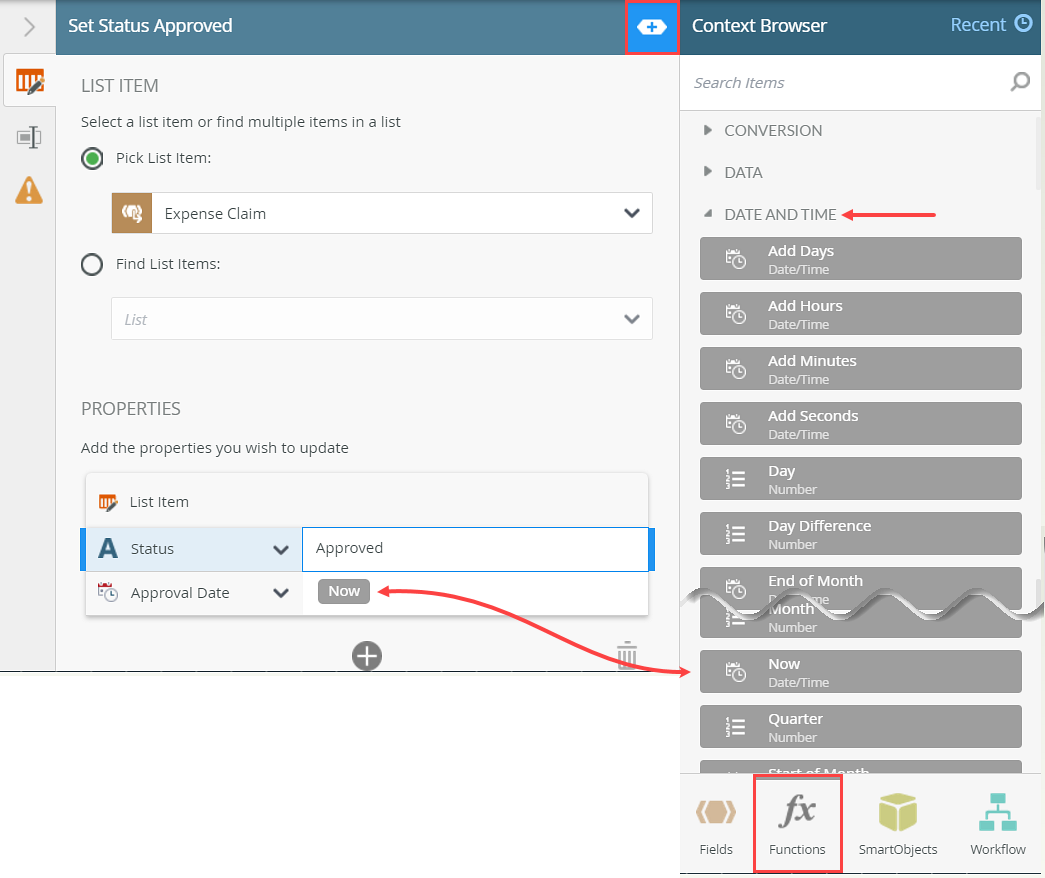
- Click the Update List Item tab so that it is active. Notice the Pick List Item value is already set. Under the PROPERTIES heading, notice the Status is already set. Change the Status value to
Approved
then click the Add (+) icon. CHECK the box for the Approval Date property. For this value, you add a function that returns today's date.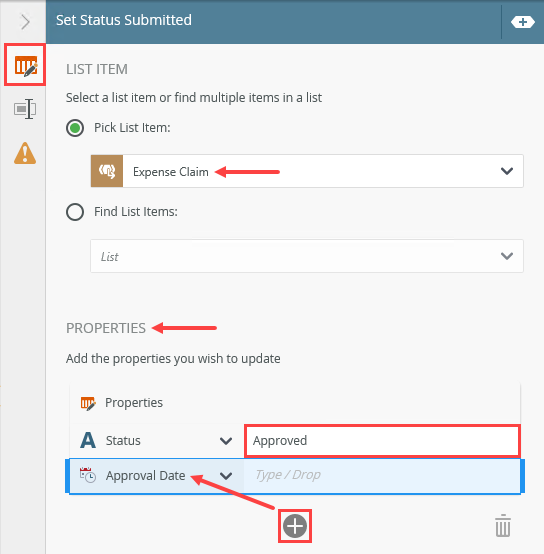
- Expand the Context Browser. Click the Functions tab. Expand the DATE AND TIME node. Drag the Now function into the Approval Date text box.
- Click the Properties tab. Change the step name to
Set Status Approved
then collapse the Configuration Panel.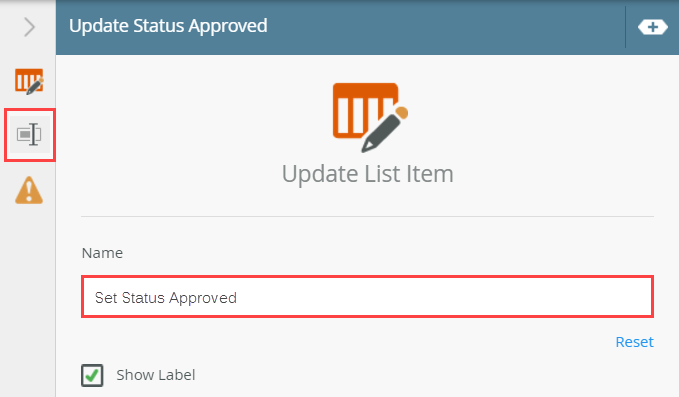
- Repeat the steps above and copy, then paste, the Set Status Submitted step for both the Rejected and Query outcomes. (Just update the status, you don't need to update any date properties for these steps.) Be sure to change the step names as well.
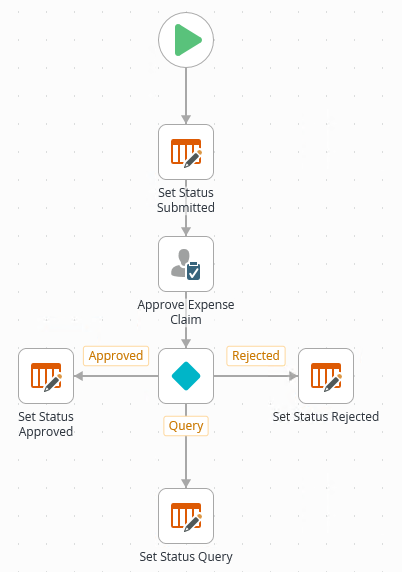
Your workflow should look like the image below at this point.
- Now that the Approve Expense Claim step is complete, add steps for each of the outcomes. First, update the status for each outcome, then send email notices for the approved and rejected outcomes. To speed things up, copy and paste the existing Set Status Submitted step, then reconfigure it with the status and date. (Reusing steps saves time and helps maintain consistency.)
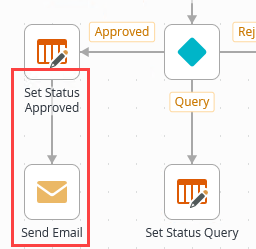
- Add Send Email steps to the Approved and Rejected outcomes to notify the originator that the item was approved or rejected. Use the image below for reference or create your own content if you prefer.
Approved email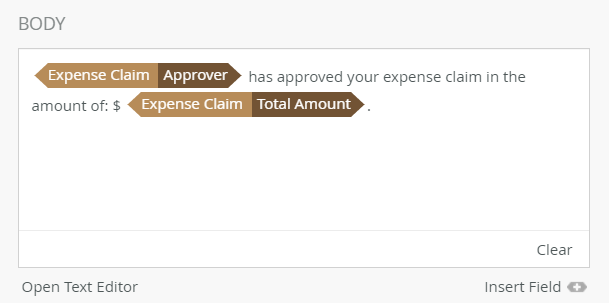
Your workflow should look like the image below at this point.
- The final configuration for the Approve Expense Claim step is to add Send Email steps for the approved and rejected outcomes. The emails inform the originator of the approver's decision. From the Toolbox > Basic node, drag a Send Email step below the Set Status Approved step. Connect the steps.
If you are running out of design canvas space, click anywhere on the design canvas, then drag your mouse. This moves the entire workflow structure so that you have more room.
- Select the Send Email step, then expand the Configuration Panel. Confirm the TO value is Originator. For the SUBJECT line, enter
Your expense claim titled: [TITLE]
then drag the Context Browser > REFERENCES > Expense Claim SmartObject > Title property to the end of the subject line. (You may need to click the Fields tab at the bottom of the right side column to return to the SmartObject references.)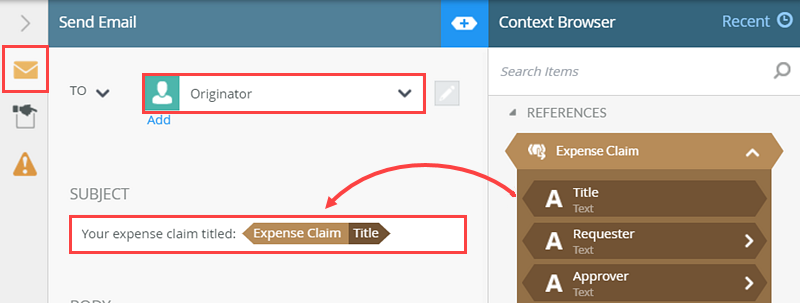
- Enter any content you like for the message BODY. Use references from the Context Browser to add additional personalization.
- Click the Properties tab. Change the name of the step to
Send Email Approved
then collapse the Configuration Panel.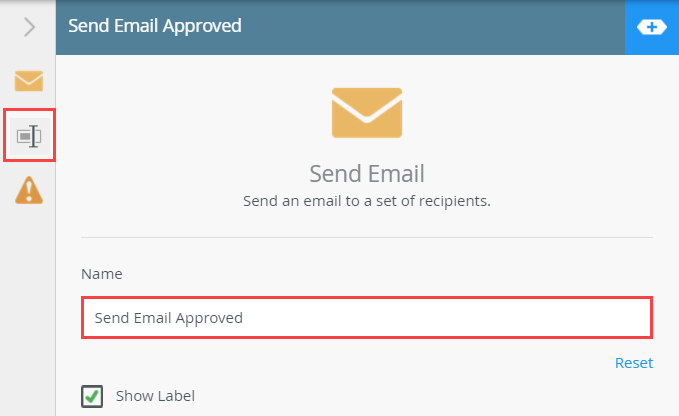
- Copy and paste the Send Email Approved step, then connect it to the Set Status Rejected step. Update the subject line and message body to reflect the rejected decision. Change the step name to
Send Email Rejected.
Your workflow should look like the image below.
- The final configuration for the Approve Expense Claim step is to add Send Email steps for the approved and rejected outcomes. The emails inform the originator of the approver's decision. From the Toolbox > Basic node, drag a Send Email step below the Set Status Approved step. Connect the steps.
Review
In this step, you completed the approval outcome steps. You added a task step, then configured it to use the Display Expense Claim form so that the approvers cannot change any of the originator's entries. You learned how to copy and paste existing steps. This saves time and maintains consistency across your step configuration. In the next step, you deploy the partially completed workflow. You configure the workflow start rules on the New Expense Claim form before continuing the workflow build. You must deploy the workflow first, so that K2 "sees" the workflow in the form rules.