16. Add the Expense Claim Workflow
Now that you have your initial view and form configurations complete, it's time to start building the Expense Claim Workflow! In this step, you add a workflow and configure it to start when you submit the new claim form. You add the first of several steps that update the status column in your SharePoint list. You update the status to reflect each leg of workflow (such as submitted, approved, rework).
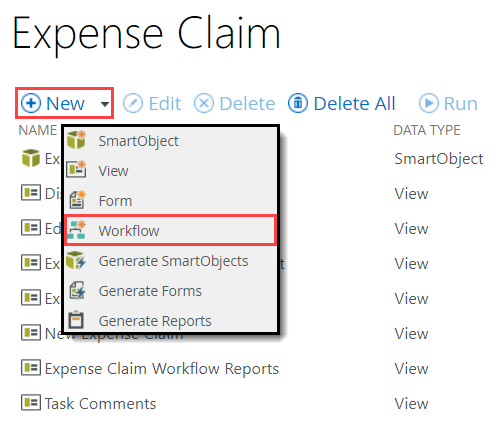
- If there are any views or forms checked out, check them in before continuing. From the K2 Application elements page, add a new workflow with the following settings:
- Name: Expense Claim Workflow
- Start: When a SmartForm is Submitted > New Expense Claim
Each workflow name must be unique. You will see an error if you try to duplicate workflow names. If you are working in a shared environment where there may be multiple builds of this workflow, consider adding your initials to the name so that it is unique. For example, Expense Claim Workflow KL.When the K2 Workflow Designer launches, you are presented with a "welcome" screen that contains helpful hints. CLOSE this screen to continue. You may also see other tip boxes throughout the workflow build. Click GOT IT or CLOSE to continue.- From the K2 Application elements page, check-in all views and forms that are still checked out to you, if any.
- Click New, then select Workflow.
- On the Create Workflow screen, confirm the workflow name is
Expense Claim Workflow
then confirm the workflow starts when you submit the New Expense Claim form. Click OK.Each workflow name must be unique. You will see an error if you try to duplicate workflow names. If you are working in a shared environment where there may be multiple builds of this workflow, consider adding your initials to the name so that it is unique. For example, Expense Claim Workflow KL.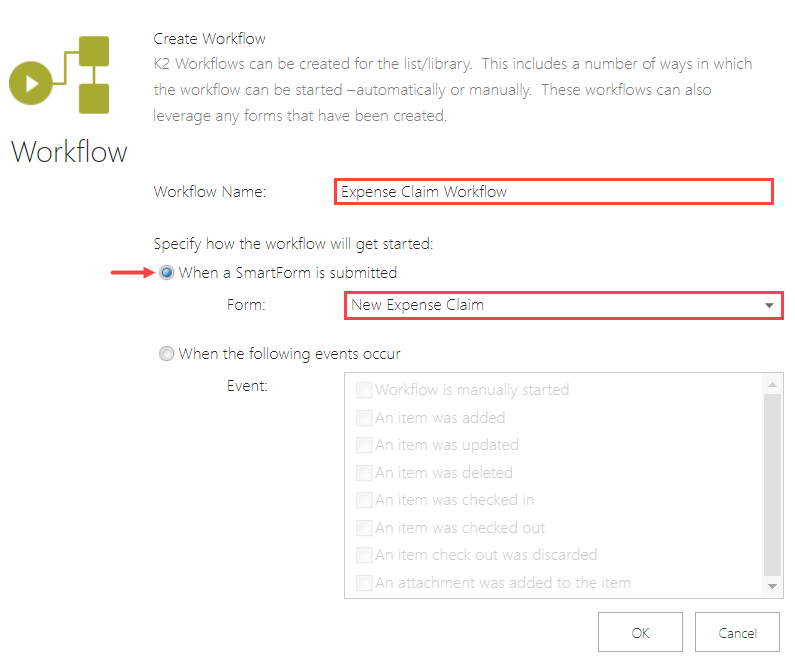
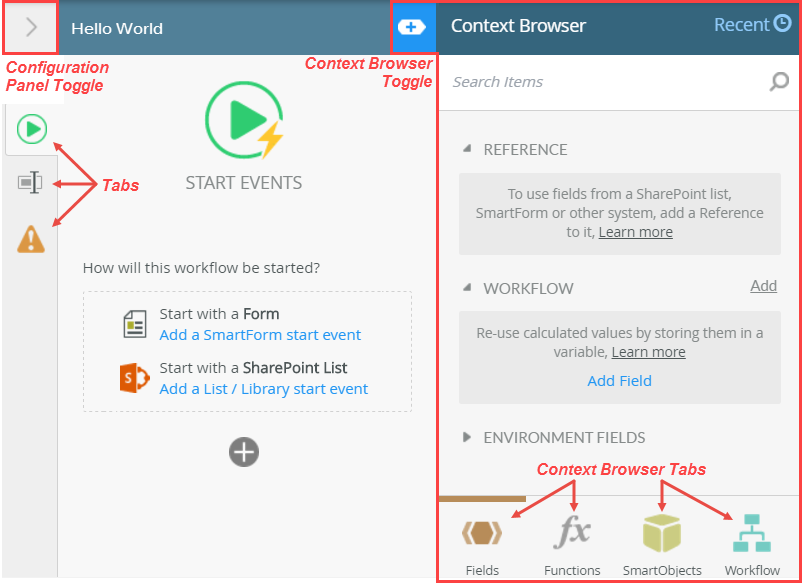
- the Toolbox on the left-side of the page
- the Design Canvas in the center of the page
- the Configuration Panel on the right-side of the page
- the Context Browser located within the Configuration Panel
The K2 Workflow Designer launches.
When the K2 Workflow Designer launches, you are presented with a "welcome" screen that contains helpful hints. CLOSE this screen to continue. You may also see other tip boxes throughout the workflow build. Click GOT IT or CLOSE to continue.The K2 Workflow Designer environment contains four primary sections:
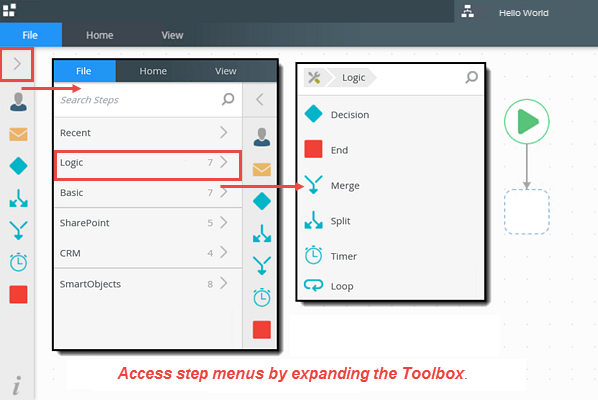
The Toolbox is where you will find the different types of steps that you can add to a workflow. You can drag and drop the steps you need for your workflow onto the canvas. User steps usually involve human interaction, such as a person having to make a decision for the workflow to continue. System steps, such as sending an email or updating data in some other system, are performed by the K2 server. Lines connect steps to each other, and define the "path" that the workflow will follow.
Accessing steps in the Toolbox
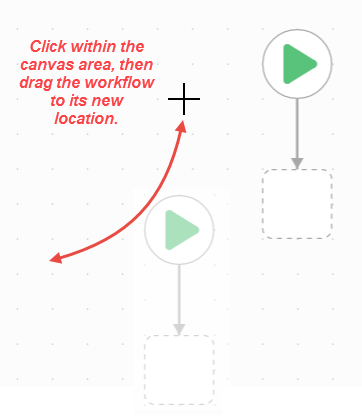
The Design Canvas is where you drag and drop the steps you need for constructing your workflow. You can move the workflow around by clicking within the canvas, then dragging your mouse to a new location. This is helpful if your workflow is larger than your browser screen.
Moving the workflow around the design canvas
The Configuration Panel contains the settings for each step. After highlighting a step on the canvas and expanding the Configuration Panel, the Configuration Panel will display a series of tabs. The tabs are specific to the step type. The Configuration Panel also contains the Context Browser. The Context Browser provides access to variables, functions, SmartObjects, and workflow variables.
Accessing step tabs in the Configuration Panel; expanding the Context Browser
- Set the status column for the first time. You update this column several times throughout the workflow build.
From the Toolbox > SharePoint > List Items menu, add an Update List Item step to the empty placeholder below the Start step. Set the Expense Claim (list item) > Status property to Submitted, then rename the step to Set Status Submitted.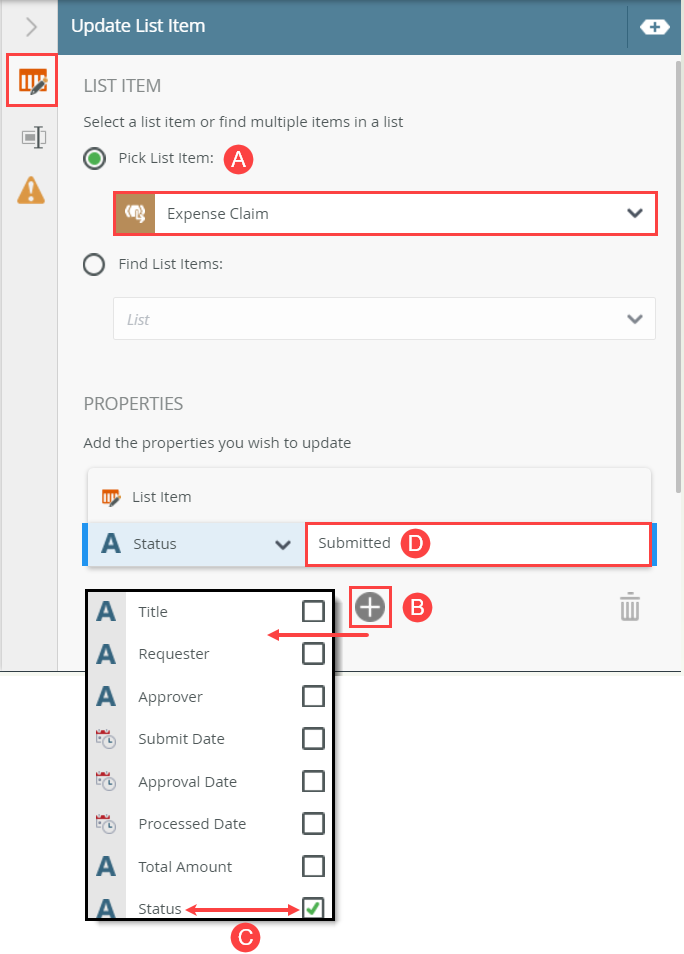
- Begin by adding an Update List Item step that updates the status property. Set the status to submitted.
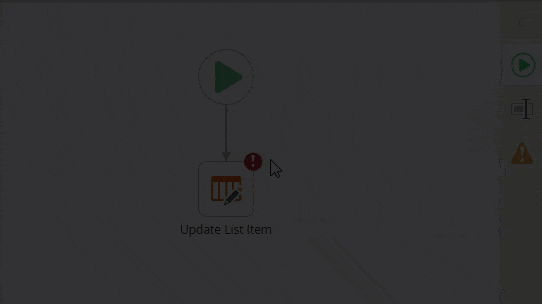
Expand the Toolbox > SharePoint > List Items menu. Drag the Update List Item step into the empty placeholder just below the Start step. When adding a step to the workflow design canvas, you may see a red warning badge. This badge simply indicates the step has required configurations. When you expand the Configuration Panel, the required configuration is also flagged. (Note that the steps below may be different from your screen.)
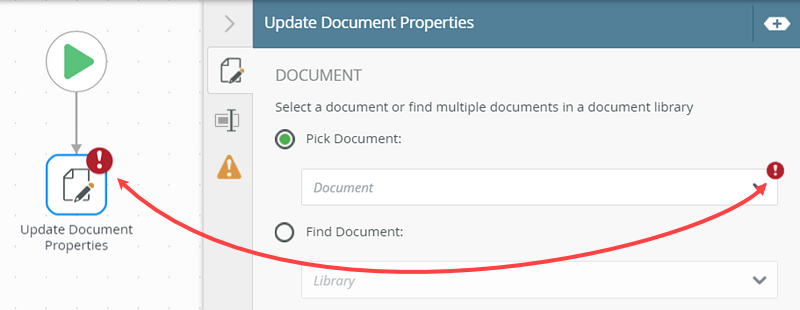
- Select the Update List Item step. (Selected steps have a blue border.) Expand the Configuration Panel. Select the Update List Item tab to make it active, if it is not already.
- Under the LIST ITEM heading, use the drop-down to select Expense Claim for the Pick List Item value.
- Under the PROPERTIES heading, click the Add (+) icon. CHECK the box to the right of the Status item. For the value, enter
Submitted - Click the Properties tab. Name the new step
Set Status Submitted
so that you can tell at a glance what function the step performs. Collapse the Configuration Panel.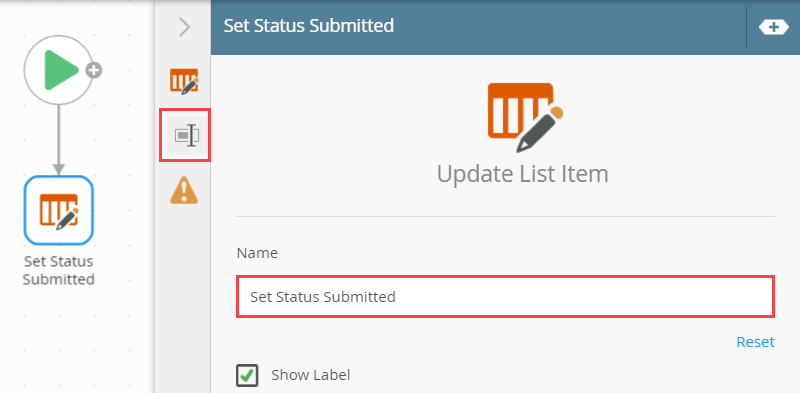
- Begin by adding an Update List Item step that updates the status property. Set the status to submitted.
Review
In this step, you created the Expense Claim Workflow. You added an Update List Item step. You update the status column in your SharePoint list several times throughout the workflow build. This lets you know the current state of the workflow progress at all times. You also changed the name of the step. The step name is the label you see on the workflow design canvas. It is always a good idea to rename steps so that you can tell at a glance what function the step performs. In the next step, you add and configure the approval outcome steps.