13. Edit the New Expense Claim Form
In the next three steps, you edit the forms used in the Expense Claim application. You add views to the forms, add and configure buttons to submit claims, configure rules to save the header and details records, and finally configure rules to cancel a claim. In a later step, you configure this form to start the Expense Claim Workflow.
- Check out and edit the New Expense Claim form.
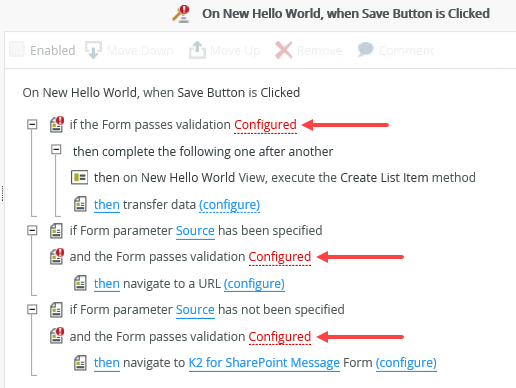
After making a control on a view invisible or deleting a control on a view, the associated form may display a red warning badge on the RULES icon. You must correct the issues before continuing. On the RULES screen, the rule associated with invisible or deleted controls also shows the red warning badge.
NOTE: This Caution Box uses images from a Hello World application. Your screen shots may not match exactly if you are building a different application. The steps for removing orphaned control references are the same, however.

Edit the rule, then locate the red configure links (there may be more than one). You need to edit each action that has a red configure link.
UNCHECK the Validate boxes that have unnamed Controls. (There may be more than one.) Click OK.
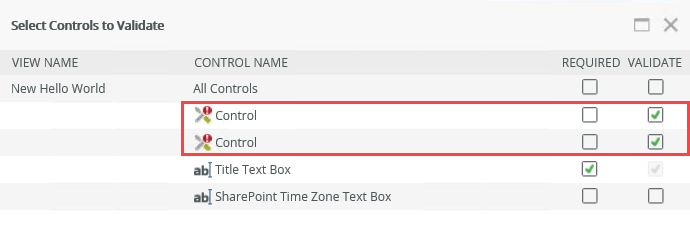
This removes the validation errors and any red warning badges. You can continue with the tutorial.

- On the K2 Application elements page, Check Out the New Expense Claim Form, then Edit the form.

When the form opens in K2 Designer, check to see if there is a red warning badge next to the RULES icon in the navigation bar.
After making a control on a view invisible or deleting a control on a view, the associated form may display a red warning badge on the RULES icon. You must correct the issues before continuing. On the RULES screen, the rule associated with invisible or deleted controls also shows the red warning badge.
NOTE: This Caution Box uses images from a Hello World application. Your screen shots may not match exactly if you are building a different application. The steps for removing orphaned control references are the same, however.
Edit the rule, then locate the red configure links (there may be more than one). You need to edit each action that has a red configure link.
UNCHECK the Validate boxes that have unnamed Controls. (There may be more than one.) Click OK.
This removes the validation errors and any red warning badges. You can continue with the tutorial.
- On the K2 Application elements page, Check Out the New Expense Claim Form, then Edit the form.
- Drag the Expense Claim Line Items Edit List view onto the form and change the view title to Expense Claim Items.
- Begin by adding the editable list view used to capture expense claim line items to the form.
Click the LAYOUT tab to return to the design canvas. In the left-side column near the top of your screen, click the Views tab. Navigate to the Expense Claim category and locate the Expense Claim Line Items Edit List view. (Do not click the view just yet. If you did and saw a warning message to stop editing the form, just click No. K2 is asking if you want to close the form and open the view.) Depending on your environment and SharePoint sites, your categories may be different from the image below.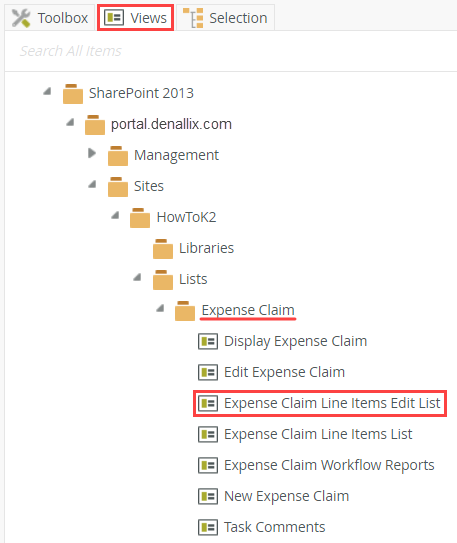
- Drag the Expense Claim Line Items Edit List view onto the form design canvas, below the New Expense Claim view. If you are not familiar with SmartForms, as you drag a new element onto the canvas, a placeholder appears. Drop the view into the placeholder.

- Click on the (Enter View Title) line and change the view heading to:
Expense Claim Items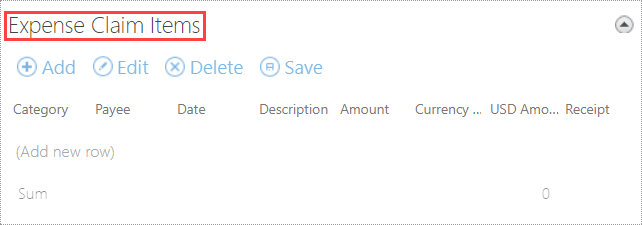
- Begin by adding the editable list view used to capture expense claim line items to the form.
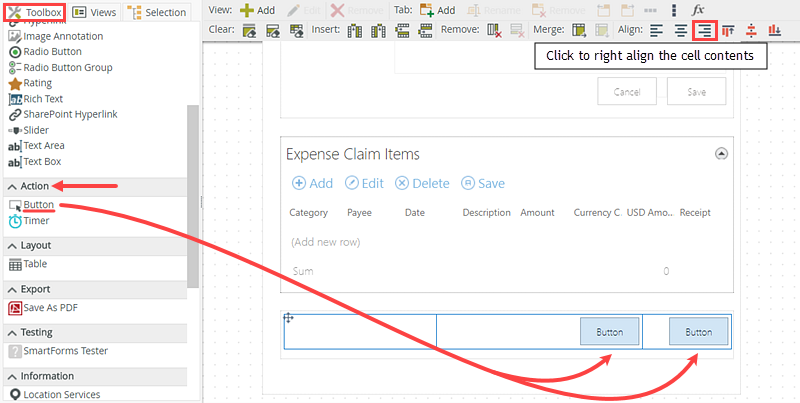
- From the Toolbox, add a one row, three column, layout table and two buttons to the form, below the Expense Claim Items view. Adjust the column widths and right-align the cells so that the buttons are closer to each other (to improve the flow). Configure the Name and Text properties as follows:
Button 1 Name Button Submit Text Submit Button 2 Name Button Cancel Text Cancel 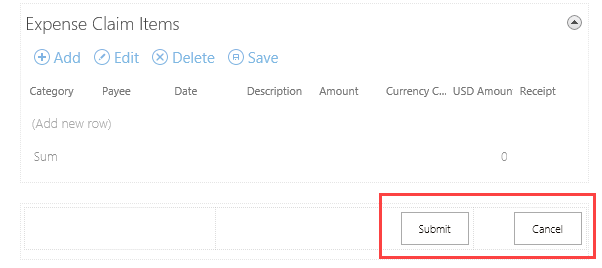
- Now you add the submit and cancel buttons to the view. Begin by adding a layout table for the buttons. Notice the Save and Cancel buttons that appear in the New Expense Claim view on the top-half of the screen. In a previous step, you hid these controls so that you could add the submit and cancel buttons to the form (and not the view). You want the submit and cancel button rules to be on the form level so that they can control the actions of both views.
From the Toolbox, drag a layout Table below the list view you just added. Configure the table to have one row and three columns.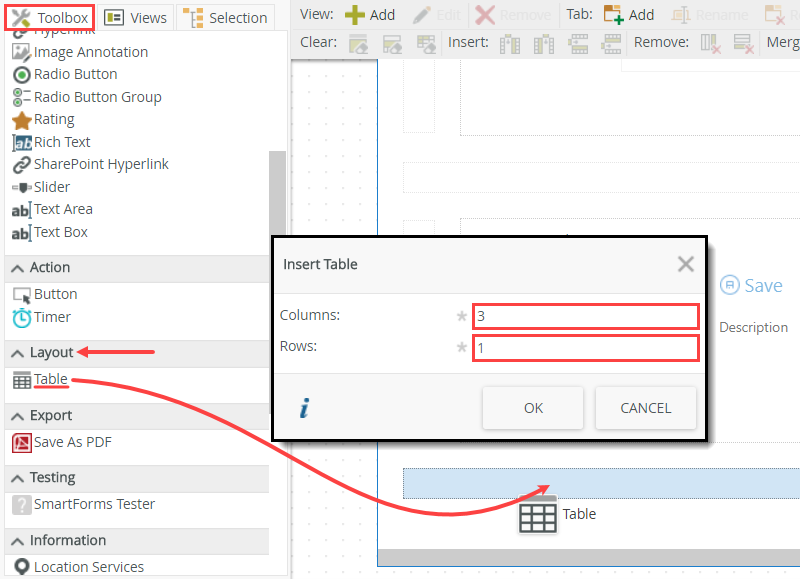
- Drag two Buttons from the Toolbox into the layout table's second and third cells. If you like, use the right-align option in the toolbar to align the buttons to the right-hand side of the cells. You can also adjust the column widths by
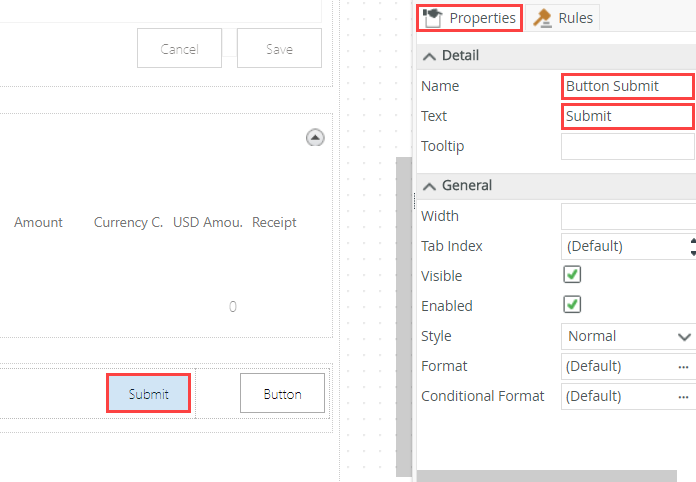
- Select the first button and change its Name to
Button Submit
and its Text to
Submit
(Once again, if you are not familiar with SmartForms, the Name property is the control identifier that K2 uses to interact with the control. The Text property is the value that you see on the control.)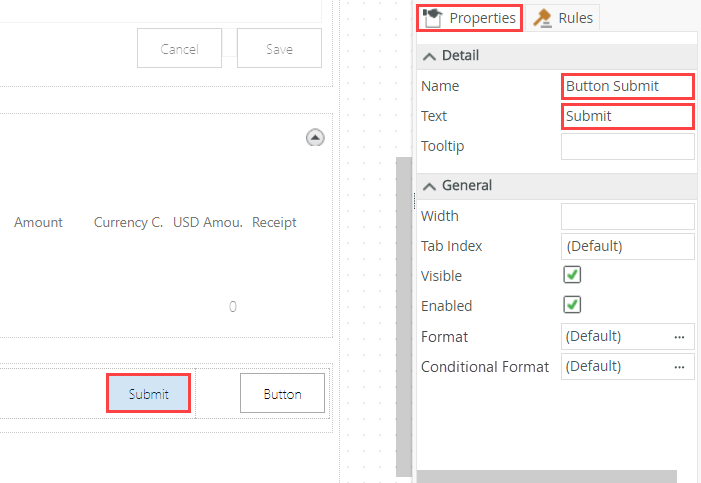
- Select the second button and change its Name to
Button Cancel
and its Text to
Cancel.
- Now you add the submit and cancel buttons to the view. Begin by adding a layout table for the buttons. Notice the Save and Cancel buttons that appear in the New Expense Claim view on the top-half of the screen. In a previous step, you hid these controls so that you could add the submit and cancel buttons to the form (and not the view). You want the submit and cancel button rules to be on the form level so that they can control the actions of both views.
- Set the form’s Width property to 90%.
- Click anywhere on design canvas (outside of the two views). From the Properties pane, under the
90%.SmartForms are browser-based forms. If you make the width 100%, the form extends the entire width of the screen, minus any left or right-side columns. Adjusting the width property gives you a form that's much easier to navigate.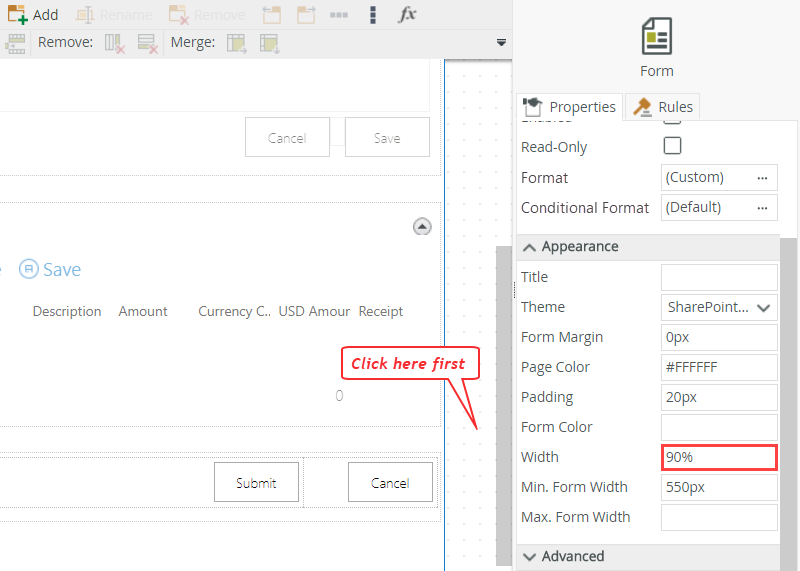
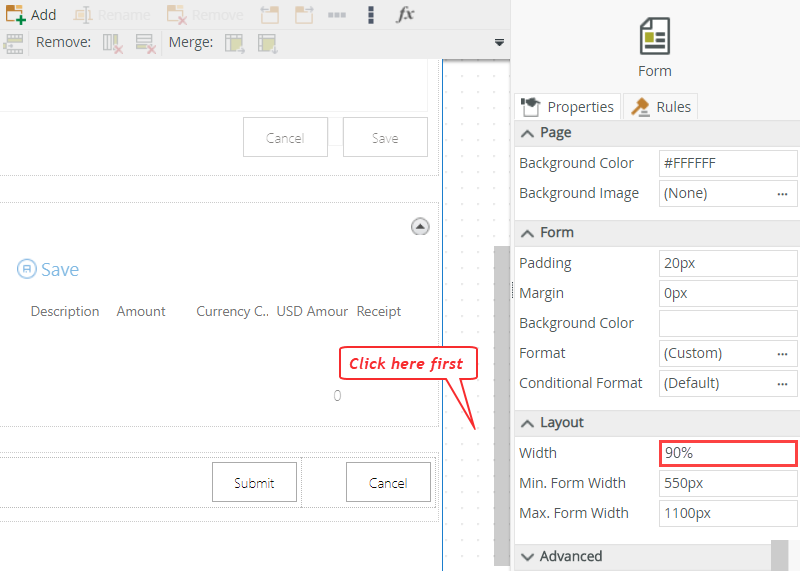
- Click anywhere on design canvas (outside of the two views). From the Properties pane, under the
- Add a rule action for the Cancel button that asks for a confirmation, then calls the On New Expense Claim, when Cancel Button is Clicked rule. Rename the rule to Confirm Cancel.
specify heading Confirm Cancel specify message Are you sure you want to cancel? 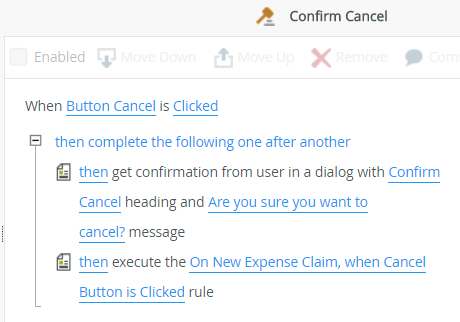
- In the next several steps, you configure the rules for the cancel and submit buttons. For the cancel button, you want to prompt the user for a confirmation before canceling the claim and closing the form.
Select the Cancel button, then Add a rule for the button.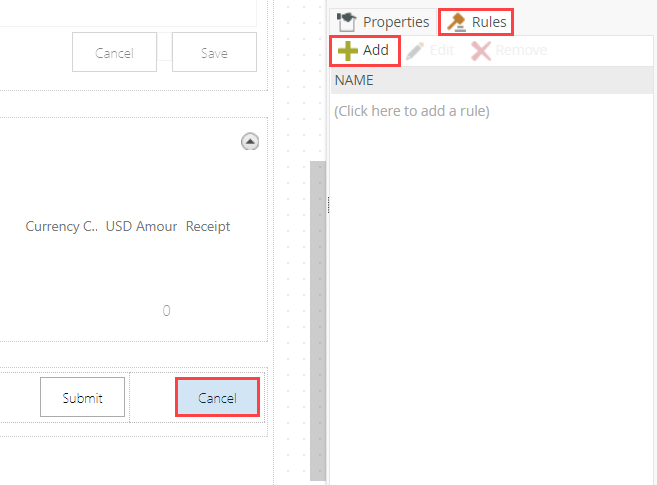
- For the Event that starts the rule, select When a Control on the Form raises an event and configure it for when the Button Cancel is clicked. Click the default title and change it to
Confirm Cancel
so that it is easier to tell what the rule does.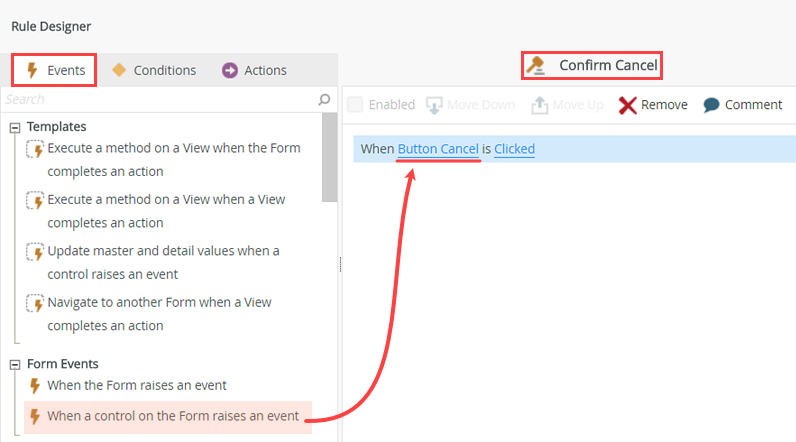
- Now add two actions to the cancel rule. The first action requires you to confirm you want to cancel the claim. The second action calls an existing rule that closes the form and redirects you back to the Expense Claim list in SharePoint.
Select the Actions tab, then locate and select the Get confirmation from user action. (You can search for the action if you like.) Configure the action as follows, then click OK:specify heading Confirm Cancel specify message Are you sure you want to cancel? 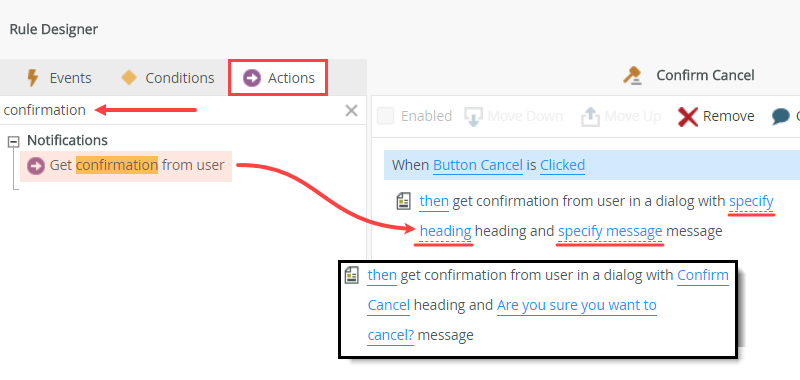
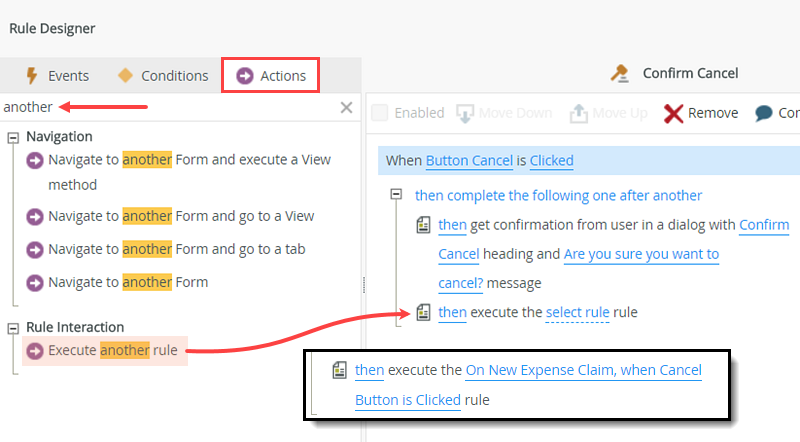
- In the Actions pane, select the Execute another Rule Action. Select the On New Expense Claim, when Cancel Button is Clicked rule, then click OK.
Explaining this step a little further. When you generated the New Expense Claim View from the Expense Claim list in SharePoint, K2 added a Save button and a Cancel button. Each of these buttons has rules already attached to them to perform the selected action. You hid both of these buttons on the view because you are adding the buttons at the form level. The rules still remain however. In this step, you are simply calling the existing cancel rule instead of configuring a new rule that does the same thing.
- In the next several steps, you configure the rules for the cancel and submit buttons. For the cancel button, you want to prompt the user for a confirmation before canceling the claim and closing the form.
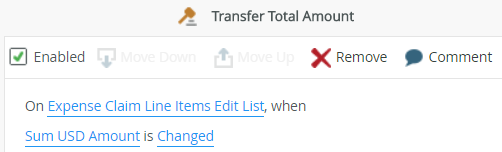
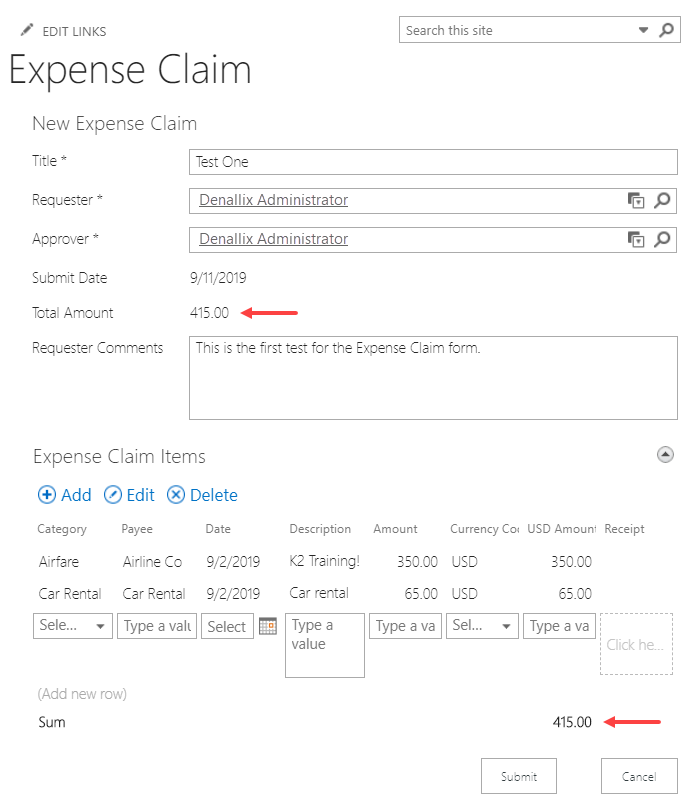
- Add a new rule to copy the value of the Sum USD Amount to the Total Amount data label on the New Expense Claim view. Rename the rule to Transfer Total Amount.
- Next, add a new rule that copies the Sum USD
Amount value from the Expense Line Items Edit View (details) to the New
Expense Claim (header) view whenever the Sum USD Amount control
changes.
Navigate to the RULES screen for the form and click Add Rule .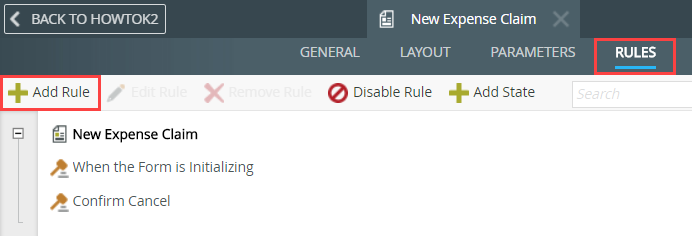
- With the Events tab active, select the
When a control on a View raises an event to add it to the rule
definition pane.

- Change the rule title so that it is
clear what the rule does. Click (Enter Rule Name) and rename
the rule to
Transfer Total Amount - Edit the rule links so that they reflect when the
Sum USD Amount control on the Expense Claim Line Items Edit List
view is Changed.
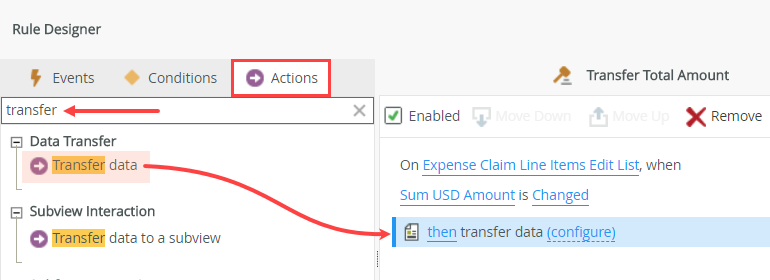
- Now switch to the Actions tab. Scroll to or search for Transfer data. Click it once to add it to
the rule definition pane.
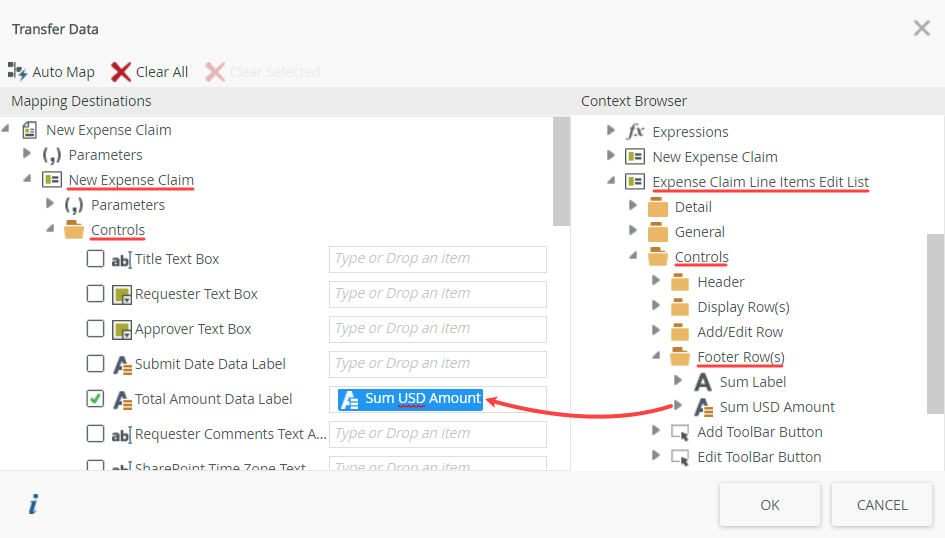
- Click (configure). On the Transfer Data screen, drag the Sum USD Amount from the Footer Rows() of the Expense Claim Line Items Edit List > Controls into the Total Amount Data Label control for the New Expense Claim view. Click OK, then OK once again to complete setting up the rule.
There are a couple of things to note in this step. First, when you added the sum aggregation to the Expense Claim Line Items Edit List view, K2 added a row to the bottom of the layout table. This row became the footer. That is why you find your initial transfer value under the Footer category. The second point to make is you are copying the sum aggregation value to the Total Amount Data Label. The Total Amount Data Label updates each time the sum aggregation value changes. Because there are two views involved, you must apply the rule at the form level, as views are independent of each other.
- Next, add a new rule that copies the Sum USD
Amount value from the Expense Line Items Edit View (details) to the New
Expense Claim (header) view whenever the Sum USD Amount control
changes.
- Add a rule that executes when you click the submit button:
- Condition: the form passes validation with the following required fields:
- Title Text Box
- Requester Text Box
- Approver Text Box
- Total Amount Data Label
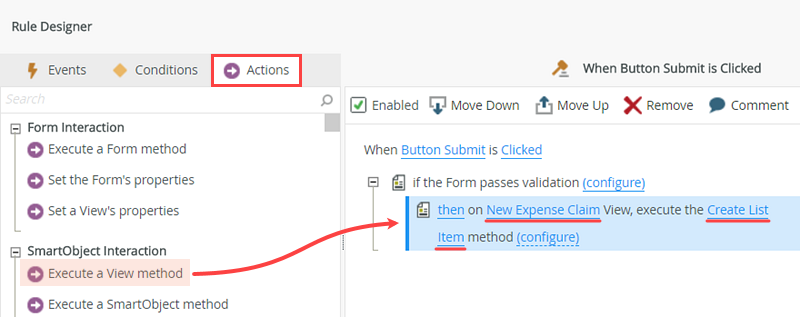
- Action: Execute the Create List Item method on the New Expense Claim view. Auto-map the input mappings. Depending on your version of K2, some fields may not map. (You previously deleted these controls.) Other versions of K2 map all fields regardless.
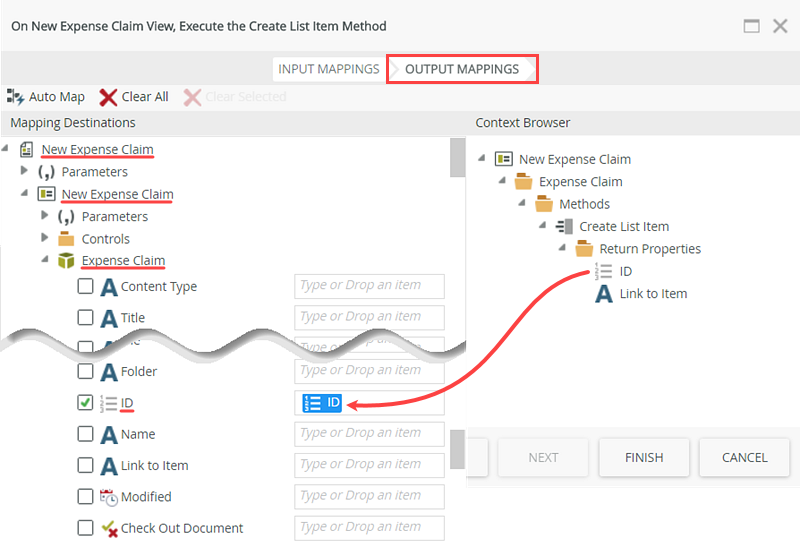
- Save the returned ID for the Expense Claim header record back to the Expense Claim SmartObject.
- Action: Execute the Create method for all the items that were added to the Expense Claim Items Edit List view.
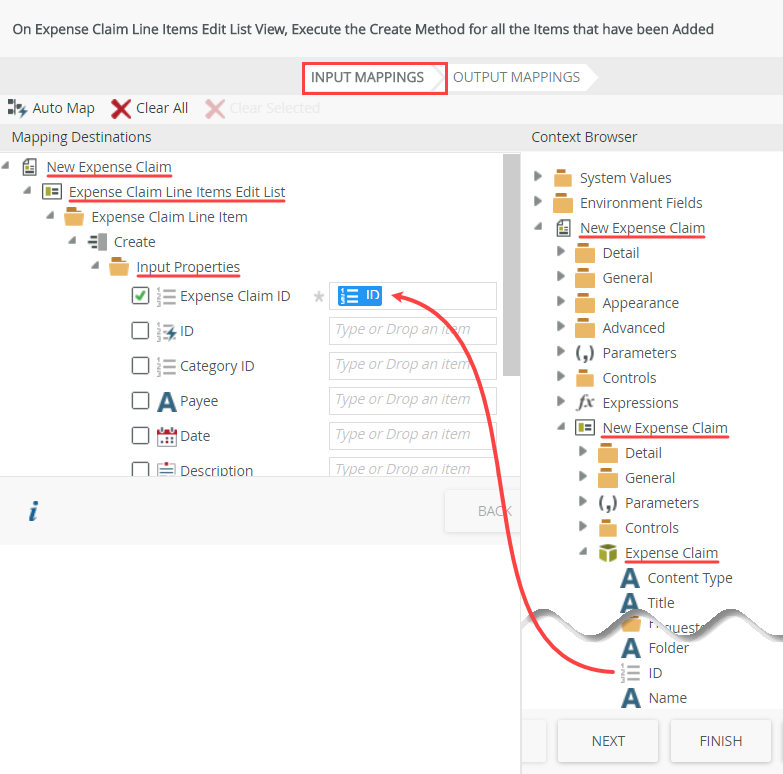
- Map the ID of the Expense Claim header record to the Expense Claim ID input property.
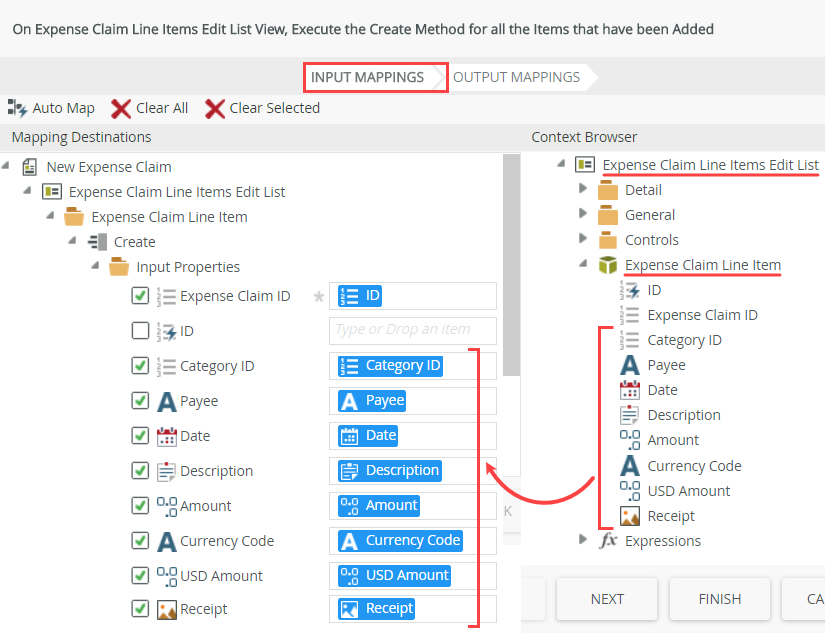
- Manually map the properties of the Expense Claim Line Item SmartObject to the remaining input mappings.
- Action: Show a message to the user with the expense claim ID and title.
- Action: Call the On New Expense Claim, when Cancel Button is Clicked rule. This rule closes the form and redirects you back to the Expense Claim list in SharePoint.
- Next, configure the rule for the submit button. The rule actions first create the header record, which is the record in the Expense Claim (SharePoint) list. You save that record's ID back to the SmartObject. After you create the header record, you create the details records, which are the records in the Expense Claim Line Items (SmartBox) SmartObject. You map the saved header ID to the Expense Claim ID property in the details records, which then link the header and details records. This creates a parent-child model where each child record has an ID property that matches its parent record.
Click the LAYOUT tab in the navigation bar. Select the Submit button at the bottom of the form, then add a new rule with the event, When a control on the Form raises an event. Configure the event to read: When Button Submit is Clicked.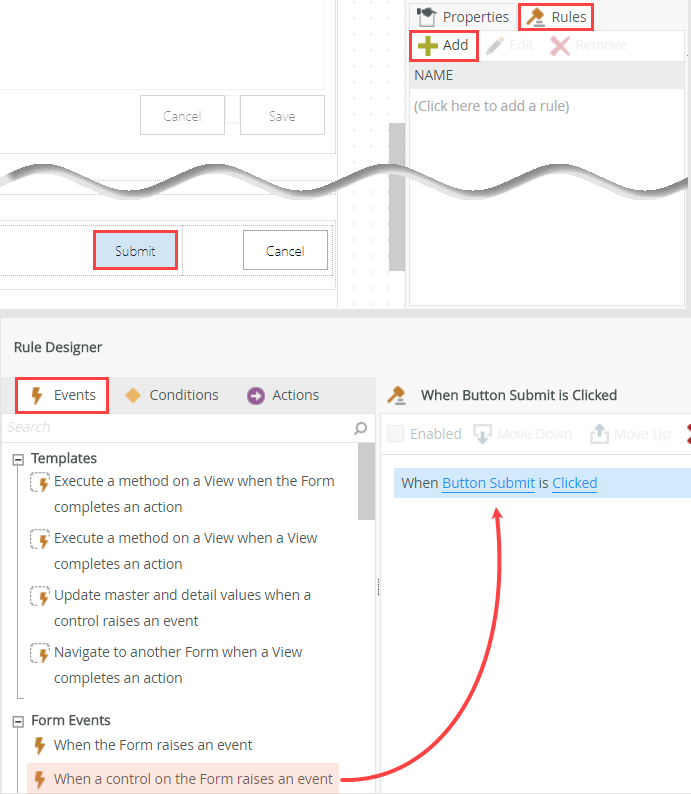
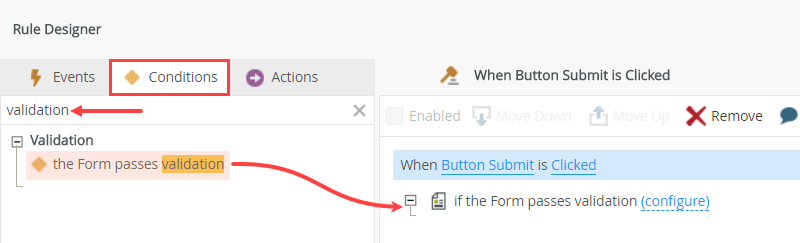
- Add a condition that checks to see if specific fields have values. In other words, you are requiring certain fields. With the Conditions tab active, click the Form passes validation to add it to the rule definition pane. Click (configure).
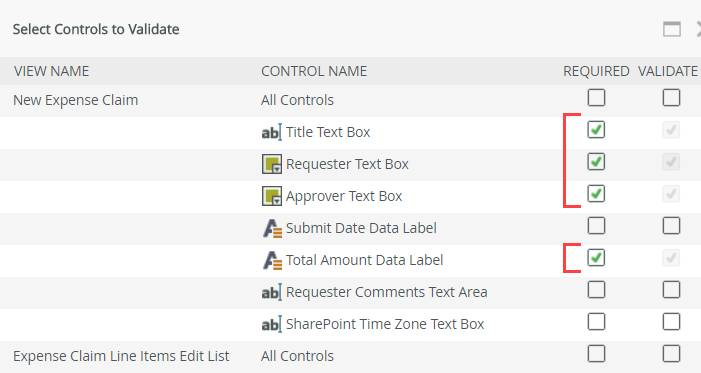
- Configure the validation so that the following controls are required, then click OK.
- Title Text Box
- Requester Text Box
- Approver Text Box
- Total Amount Data Label
- The next two actions create the header (parent) record, then the details (child) records. First, you create the parent record (the record in the Expense Claim list in SharePoint). Then you save the list item ID back to the SmartObject. Next, you create the child records in the Expense Claim Line Item SmartObject, mapping the parent list item ID to a property in the child record. By mapping the ID from the parent record to the child records, each child record in the SmartObject is linked with a single parent record in the SharePoint list. A single parent record could have many child records.
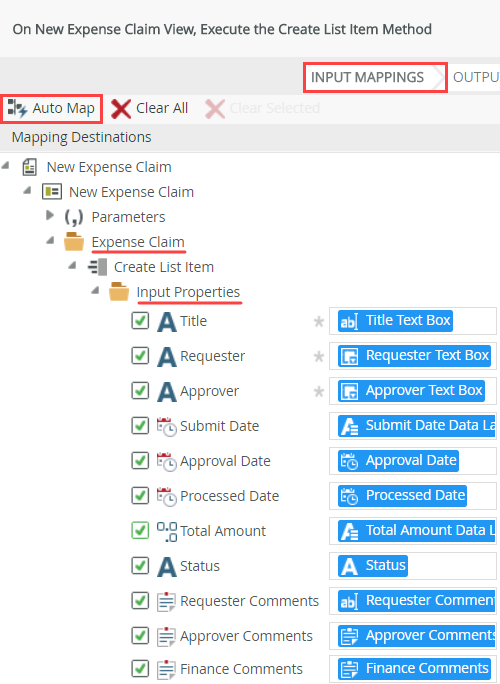
Add an action to Execute a View method. Configure the action to call the Create List Item method of the New Expense Claim view. Click (configure). - On the Input Mappings screen, select Auto Map to automatically map the controls on the form to the Expense Claim SmartObject properties.
- Now, you save the ID from the Expense Claim (SharePoint) list item back to the SmartObject. This makes the ID available for you to map it to the child records. Click NEXT. On the Output Mappings screen, drag the ID return property to the ID of the Expense Claim SmartObject. Click FINISH to complete this action configuration.
- You have just created the parent record in the SharePoint list and you saved the ID from that record back to the Expense Claim SmartObject. Now, you add the action to create the child records.
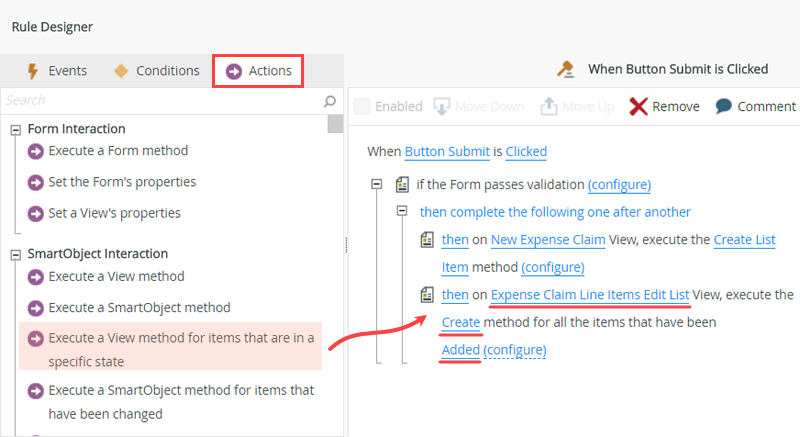
Add an action to Execute a View method for items that are in a specific state and configure the action to execute the Create method of the Expense Claim Line Items Edit List view for all the items that have been Added. - On the Input Mappings screen, use the Context Browser to navigate to the New Expense Claim view, then expand the Expense Claim SmartObject. Drag the ID property into the Expense Claim ID input property. (This is the ID you just saved from the parent record.) The child records have an association now with their parent record.
- Next you map the remaining input values. In the Context Browser, expand the Expense Claim Line Items Edit List > Expense Claim Line Item SmartObject, then drag the properties to their respective Input Properties. (You don't have to map the ID because K2 creates a new ID for each new record.) When mapping properties for an editable list, you map the properties from the associated SmartObject and not the controls. The SmartObject allows for the looping process while saving multiple records.
- Click NEXT, then FINISH to complete the rule action configuration.
- To complete the user experience, show a confirmation message with the ID of the new expense claim.
Add an action to Show a message, then click (configure).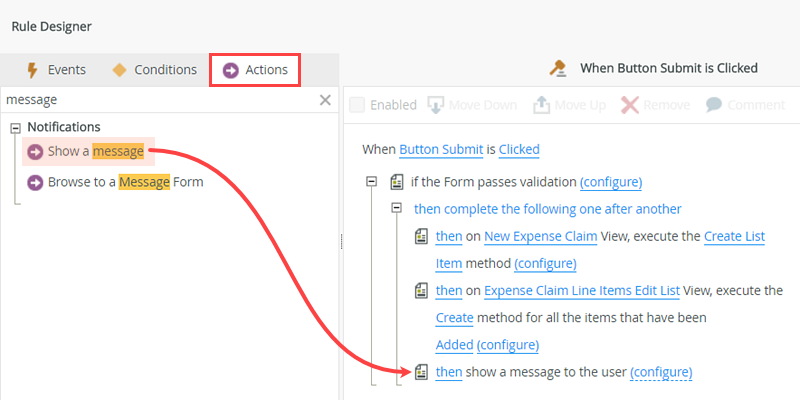
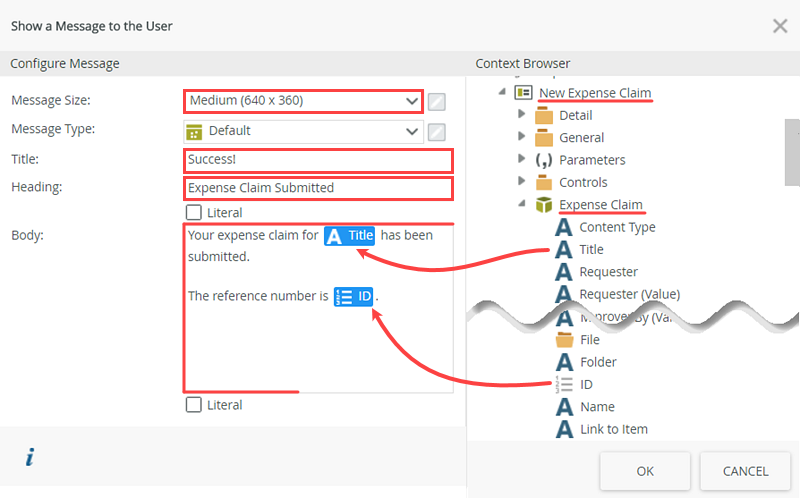
- Configure the message using the values below and dragging values from the Context Browser for the Title and ID. Click OK to save the action.
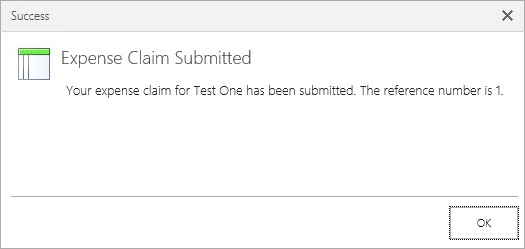
Message Size Medium Message Type Default Title Success Heading Expense Claim Submitted Body Your expense claim for [Title] has been submitted. The reference number is [ID]. - Finally, you want to redirect the user back to the Expense Claim list (in SharePoint) after they have read the confirmation message.
Add an action to Execute another Rule. Configure the action to call the On New Expense Claim, when Cancel Button is Clicked rule . You are reusing the rule defined for the cancel button. Since the data is already saved, clicking cancel will not undo any records. The rule closes the form and sends you back to the Expense Claim list.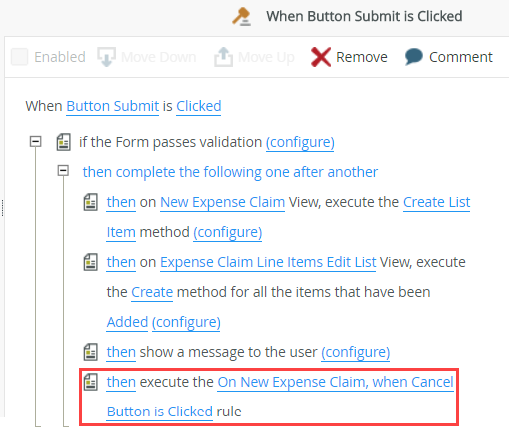
This step takes the form field values from the Expense Claim header view and uses them to create a new list item in the Expense Claim list. (Depending on your K2 version, auto-mapping may populate all the properties, or just the properties actually displayed on the form, leaving some properties blank. Either way, it is safe to continue.)
This is the action that loops through rows of line items and creates individual records for each row. You map the ID you saved from the parent record to a property in the child records to link the parent and child records. Click (configure).
- Condition: the form passes validation with the following required fields:
- Set the two methods that create items to execute as a batch. Finish the form, then check in the form.
- Next, set up the rule execution so that the data create operations execute as a single batch action. By default, the actions are set to run one after another. You want them to run as a group, so that K2 creates the parent and child records before moving on to any other events or actions. To do this, you must change the order to run as a batch.
In the rule definition pane, select then for the New Expense Claim View, execute the Create List Item method action. Change it to also.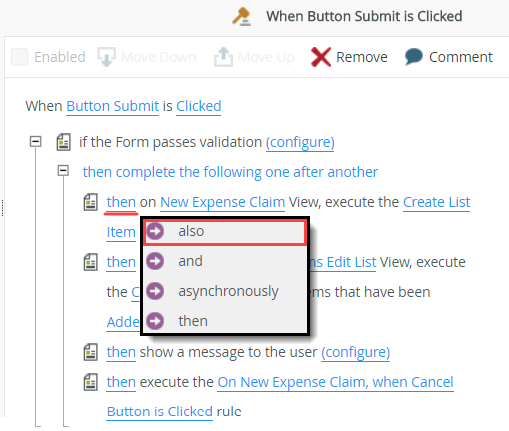
- In the rule definition pane, select then for the Expense Claim Line Items Edit List View, execute the Create method for all the items that have been Added action. Change it to also.
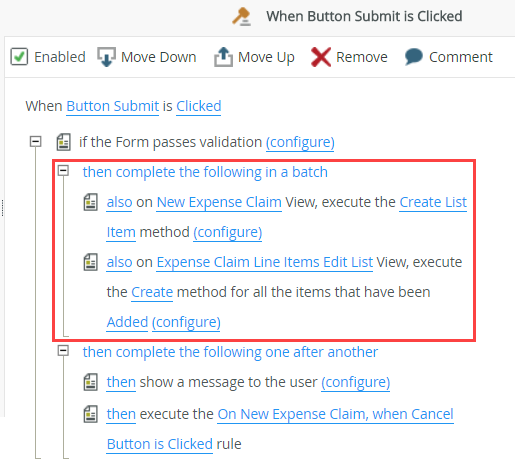
- if the form passes validation (all the relevant required fields have values)
- as a single operation, create the Expense Claim header, or parent, record
- then create the details, or child, records for each line item you add to the Expense Claim Edit List
- then show a message with the ID of the new Expense Claim header record
- then return to the SharePoint site where you began
- Click OK to exit the rule designer, then click FINISH to save and exit the New Expense Claim form. Check in the form.
The When Button Submit is Clicked rule should look like the image below.
You have now set up the two create record actions to run as a single batch task. To recap, the rule does the following when the user clicks the submit button:
- Next, set up the rule execution so that the data create operations execute as a single batch action. By default, the actions are set to run one after another. You want them to run as a group, so that K2 creates the parent and child records before moving on to any other events or actions. To do this, you must change the order to run as a batch.
- If time allows, test the form by adding a new item to the Expense Claim list in SharePoint. When you submit the form, you should see the confirmation message with the reference ID.
- The New Expense Claim form is now complete. If time allows, test the form by submitting a new claim to your SharePoint list.
From the Expense Claim list landing page, and add a new item. - Add some comments, pick an approver, and add some items to the form. You should see the total amount on the form update when you add new line items to the expense claim.
- After clicking Submit, you should see a message with the ID of the new expense claim record.
- After clicking OK on the confirmation message, you should be sent back to the Expense Claim list where you see your new item!
- The New Expense Claim form is now complete. If time allows, test the form by submitting a new claim to your SharePoint list.
Review
In this step, you created a complex form that leverages several SmartForm concepts including:
- Header/detail views
- Reusing existing rules
- Using form rules to transfer values from one view to another view
- Asking the user for confirmation before continuing
- Performing validation before executing rule actions
- Using execution blocks to control the grouping of rule actions