5. Create the Expense Claim Line Item SmartBox SmartObject
In this step, you create a new data source that stores the "details" records, or expense claim line items. Recall that the Expense Claim list stores the "header" records. You link these two data sources together via a common property (an ID) that creates a header-details (or parent-child) record model.
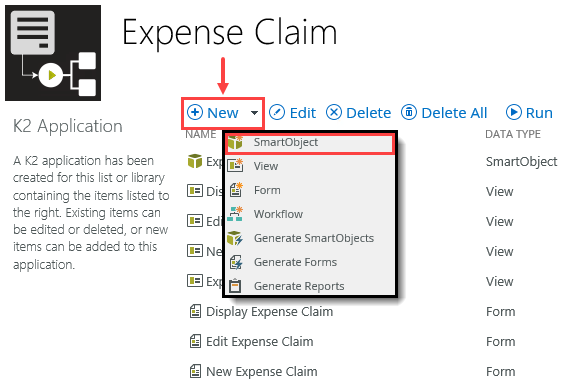
- From the K2 Application elements page, add a new SmartObject using the table below as a guide for the configuration. (Once again, if you are working in a shared environment where there may be multiple builds of this SmartObject, consider adding your initials so that the name is unique.)
Field Value Notes Name Expense Claim Line Item Description Stores line items for expense claims. Category (leave default value unchanged) Type SmartObject Basic SmartObjects automatically use the SmartBox database as their data store. - From the K2 Application elements page, click New and select SmartObject.
- The K2 Designer opens on the GENERAL settings page. Configure the settings for the new SmartObject as follows, then click CREATE:
Field Value Notes Name Expense Claim Line Item Once again, if you are working in a shared environment where there may be multiple builds of this SmartObject, consider adding your initials so that the name is unique. Description Stores line items for expense claims. Category (leave default value unchanged) Type SmartObject Default SmartObjects automatically use the SmartBox database as their data store. 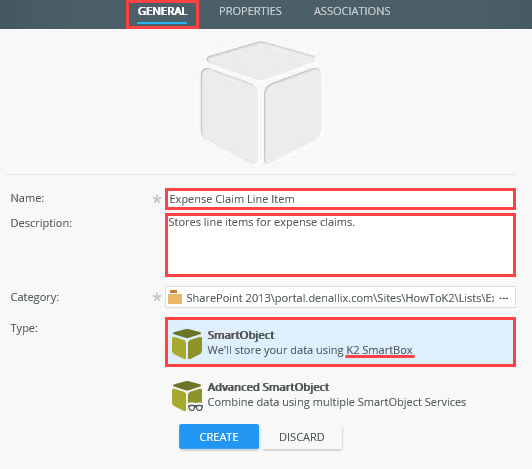
- From the K2 Application elements page, click New and select SmartObject.
-
Add properties to the new SmartObject:
Property Type Notes ID AutoNumber (Key) This property stores a unique ID for the line item. Expense Claim ID Number
(Required)This property stores the ID of the associated Expense Claim "header" SmartObject record, creating a link between the header record and the details records. Mark this property as required. Category ID Number This property stores the ID for the selected category. The category descriptions are provided by the SQL database you configured earlier. Payee Text This is the person or company providing the expense claim item (such as a hotel or car rental company). Date Date The date of the expense. Description Memo A description of the expense line item. Amount Decimal The source amount for the expense claim (potentially in another currency). Currency Code Text The currency code for the expense amount. USD Amount Decimal The USD equivalent amount. This value is calculated automatically by a rule that runs when the control changes. Receipt Image An attached receipt for the expense. - On the PROPERTIES screen, notice that K2 adds the ID property as the key value. This ensures each record added to the SmartObject has a unique identifying ID.
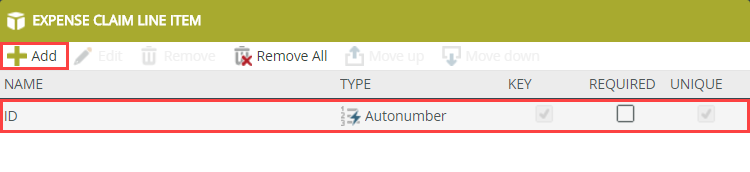
- Next, add properties to the SmartObject. Click Add. Use the table below as a guide for completing the remaining properties. Click OK to continue.
Property Type Notes Expense Claim ID Number
(mark as required)This property stores the ID of the associated Expense Claim "header" SmartObject record, creating a link between the header record and the details records. Mark this property as required. Category ID Number This property stores the ID for the selected category. The category descriptions are provided by the SQL database you configured earlier. Payee Text This is the person or company providing the expense claim item (such as a hotel or car rental company). Date Date The date of the expense. Description Memo A description of the expense line item. Amount Decimal The source amount for the expense claim (potentially in another currency). Currency Code Text The currency code for the expense amount. USD Amount Decimal The USD equivalent amount. This value is calculated automatically by a rule that runs when the control changes. Receipt Image An attached receipt for the expense. 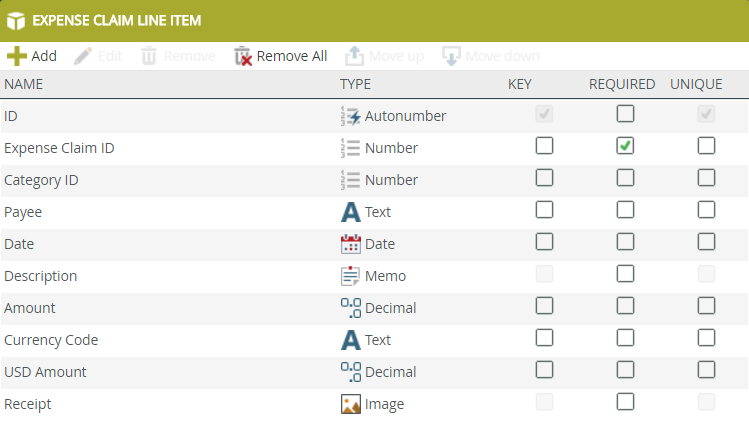
- On the PROPERTIES screen, notice that K2 adds the ID property as the key value. This ensures each record added to the SmartObject has a unique identifying ID.
-
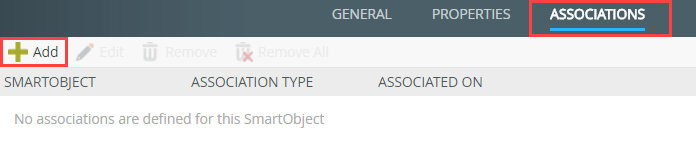
Add the following two associations to the Expense Claim Line Item SmartObject.
Associated SmartObject Association Property Mappings Expense Claim Each Expense Claim Line Item has a single Expense Claim and an Expense Claim can have many Expense Claim Line Items. Expense Claim Line Item. Expense Claim Id = Expense Claim.ID [Finance].[ExpenseCategory] Each Expense Claim Line Item has a single [Finance].[ExpenseCategory] and a [Finance].[ExpenseCategory] can have many Expense Claim Line Items. Expense Claim Line Item. Category Id= [Finance].[ExpenseCategory].ExpenseCategoryId - Click the ASSOCIATIONS tab in the toolbar. You associate the Expense Claim Line Item (Smartbox) SmartObject with the Expense Claim SmartObject (generated from the SharePoint Expense Claim list).SmartObject associations create a relationship between two SmartObject data sources. Like a SQL JOIN statement, you associate SmartObjects by mapping common properties. For example, an ID property. Associating SmartObjects creates a parent - child model. In this step, the parent is the Expense Claim (or "header") SmartObject, generated from the Expense Claim list. The child is the Expense Claim Line Item SmartObject (or "details"). You have one parent record with one or more child records (associated with the parent).
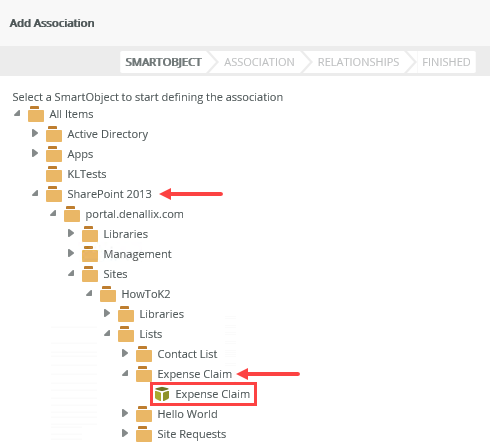
- On the Add Association screen, navigate to the Expense Claim SmartObject. Your screen may be different than the image below, depending on your SharePoint names and subsite structure. Click NEXT.
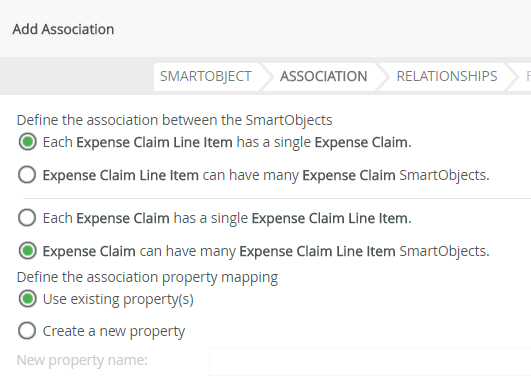
- Configure the association so that each Expense Claim Line Item has a single Expense Claim and an Expense Claim can have many Expense Claim Line Items. Select the Use Existing Property radio button to define association mapping and click NEXT.
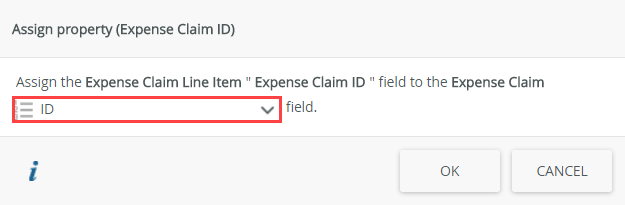
- Next, you define which properties form the link between the two data sources. Select the Expense Claim ID property and click Assign. You map the Expense Claim ID property (from the Expense Claim Line Item SmartObject) to the ID property (from the Expense Claim SmartObject).

- In the dialog box, select ID from the drop-down list and click OK.
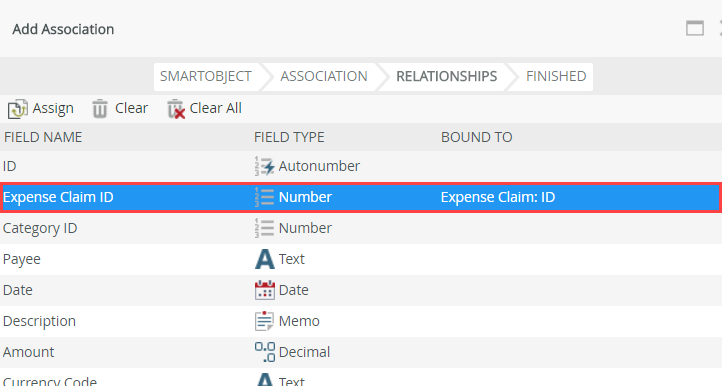
- The Association mappings screen should look like the image below. Click FINISH to complete the association wizard. (Finish is the equivalent of save.)
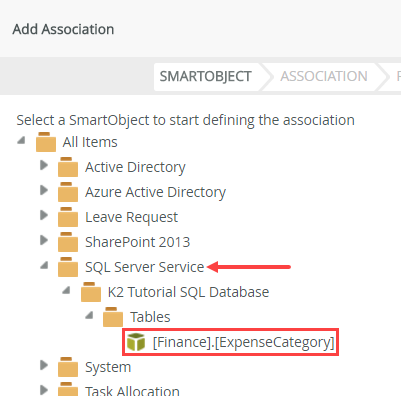
- Click the Add button. On the Add Association screen, navigate to the [Finance].[ExpenseCategory] SmartObject and click NEXT. (Your screen may not match the image below exactly depending on your SharePoint site names.)
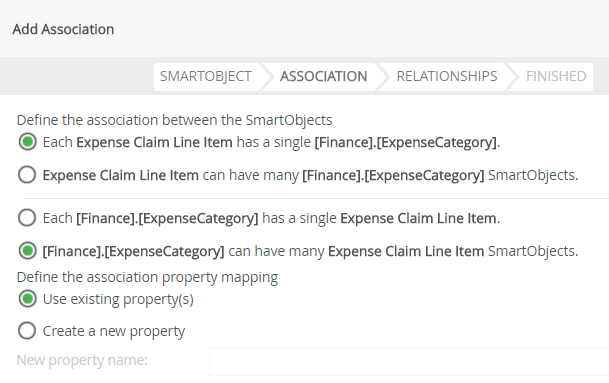
- Configure the association so that each Expense Claim Line Item has a single [Finance].[ExpenseCategory] and a [Finance].[ExpenseCategory] can have many Expense Claim Line Item SmartObjects. Select the Use Existing Property radio button to define the property mapping. Click NEXT. Once again, each line item record has a single category, while each category may have many line item records.
- On the Add Association screen, select the Category ID property and click Assign. Associate the Category ID property (which is the category drop-down list control on your form) with the Azure SQL SmartObject. When your form loads, K2 populates the category control with the values it finds from the ExpenseCategory SmartObject.
In the pop-up dialog box, select the ExpenseCategoryId property and click OK.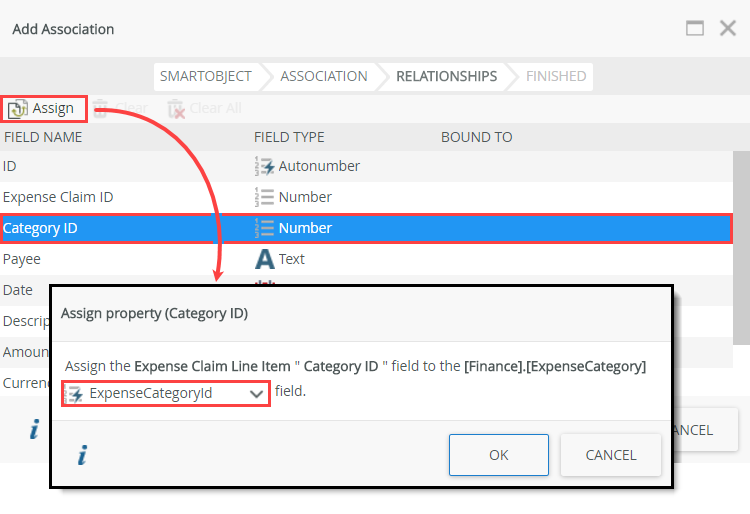
- Click FINISH to complete the association wizard.
Add another association to link the new SmartObject to the SQL data source that returns expense categories. In a later step, you use the SQL data to provide values for the expense claim category drop-down list.
- Click the ASSOCIATIONS tab in the toolbar. You associate the Expense Claim Line Item (Smartbox) SmartObject with the Expense Claim SmartObject (generated from the SharePoint Expense Claim list).
- Finish the SmartObject wizard.
- Click FINISH to save and exit the SmartObject wizard. The finish button is near the upper right corner of your screen. You return to the K2 Application elements page.

- Click FINISH to save and exit the SmartObject wizard. The finish button is near the upper right corner of your screen. You return to the K2 Application elements page.
Review
In this step, you created a new SmartBox SmartObject. SmartBox SmartObjects are K2-provided storage where K2 creates a table on your behalf in the K2 database. This SmartObject stores the line item "details". You can use many different types of data sources to store this content, such as SharePoint lists or other SQL tables. This step demonstrates how to create a SmartBox SmartObject and associate it with other existing data sources. In the next step, you create the last data source for this application. This data source uses the K2 Tutorial Currency Web Service - service instance created earlier.