Deadline tab
Use the Deadline tab to control what happens to the task when recipients have not completed it within a set amount of time. You can specify when the task expires and the workflow moves to the next step. You can also use the Task Result Rule to configure which task result rule should be followed if the deadline is reached.Example of a configured Deadline

See the following resources for more information:
- See How To: Expire Parallel Tasks Based on a Condition for an example of using the Deadline tab to configure a condition that expire tasks based on a time frame.
- Select the Task step and click the Deadline tab.

- Click the calendar icon to display the date picker. Select a date using the calendar control.
- To use dynamic values, you can drag and drop inline functions, fields, variables and other values from the Context Browser into the field.
- Suppose the task starts at 2PM on a Friday. Since this is still within working hours for the Sales team, K2 will expire the task at 2:30PM, because 30 minutes of working time have elapsed.
- Now suppose that the task starts at 10AM on a Saturday. Since this time falls outside of working hours for the sales team, K2 waits until working hours start at 8AM on Monday, and then starts counting down. This means that K2 expires the task at 8:30AM on Monday, once 30 minutes of working time have passed.
- The task result rule is evaluated for each task response as it comes in.
- If the deadline is reached, the task is expired, and the task result path you specify is followed.
- You can use linked or unlinked results.
- Select On Date and click the calendar icon to choose a date.

- Choose a date from the calendar control.

- You can drag dynamic values into the On Date field. From the Context Browser, select and drag inline functions from the Functions, Fields, SmartObjects and / or Workflow categories to define the specific date field.

- The Smartfield Composerdisplays. Use the Context Browser to drag fields and functions to define your deadline date.
 For more information on how to use SmartFields, see the Smartfield Composer topic.
 - You can change the name of the function by double-clicking the label.

- To close the Smartfield Composer click Close. The defined field displays as follows:

- Click the Create link in the Deadline Behavior section.

- This adds the Expired task result rule.

- Select the After Time radio button.

- Enter values in days, hours, minutes, and seconds. You can use a single field or multiple fields, such as two days, or one hour and 30 minutes.

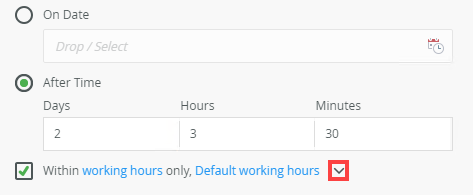
- Check the Within Working Hours Only check box to ensure the task expires after the set time within the specified working hours. Click the working hours link to edit or add working hours.

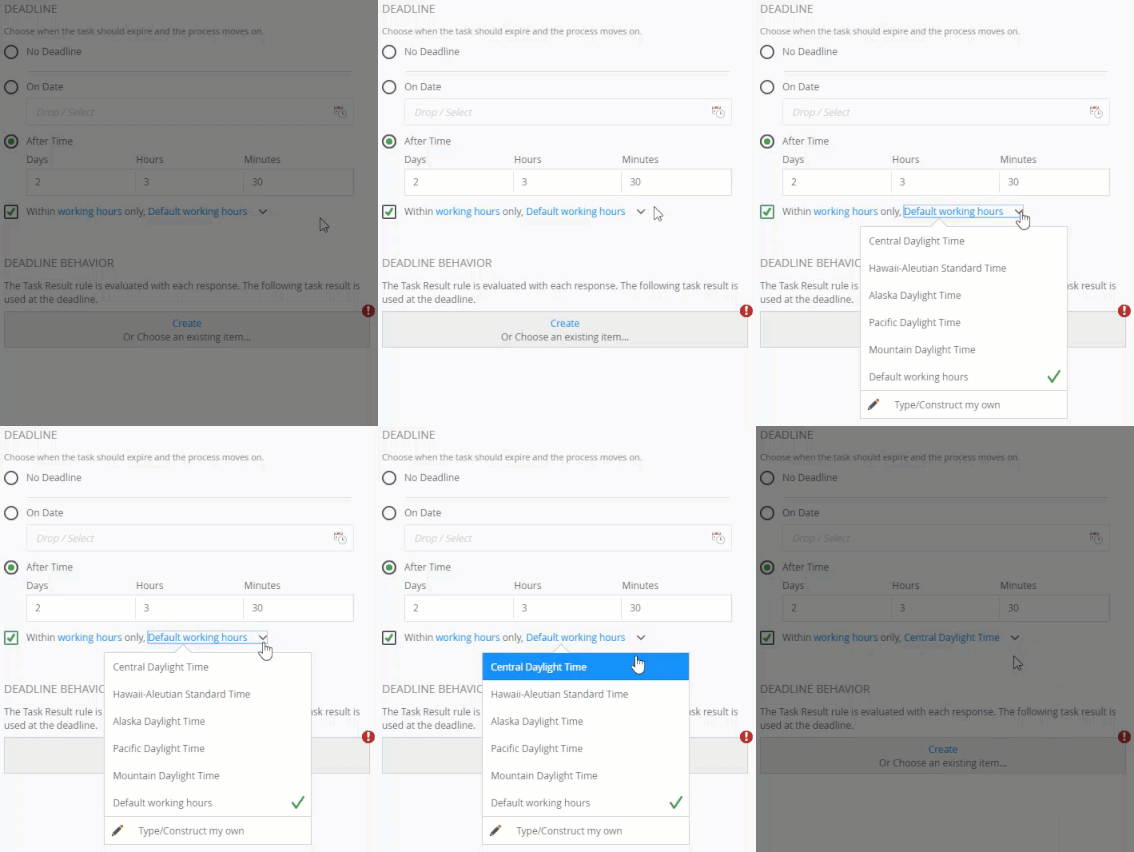
- Click the Default working hours menu to select a preconfigured (static) set of work hours.
This allows you to set the deadline to occur within specified working hours. If you select one of these options (On Date or After Time), the task expires on a specific date or after the set time within the specified working hours. If you don't select this option, the deadline does not take these hours into consideration (so in most cases the deadline occurs sooner).

- You can define working hours on your K2 environment to store the working hours for your organization, or to create different zones for different departments and offices in the organization. To configure them, click the working hours link. You must have access and admin permissions in K2 Management to set the working hours. For more information on how to set your working hours see Work Hours. In this example, five different working hours are available in your organization.

- To view and set the predefined working hours in the reminder, click the Default working hours link menu. By default, the Default working hours option is selected. In this example, select Central Daylight Time from the menu.

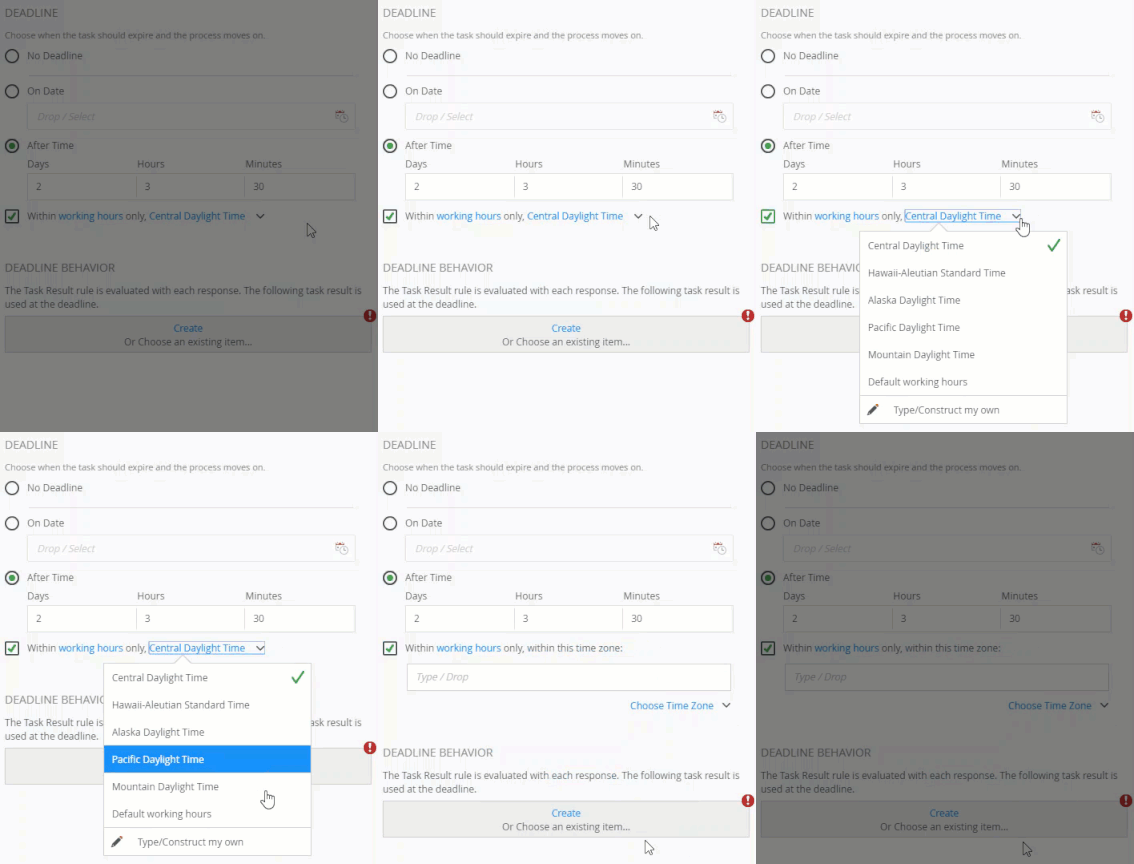
- To create a dynamic time zone, select the Type/Construct my own option.
Here you can specify a dynamic value for the working hours. This option is useful when you have global users across multiple time zones.

- You can use a combination of SmartObject calls and functions to determine where a specific user is based, and then use a variable in the Within working hours only option that matches their location.
Type values or create dynamic values by dragging Functions, Fields, SmartObjects and Workflow-related items from the Context Browser into the fields.

- To revert to static working hours, select one from the Choose Time Zone link menu.

- From the Deadline Behavior section, choose to evaluate theTask Result Rule with each response. Specify or create the task result to use the task deadline is reached. To select an existing result, click the Choose an existing item... link. You can use linked or unlinked results.

- Select a task result and click OK.

- Notice the deadline result is linked to the deadline. To edit the deadline result label, click the Edit link. Click the Change link to select a different deadline result. Changing the label name does not update the linked task result action on the Task Detail.

- To create a new deadline result, click theCreate link.

- The Expired result is added. To edit the deadline result label, click the Edit link.

- You can use the Expired result as an unlinked task result action on the Task Result Rule tab.

- You can also use this result in the Custom Voting Rule.

Your changes are automatically saved.
The following table explains the available options:
| Option | Explanation | How to Use |
|---|---|---|
| Deadline | ||
| No Deadline | No deadline on the task. This is the default configuration for all tasks. | Click the No Deadline option. |
| On Date | Specify a date and time for the deadline. You can also specify a dynamic value, for example by using a function or SmartObject method that returns a date and time. |
Click the On Date option. The following applies to this field: |
| After Time | Specify an elapsed time interval for the deadline, for example 7 days after the task has started. This option allows you to set days, hours, minutes, and seconds. You can use a single field or multiple fields, such as two days or one hour and 30 minutes. You cannot use decimal values such as 9.5 hours. Instead use 9 hours and 30 minutes. |
Click the After Time option. Enter values in days, hours, minutes, and seconds. To use dynamic values, you can drag and drop inline functions, fields, variables and other values from the Context Browser into the field. |
| Within Working Hours Only |
Within working hours only allows you to set the deadline to take the specified working hours into account when calculating when the deadline should run. This function applies when either the On Date or After Time option is selected. If you select one of these options, the deadline will take working hours into consideration. If you don't select the Within Working Hours only option, the deadline does not take working hours into consideration (so in some cases, the deadline occurs sooner. For example: suppose that you configure a deadline to expire the task after 30 minutes. You also configure this deadline within working hours, and you selected the Sales team working hours zone, which is set up as Monday through Friday, 8 am - 5 pm. To define the working hours for your organization, click the working hours link. You must have access to, and admin permissions in, K2 Management to set the working hours. For more information on how to set your working hours see Work Hours. Keep in mind that working hours are based on static time zones because you select a specific time zone when defining the working hours. If you want the time zone to be dynamic and change depending on some condition (such as a user's geographical location), select the Type/Construct my own option to add logic that determines which working hours configuration to use when calculating the time limit. Select the Type/Construct my own option to configure which working hours should apply to the deadline. You can use this approach to specify a dynamic value for the working hours, based on some logic. This option is useful when you have global users across multiple time zones. You can, for example, use the result of a SmartObject method and/or functions to determine where a specific user is based, return the name of that working hours zone, and then use the returned working hours zone value in the Within working hours only option to match their location. Type values or create dynamic values by dragging Functions, Fields, SmartObjects and Workflow-related items from the Context Browser into the fields. The Default working hours menu has a list of defined working hours. If you have not defined any working hours, the Default working hours option is selected. By default, the Within Working Hours Only option is checked. |
Check the Within Working Hours Only box. Click the working hours link to edit or add the working hours parameters. Click the Default working hours menu to select a preconfigured set of work hours or select Type/Construct my own to configure a dynamic time zone. |
| Deadline Behavior |
Use this to expire the task at the deadline. |
Click the Expire on Deadline option. Click Create to create or select a task result action. Click the Choose an existing item... link to select a task result action. |
For more information on how to use fields, functions, SmartObjects, and workflow context, see the Context Browser topic.
For more information on how to set your working hours see the Work Hours topic.